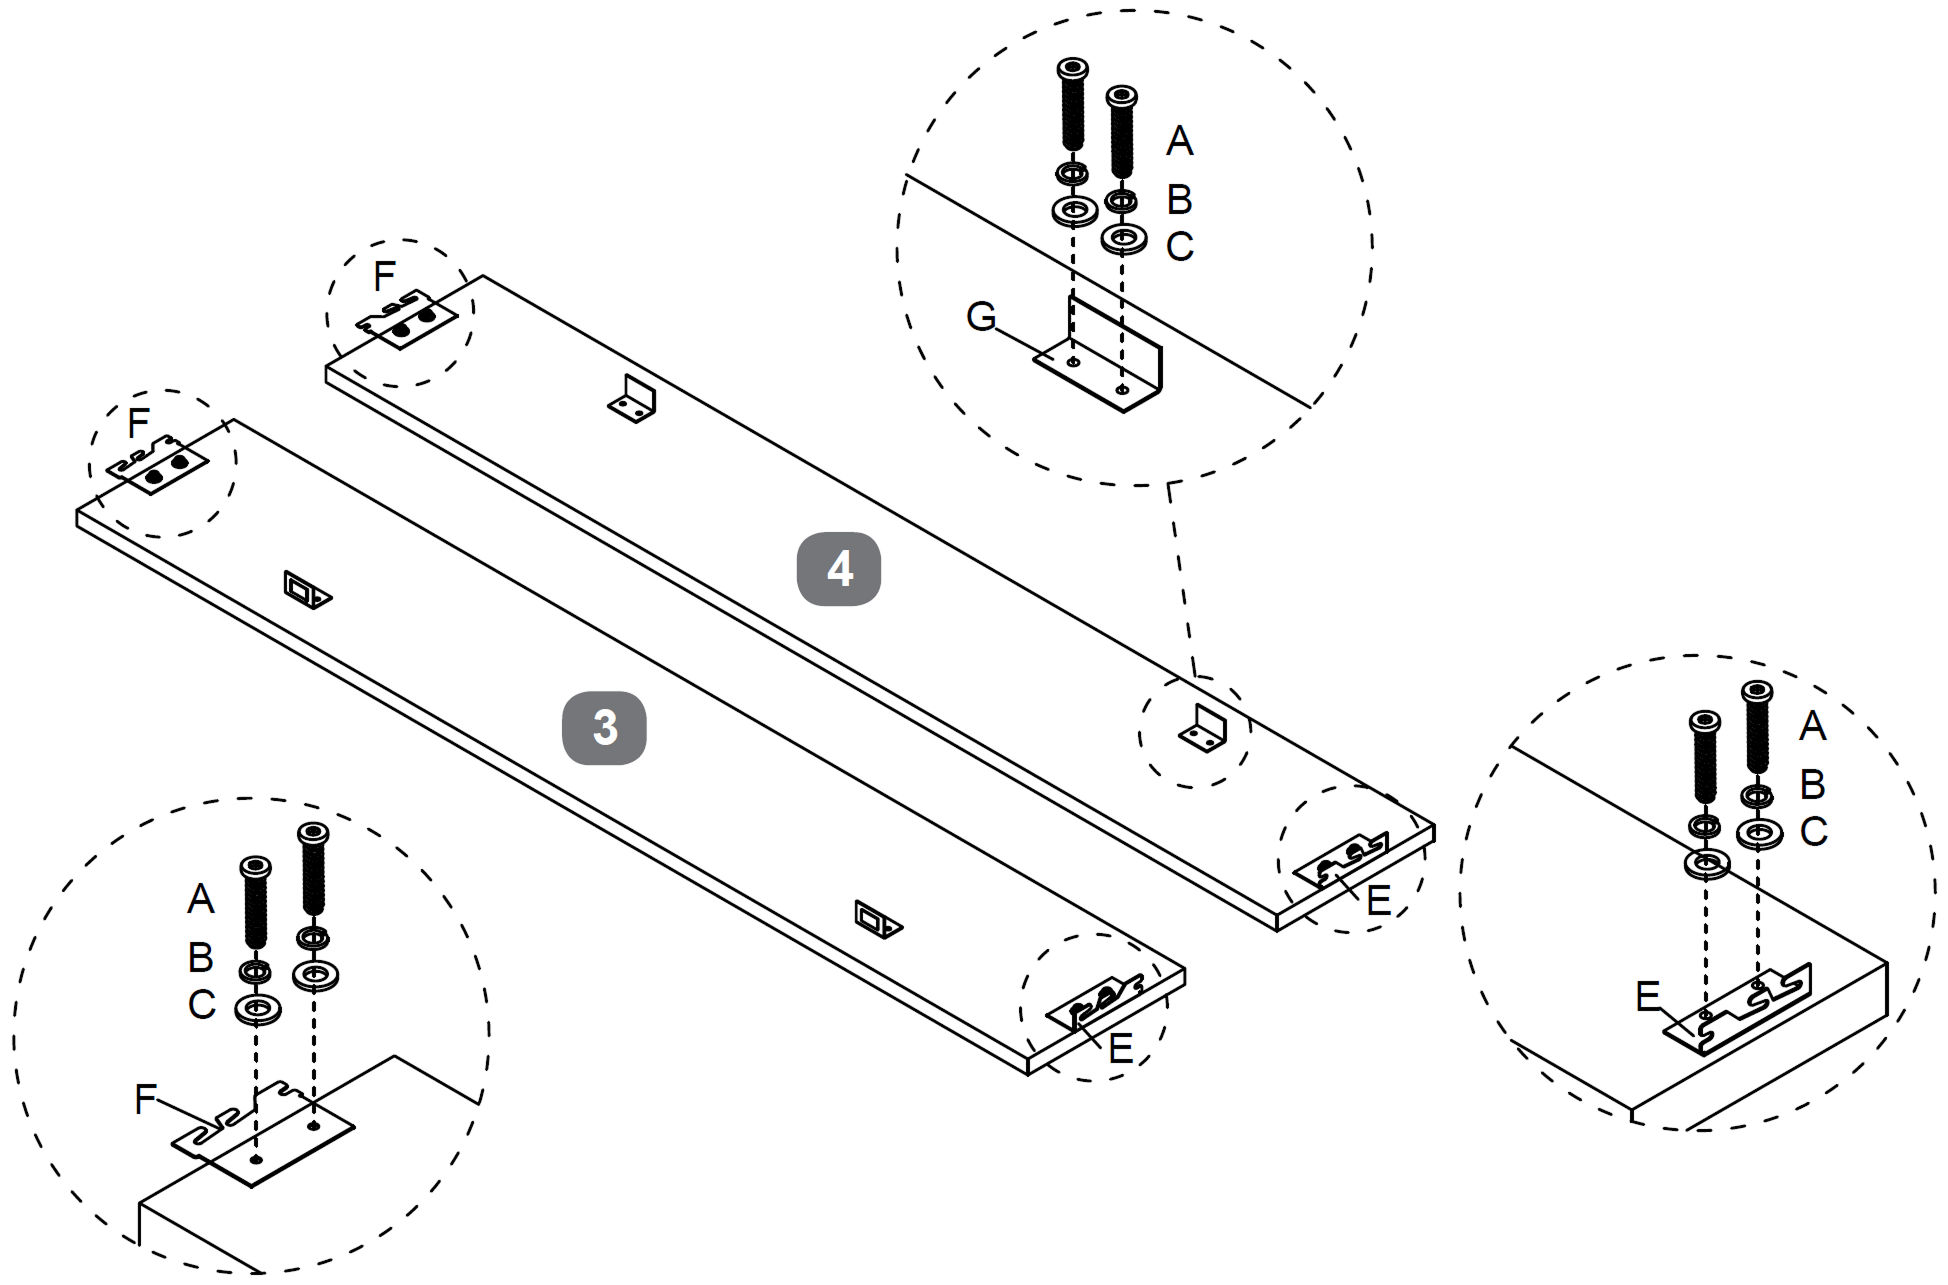
Place Side Rail - RH (3) and Side Rail - LH (4) flat on the floor with the fixing holes facing upward.
Position the Corner Hook Bracket - Flat (F) at one end of each side rail and the Corner Hook Bracket (E) at the opposite end, aligning the holes as shown in the diagram.
Secure each bracket using Bolt (A) with Spring Washer (B) and Flat Washer (C), and tighten lightly using the Allen Key (D).
Attach the Support Bracket (G) to the marked position on each side rail using the same bolt and washer combination.
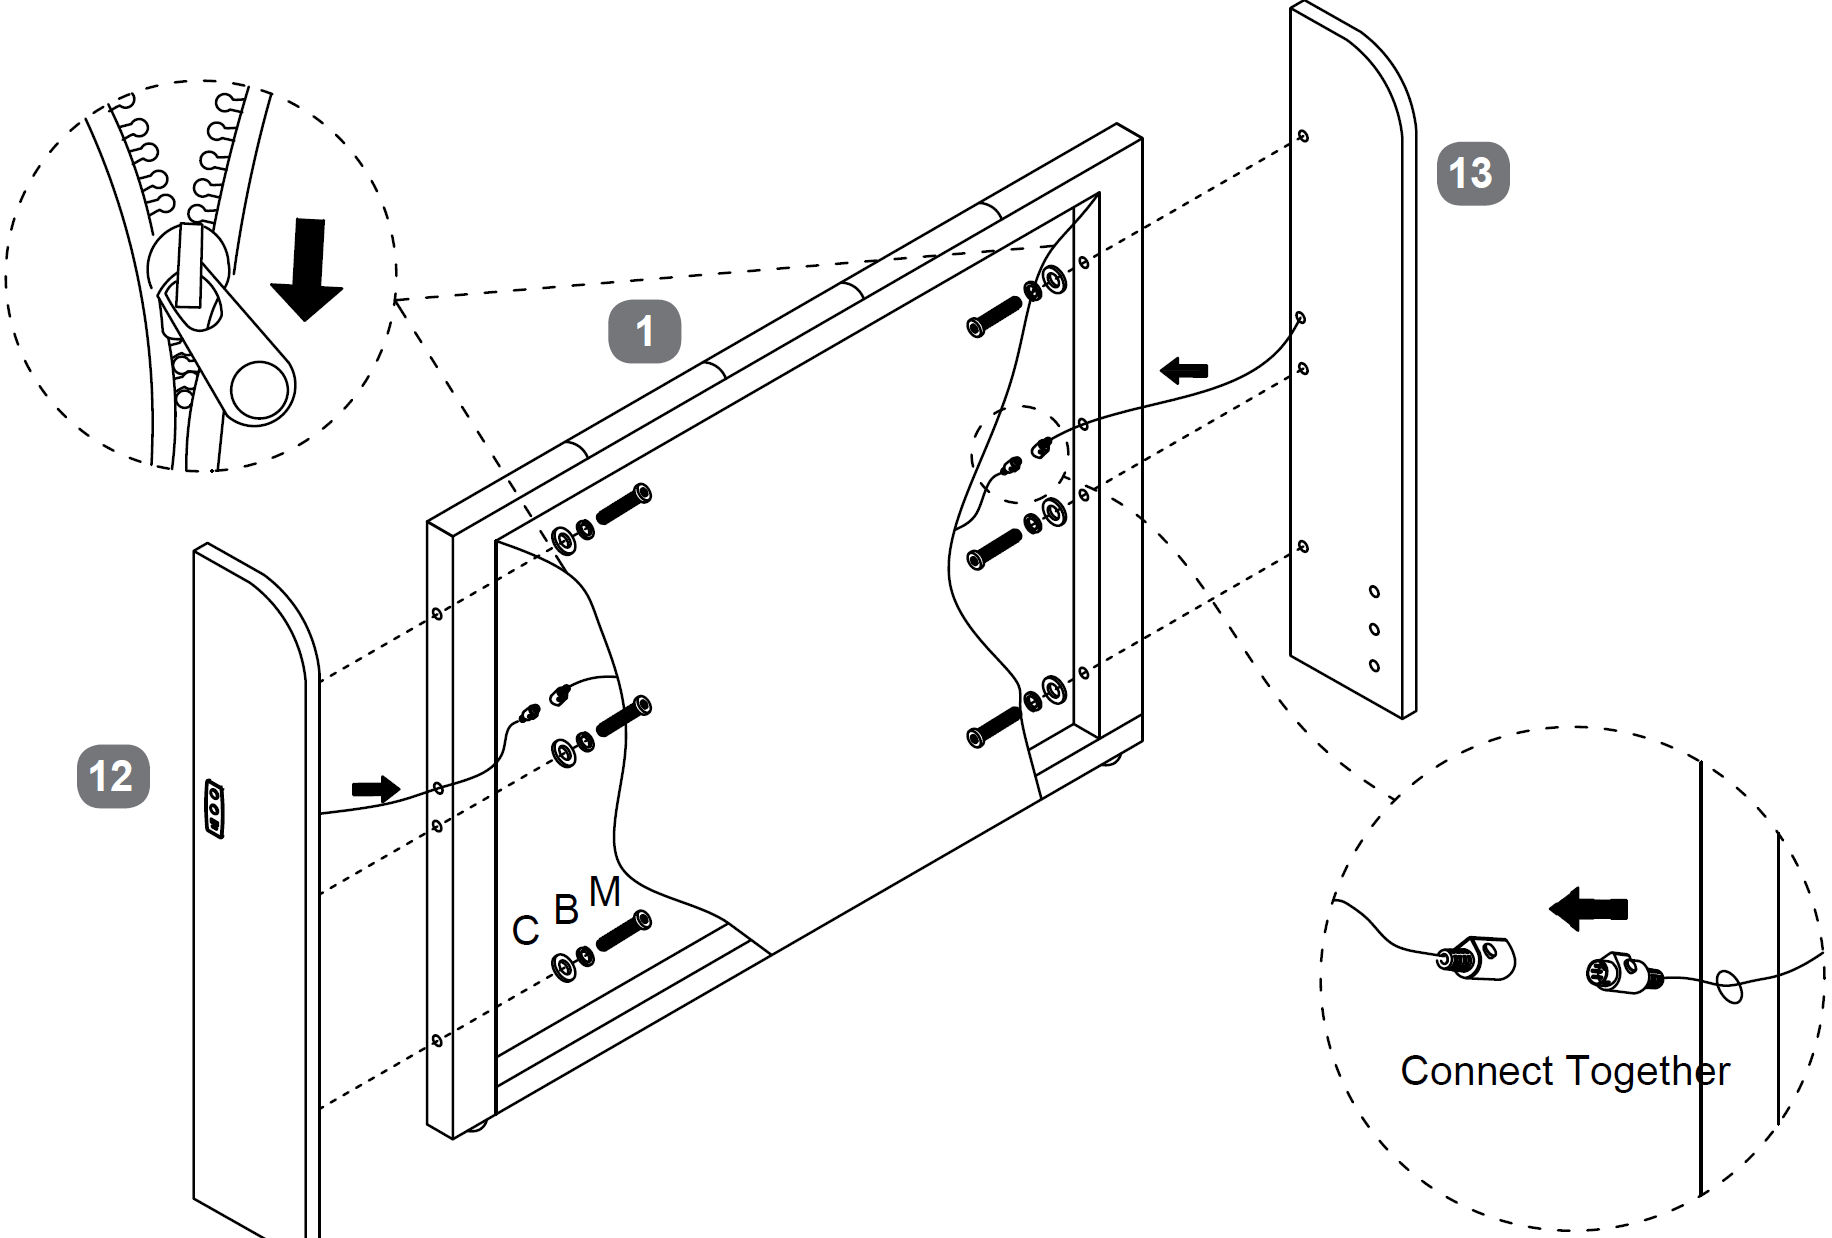
2. Attach Wings to the Headboard
Position the Headboard (1) upright with the rear side facing you.
Align Wing - Left (12) and Wing - Right (13) with the corresponding fixing holes on each side of the headboard.
Insert Bolt (M) with Spring Washer (B) and Flat Washer (C) through the wings and into the headboard.
Tighten the bolts using the Allen Key (D) until the wings are secure and sit flush against the headboard.
Connect the pre-installed cable connectors as shown, ensuring they are fully pushed together.
3. Fit Gas Lift Mechanisms (Open From the Left)
Confirm that the bed will open from the left side when facing the bed from the footboard.
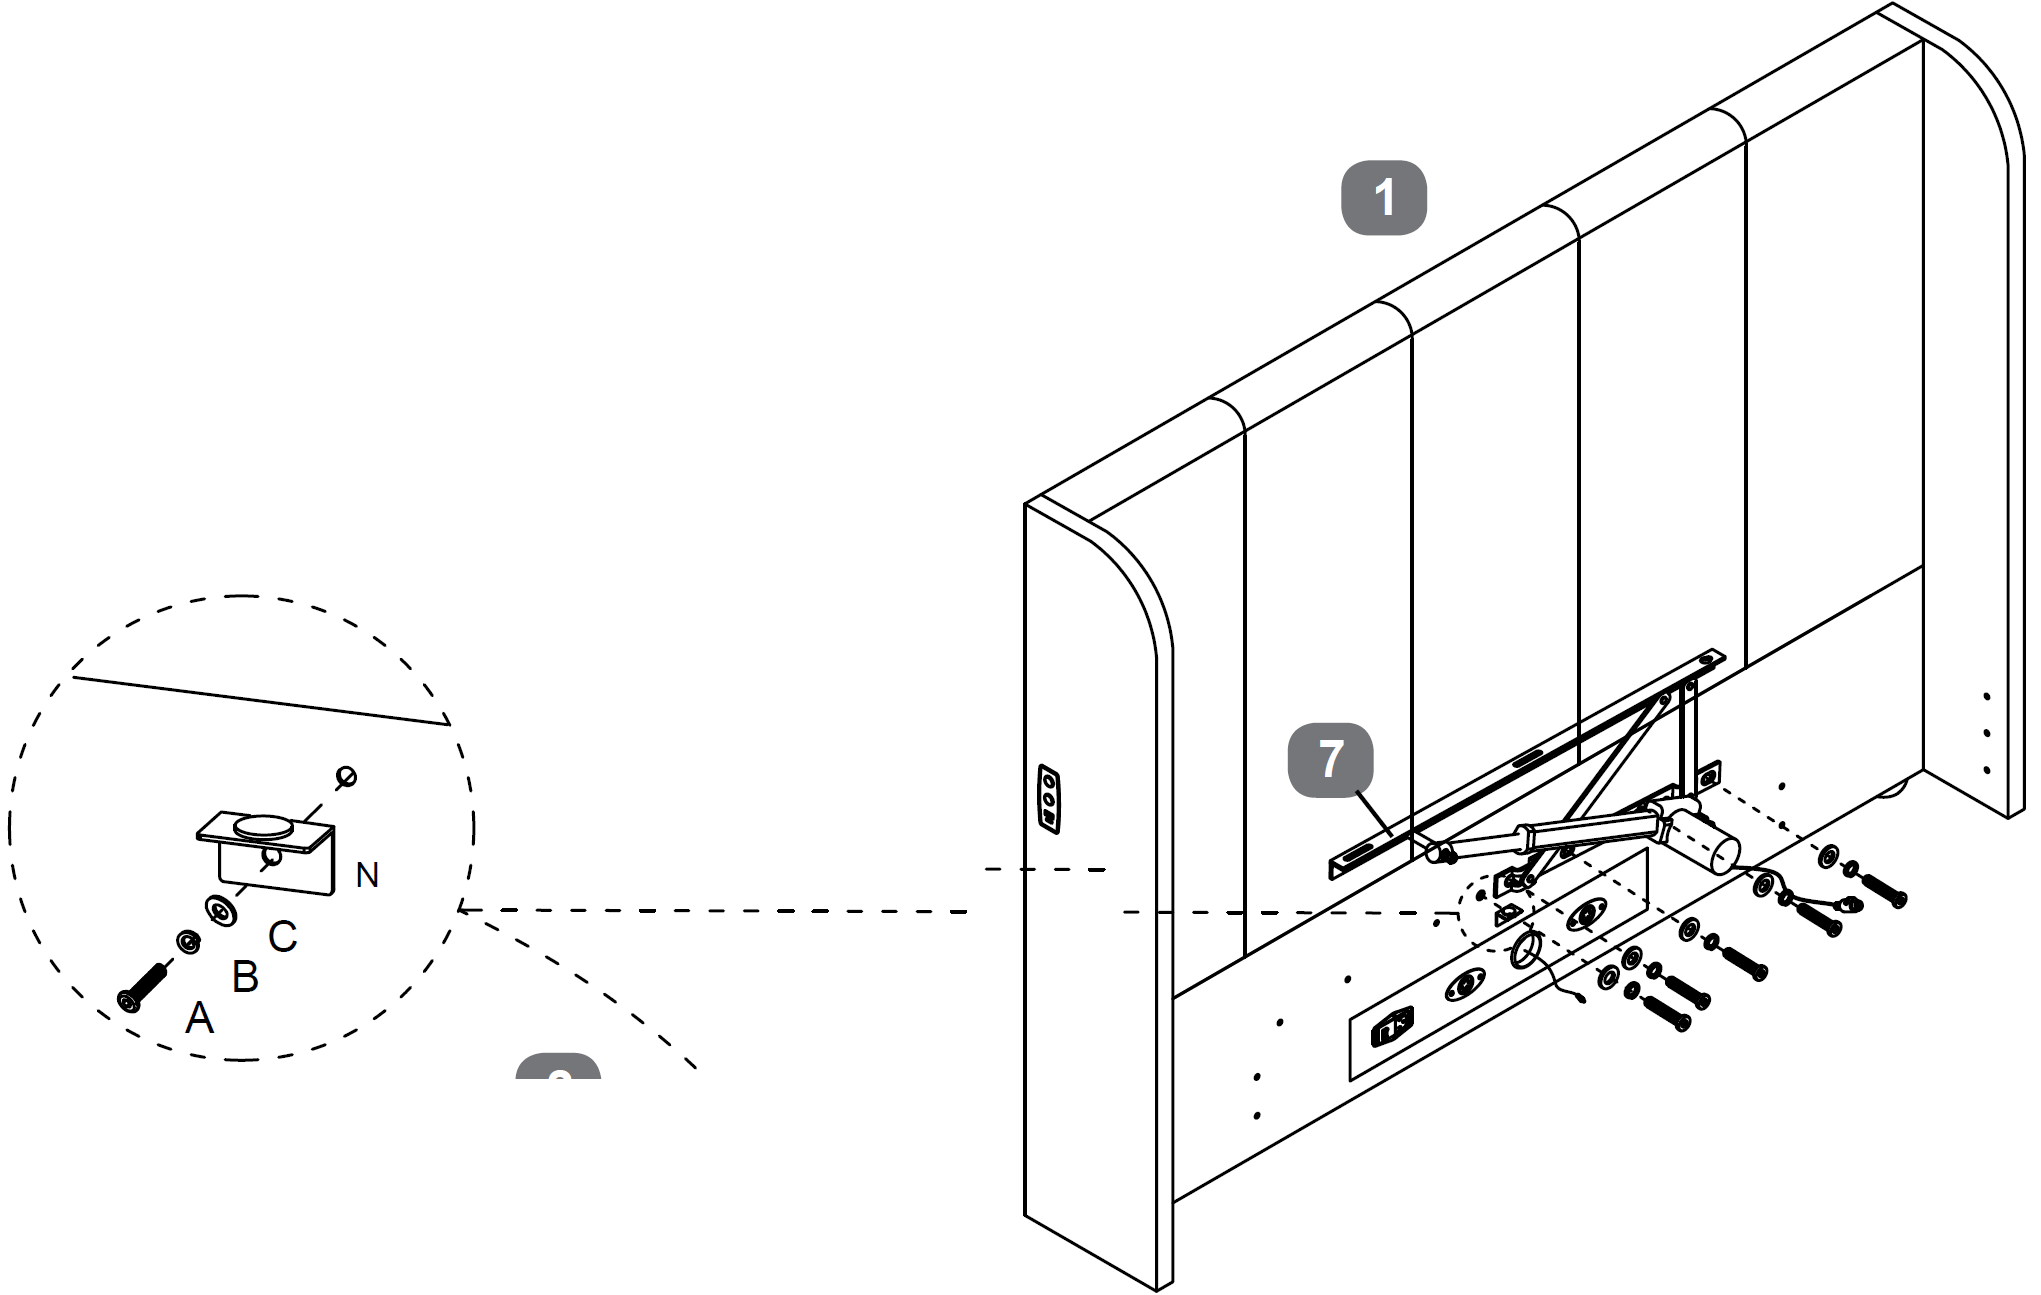
Position both Gas lift Mechanism - Right (6) and Gas lift Mechanism - Left (7) on the right side of the headboard and footboard, aligning them with the holes marked (R) and the blue labels.
Insert Bolt (A) with Spring Washer (B) and Flat Washer (C) through the gas lift mechanisms and into the frame.
Make sure the bolts sit in the centre of the long adjustment holes before tightening.
Tighten the bolts using the Allen Key (D), leaving a small amount of adjustment until the frame is fully assembled.
Super King only: Fit the Base Support Bracket (N) in the position shown, using the same bolt and washer combination.
4. Fit Gas Lift Mechanisms (Open From the Right)
Confirm that the bed will open from the left side when facing the bed from the footboard.
If you want the bed to open from the right side, position both Gas lift Mechanism - Right (6) and Gas lift Mechanism - Left (7) on the left side of the headboard and footboard, using the holes marked L with red labels.
Align the mechanisms so the fixing slots line up with the marked holes, making sure the bolts sit in the centre of the long slots.
Secure the mechanisms using Bolt (A) with Spring Washer (B) and Flat Washer (C), tightening lightly with the Allen Key (D).
Super King only: Fit the Base Support Bracket (N) in the position shown, using the same bolt and washer combination.
5. Assemble the Bed Frame and Fully Tighten Bolts
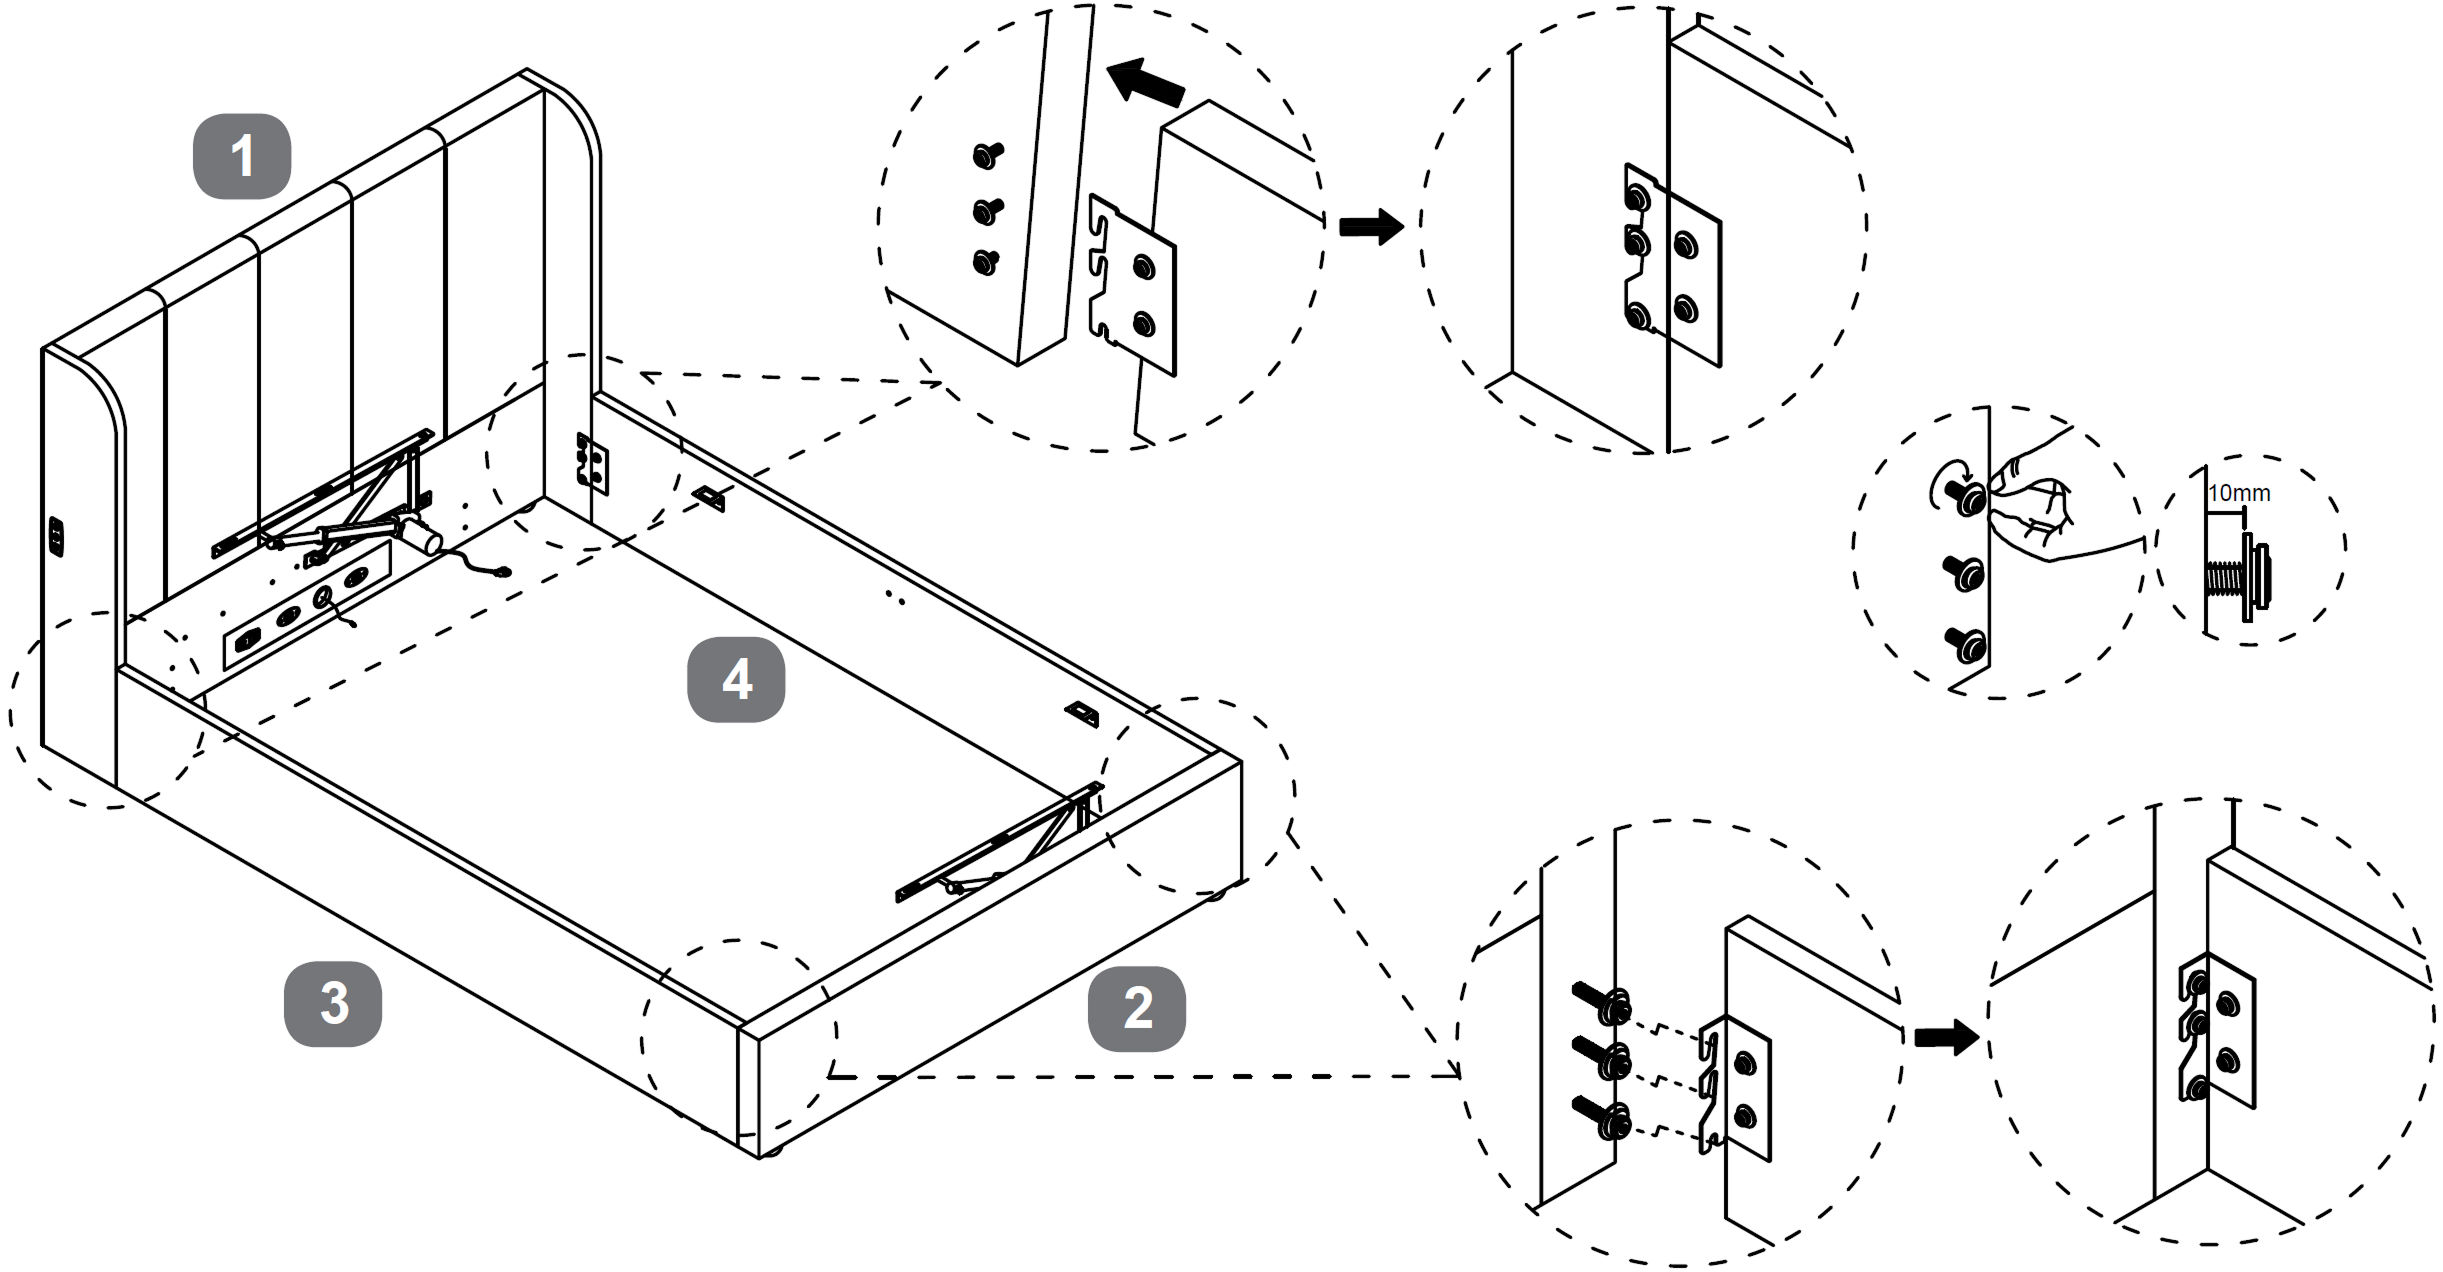
Attach the Side Rail - RH (3) and Side Rail - LH (4) to the Headboard (1) and Footboard (2) using the corner hook brackets already fitted.
Insert Bolt (A) with Spring Washer (B) and Flat Washer (C) into all fixing points and tighten loosely at first.
Check that the bed frame is perfectly square by comparing both diagonals.
Once aligned correctly, fully tighten all bed assembly bolts 100% using the Allen Key (D).
6. Connect the Long Connection Cable
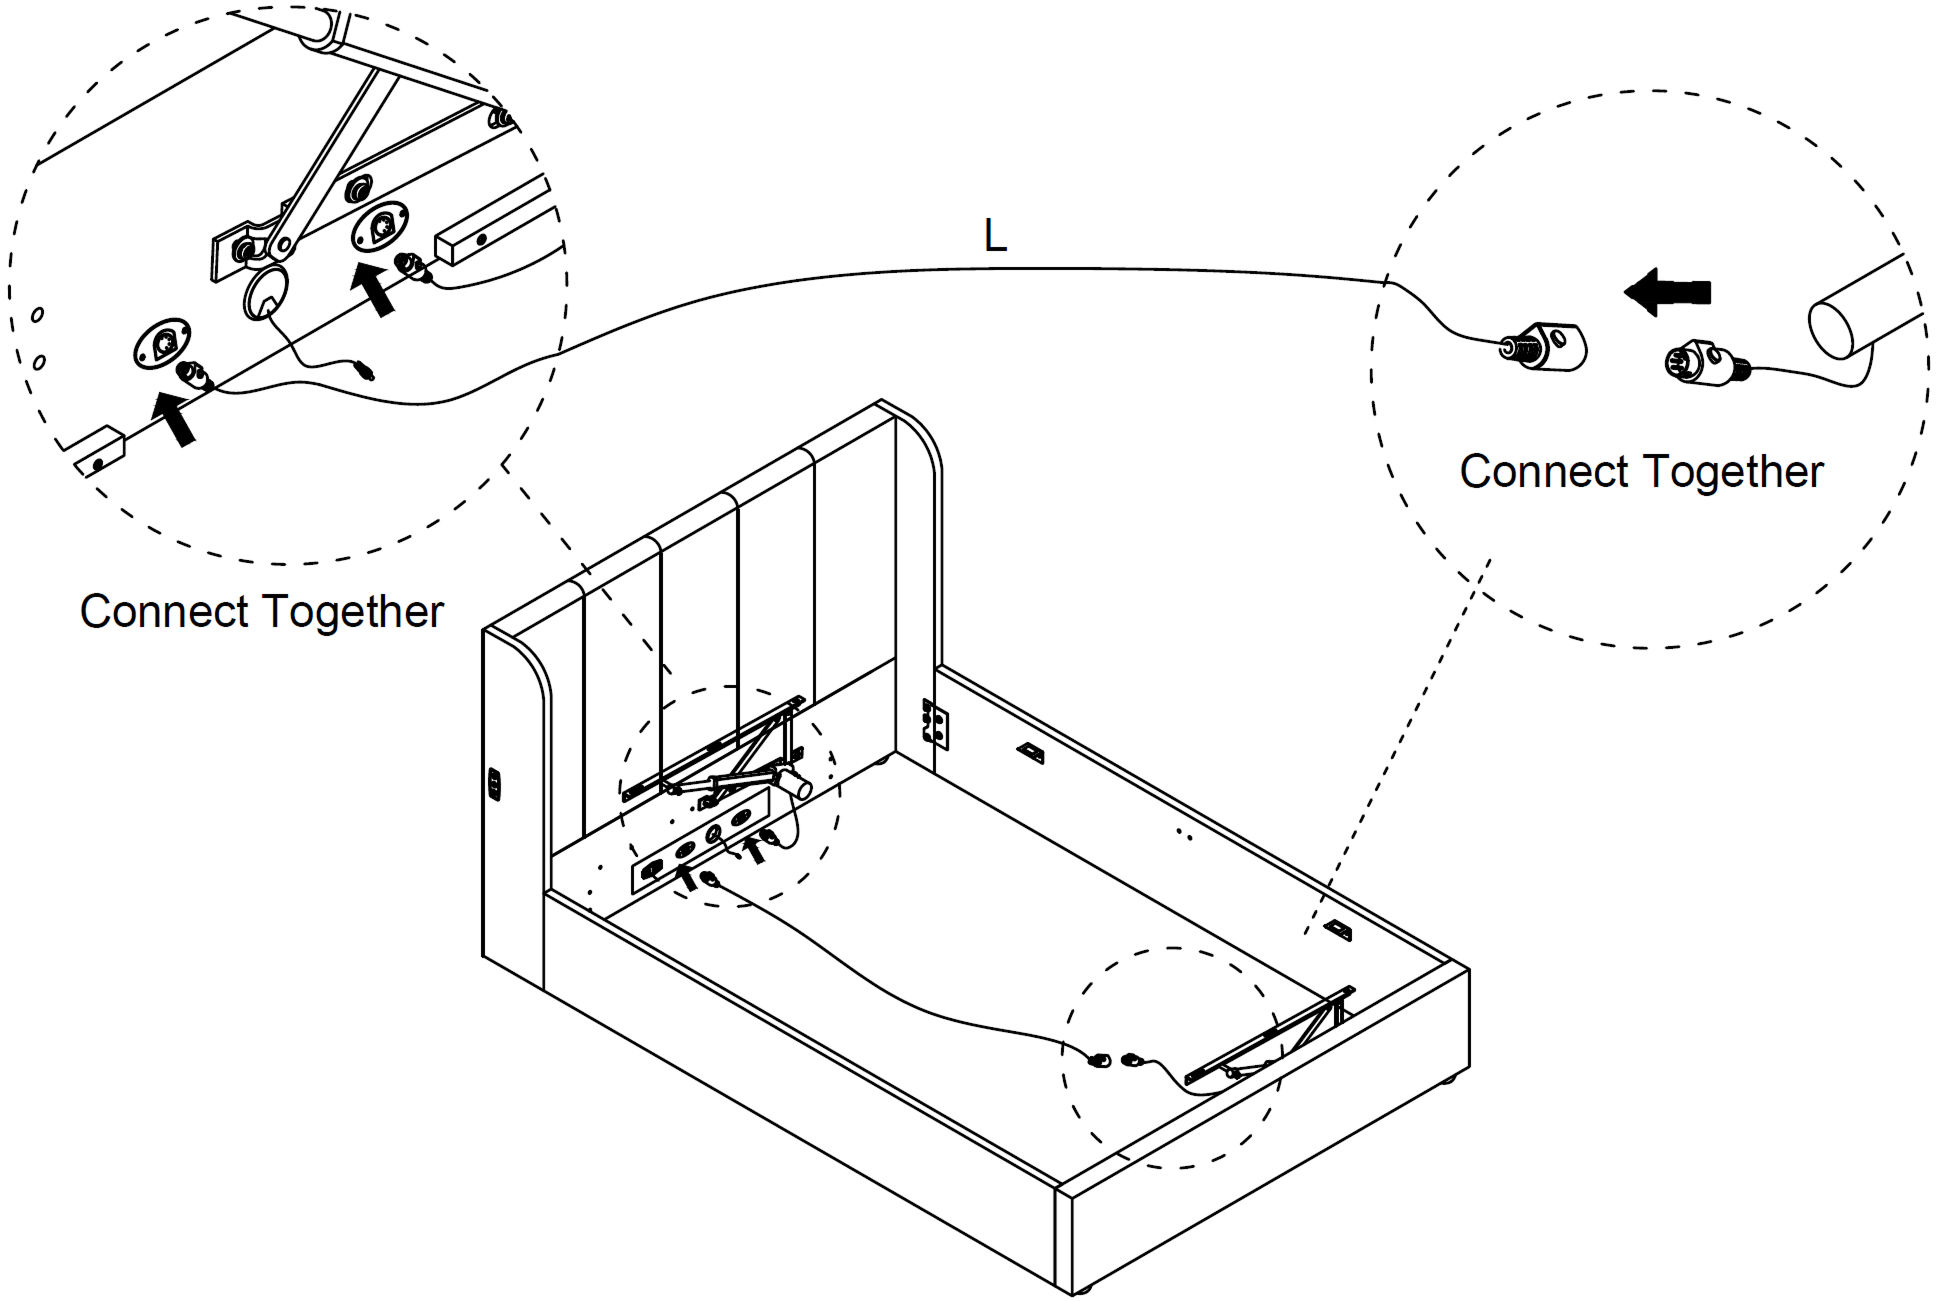
Locate the Long Connection Cable (L) coming from the lift mechanism at the headboard end.
Connect the cable to the matching connector on the opposite lift mechanism, making sure the plugs are fully inserted and locked together.
Check that the cable is routed neatly along the inside of the bed frame and is not twisted, trapped, or resting against any moving parts.
7. Connect the Power Supply
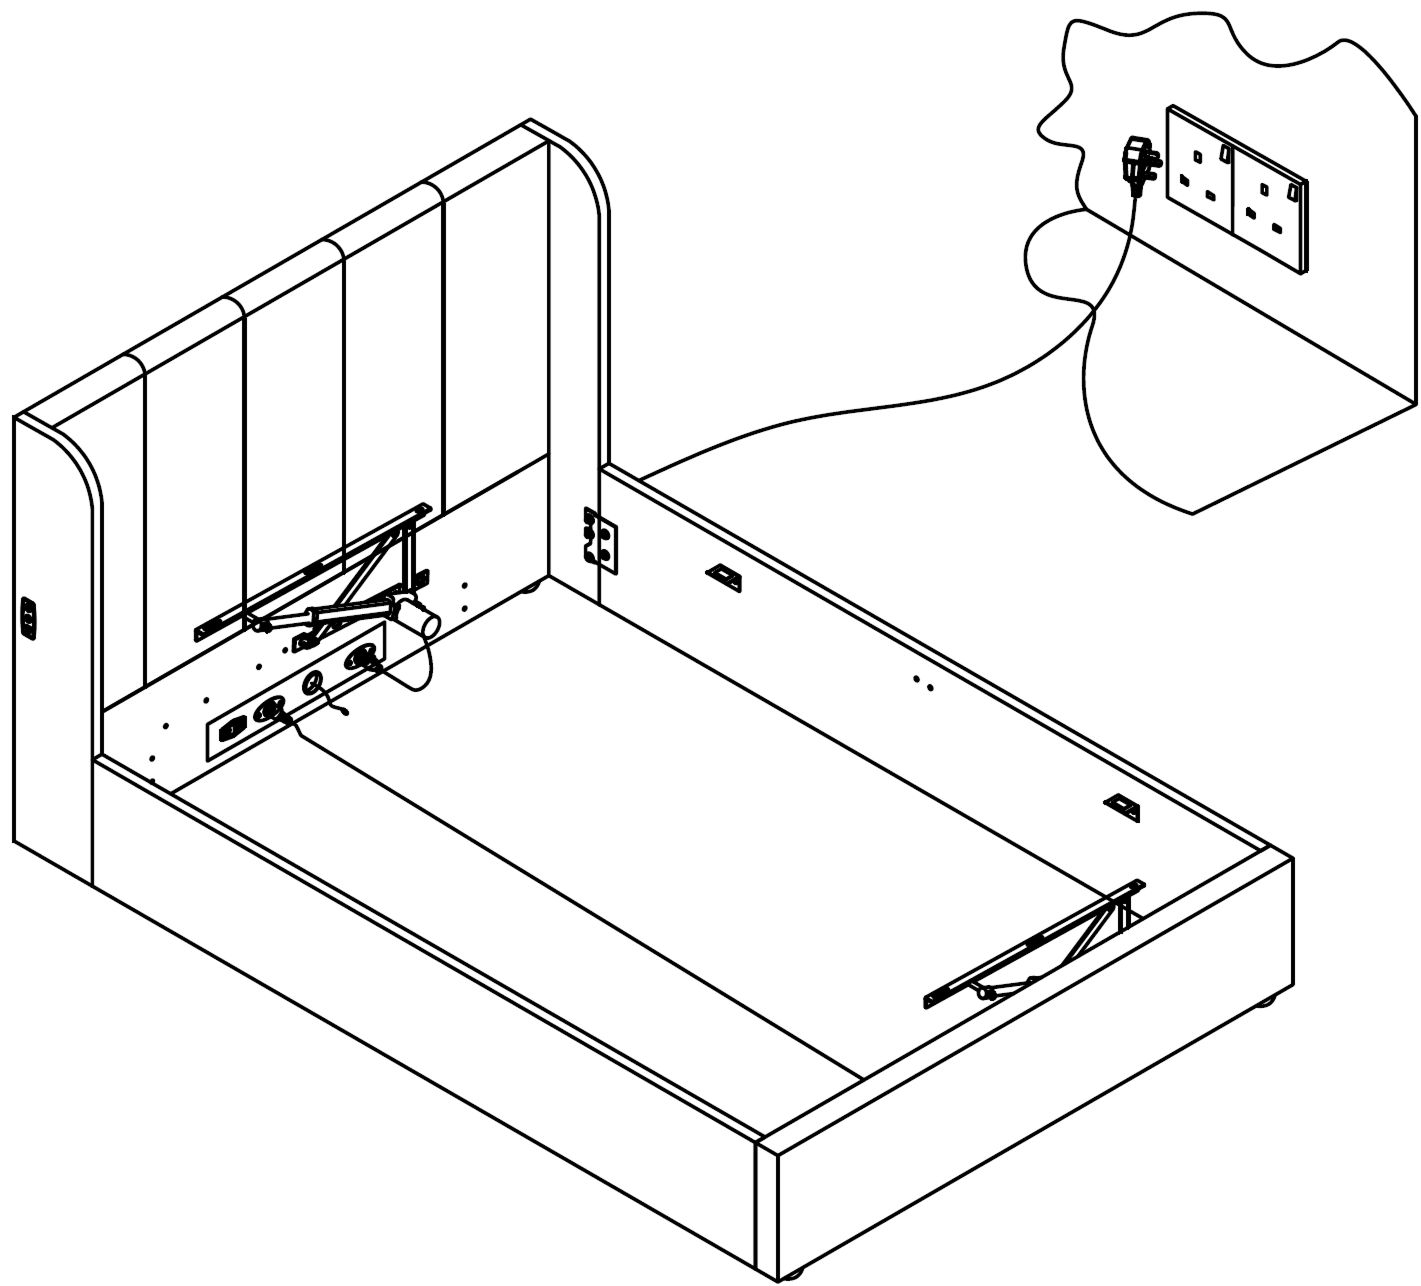
Plug the Mains Power Lead (K) into the power socket on the bed frame.
Connect the other end of the power lead to a wall socket, making sure the power supply is properly earthed.
Ensure the power switch is set to ON before operating the ottoman.
Do not operate the lift mechanism at this stage. Refer to Step 17 (Operate the Electric Ottoman Lift) for the ottoman operation instructions.
8. Fit the Metal Plates to the Lower Mattress Base Board
Place the Mattress Base Board - Lower (9) on a flat surface with the underside facing up.
Position the Metal Plates for Connecting Mattress Boards (H) onto the marked fixing points along the board, aligning them with the pre-drilled holes.
Secure each metal plate using Bolt (A) with Spring Washer (B) and Flat Washer (C), tightening them with the Allen Key (D).
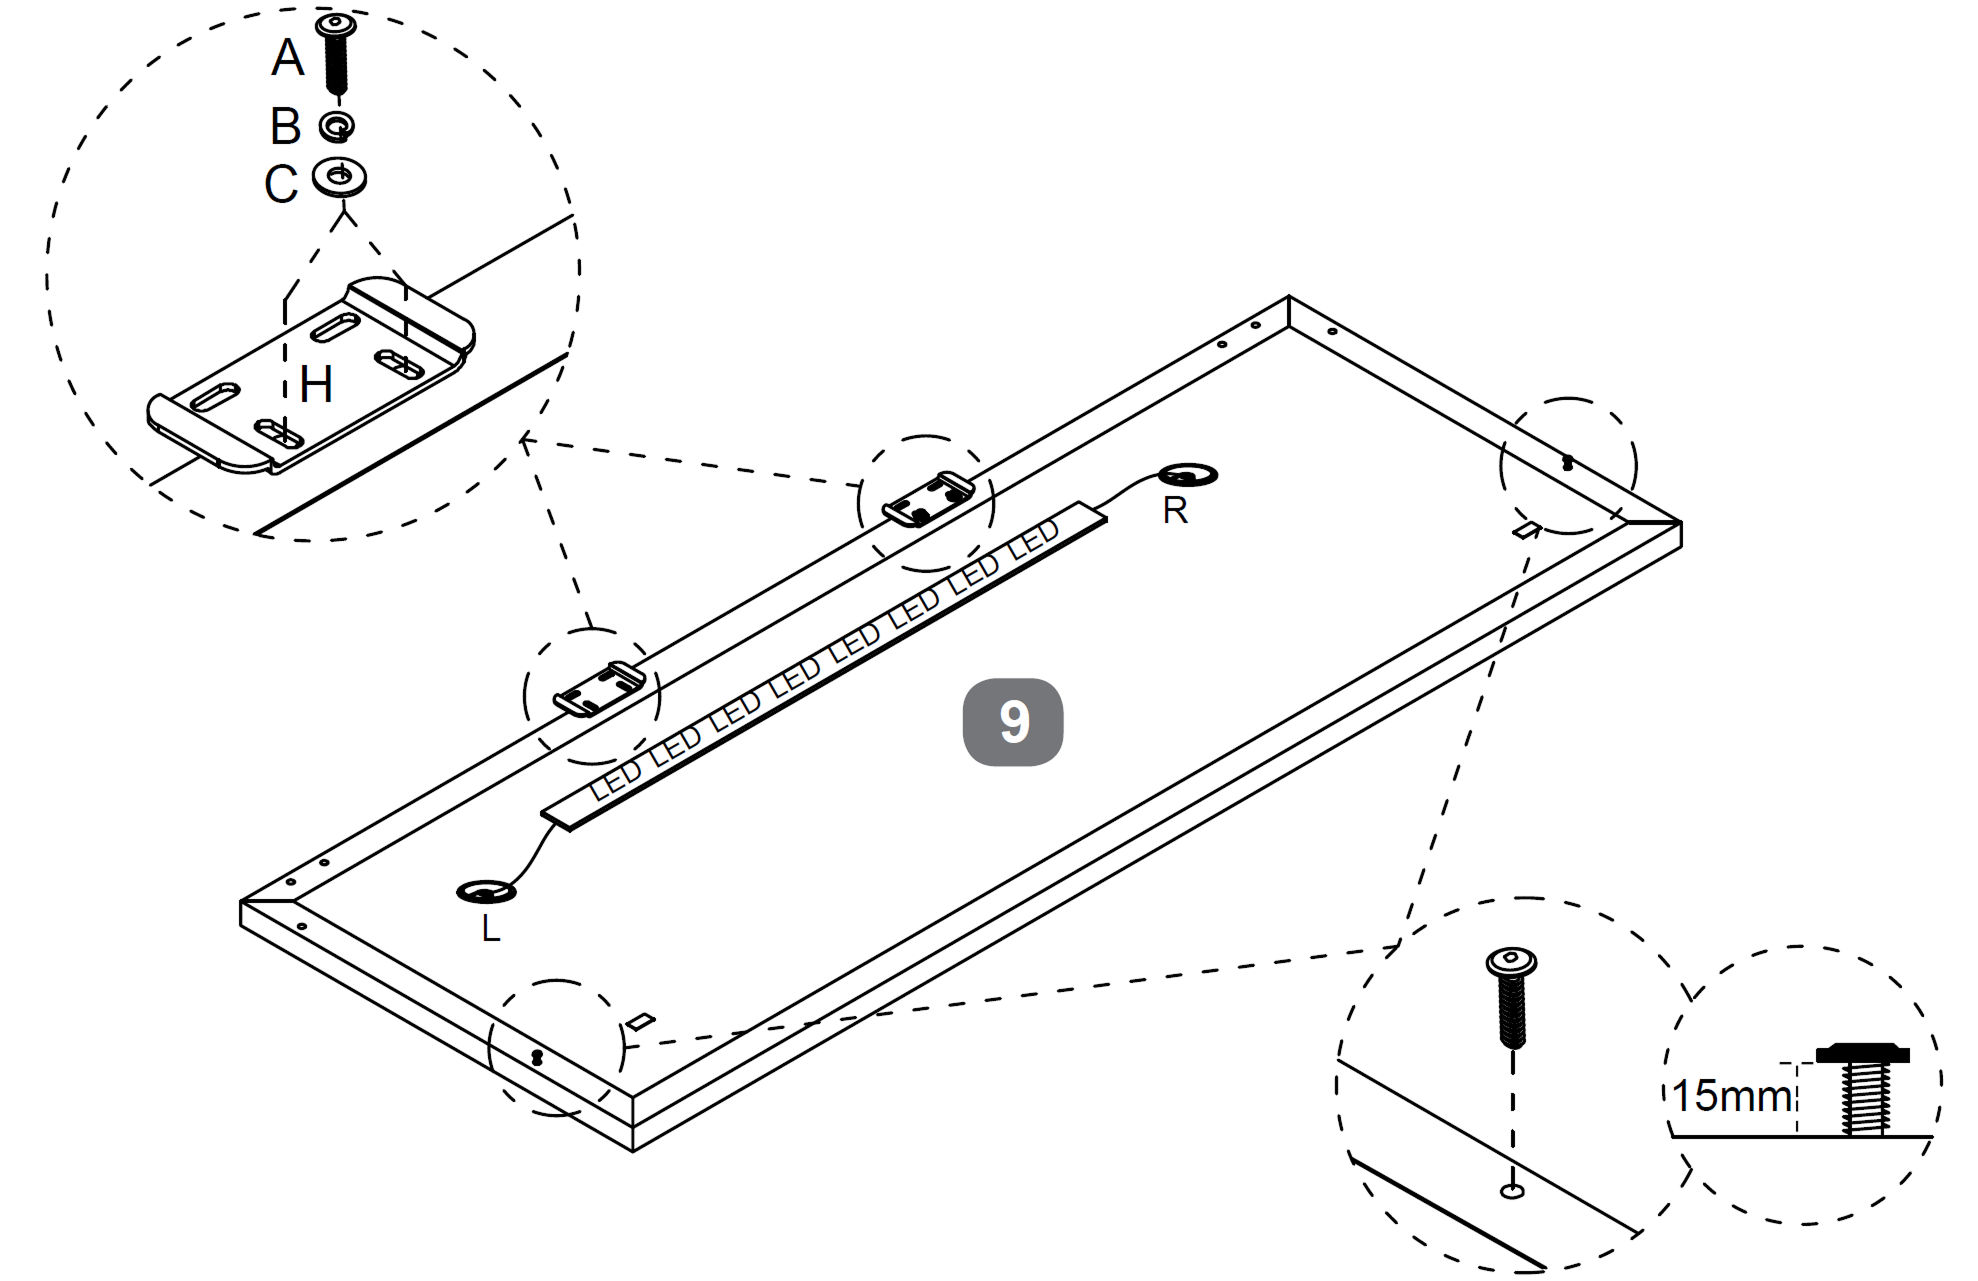
9. Connect the LED Light Cable
Release the power cable for the LED light by removing it from the cable holder as shown.
If the bed opens from the right, connect the LED light cable to (L), which will be on the left side of the bed nearest to the headboard (A) when viewed standing behind the footboard.
If the bed opens from the left, connect the LED light cable to (R), which will be on the right side of the bed nearest to the headboard (A) when viewed standing behind the footboard.
Rotate the mattress base board 180° as shown to confirm the correct orientation before final positioning.
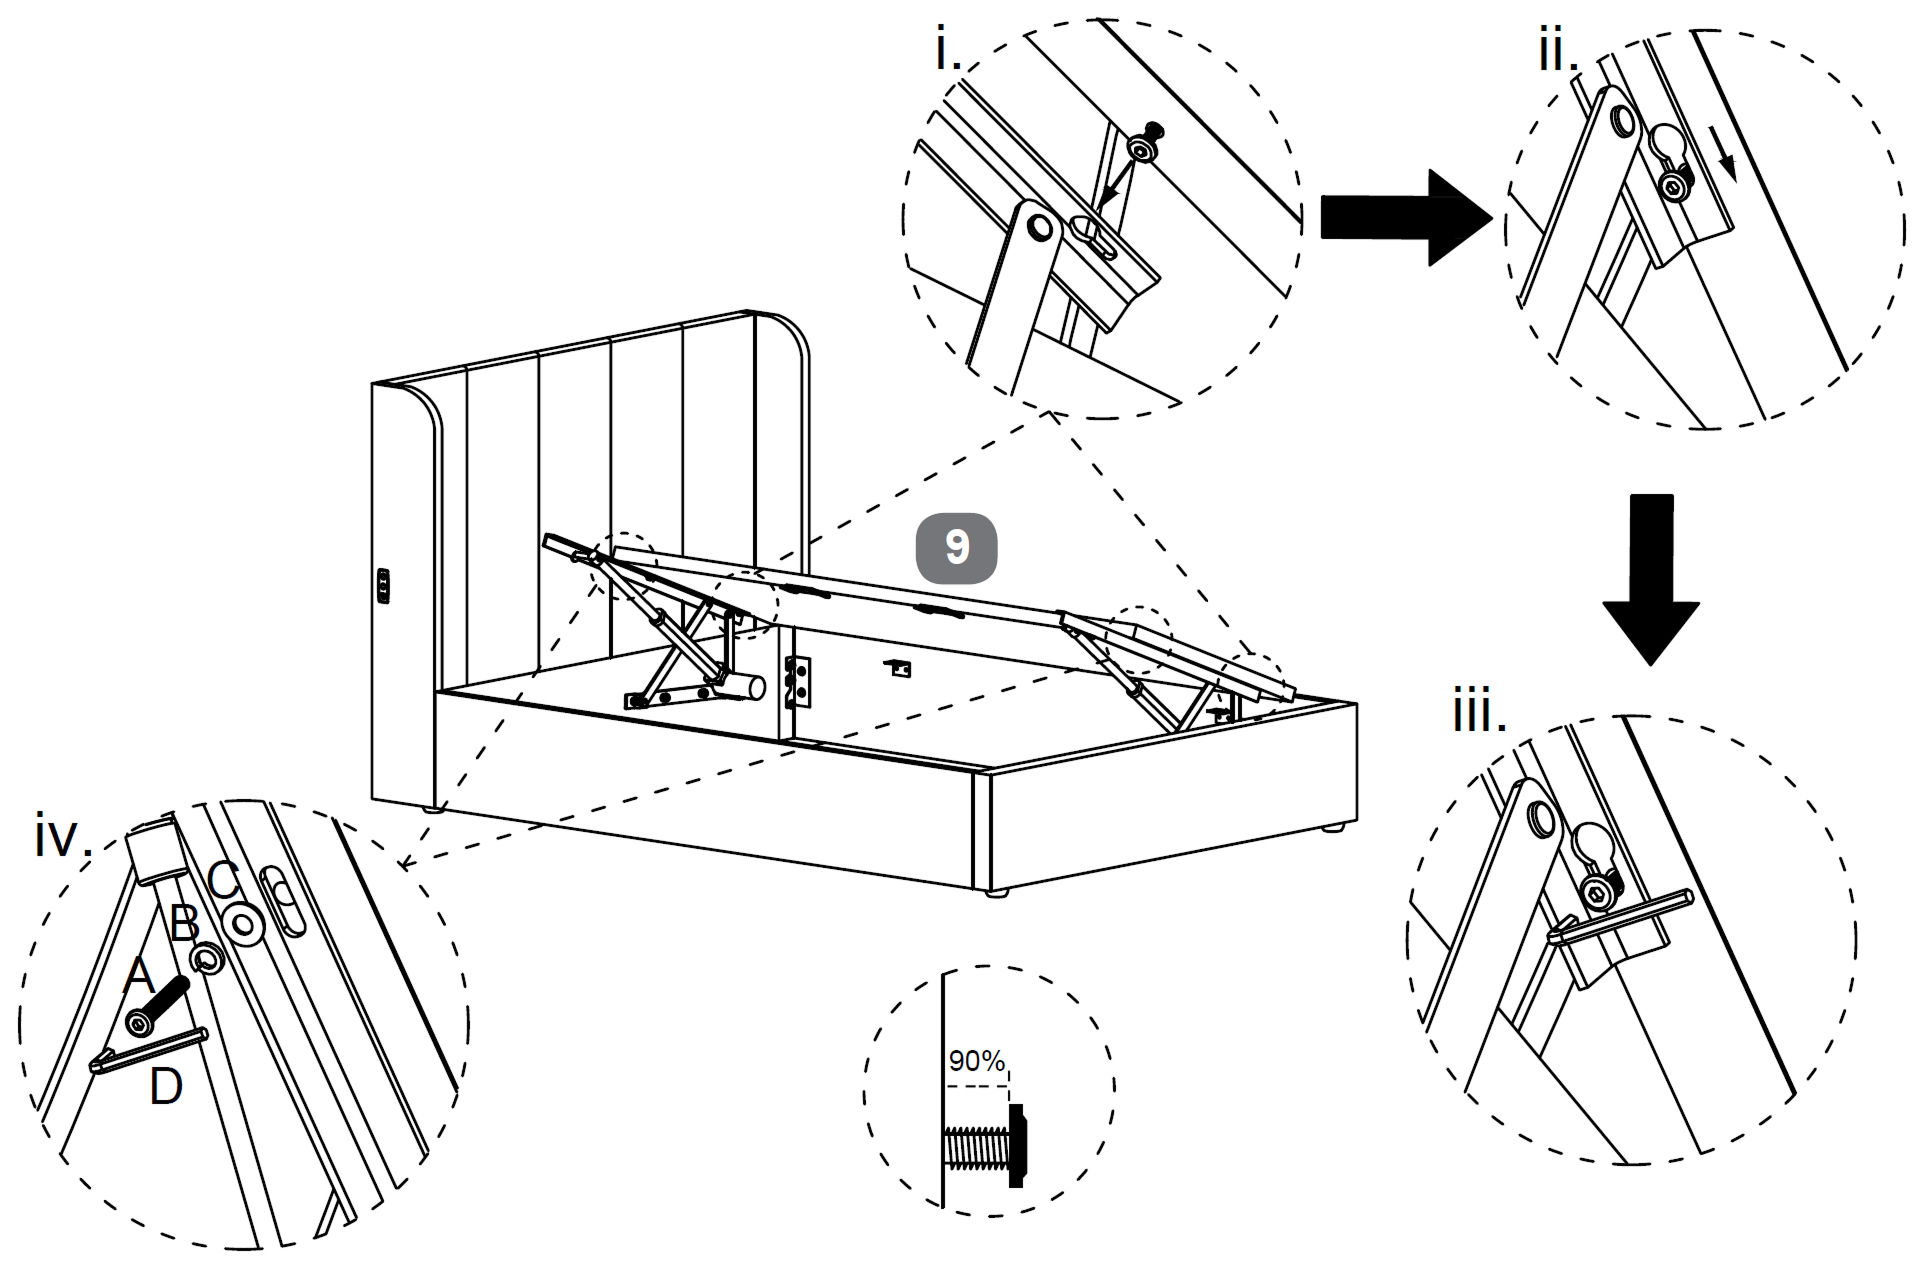
10. Secure the Lift Mechanism to the Mattress Base
Raise the mattress base slightly to access the fixing points on the lift mechanism arms.
Align the holes in the lift mechanism with the holes in the Mattress Base Board - Lower (9) as shown.
Insert Bolt (A) with Spring Washer (B) and Flat Washer (C) through the aligned holes.
Tighten the bolts using the Allen Key (D), leaving them slightly loose at first.
Adjust the position of the mechanism so it sits correctly, then tighten all bolts to approximately 90 percent, ensuring the mechanism moves smoothly without resistance.
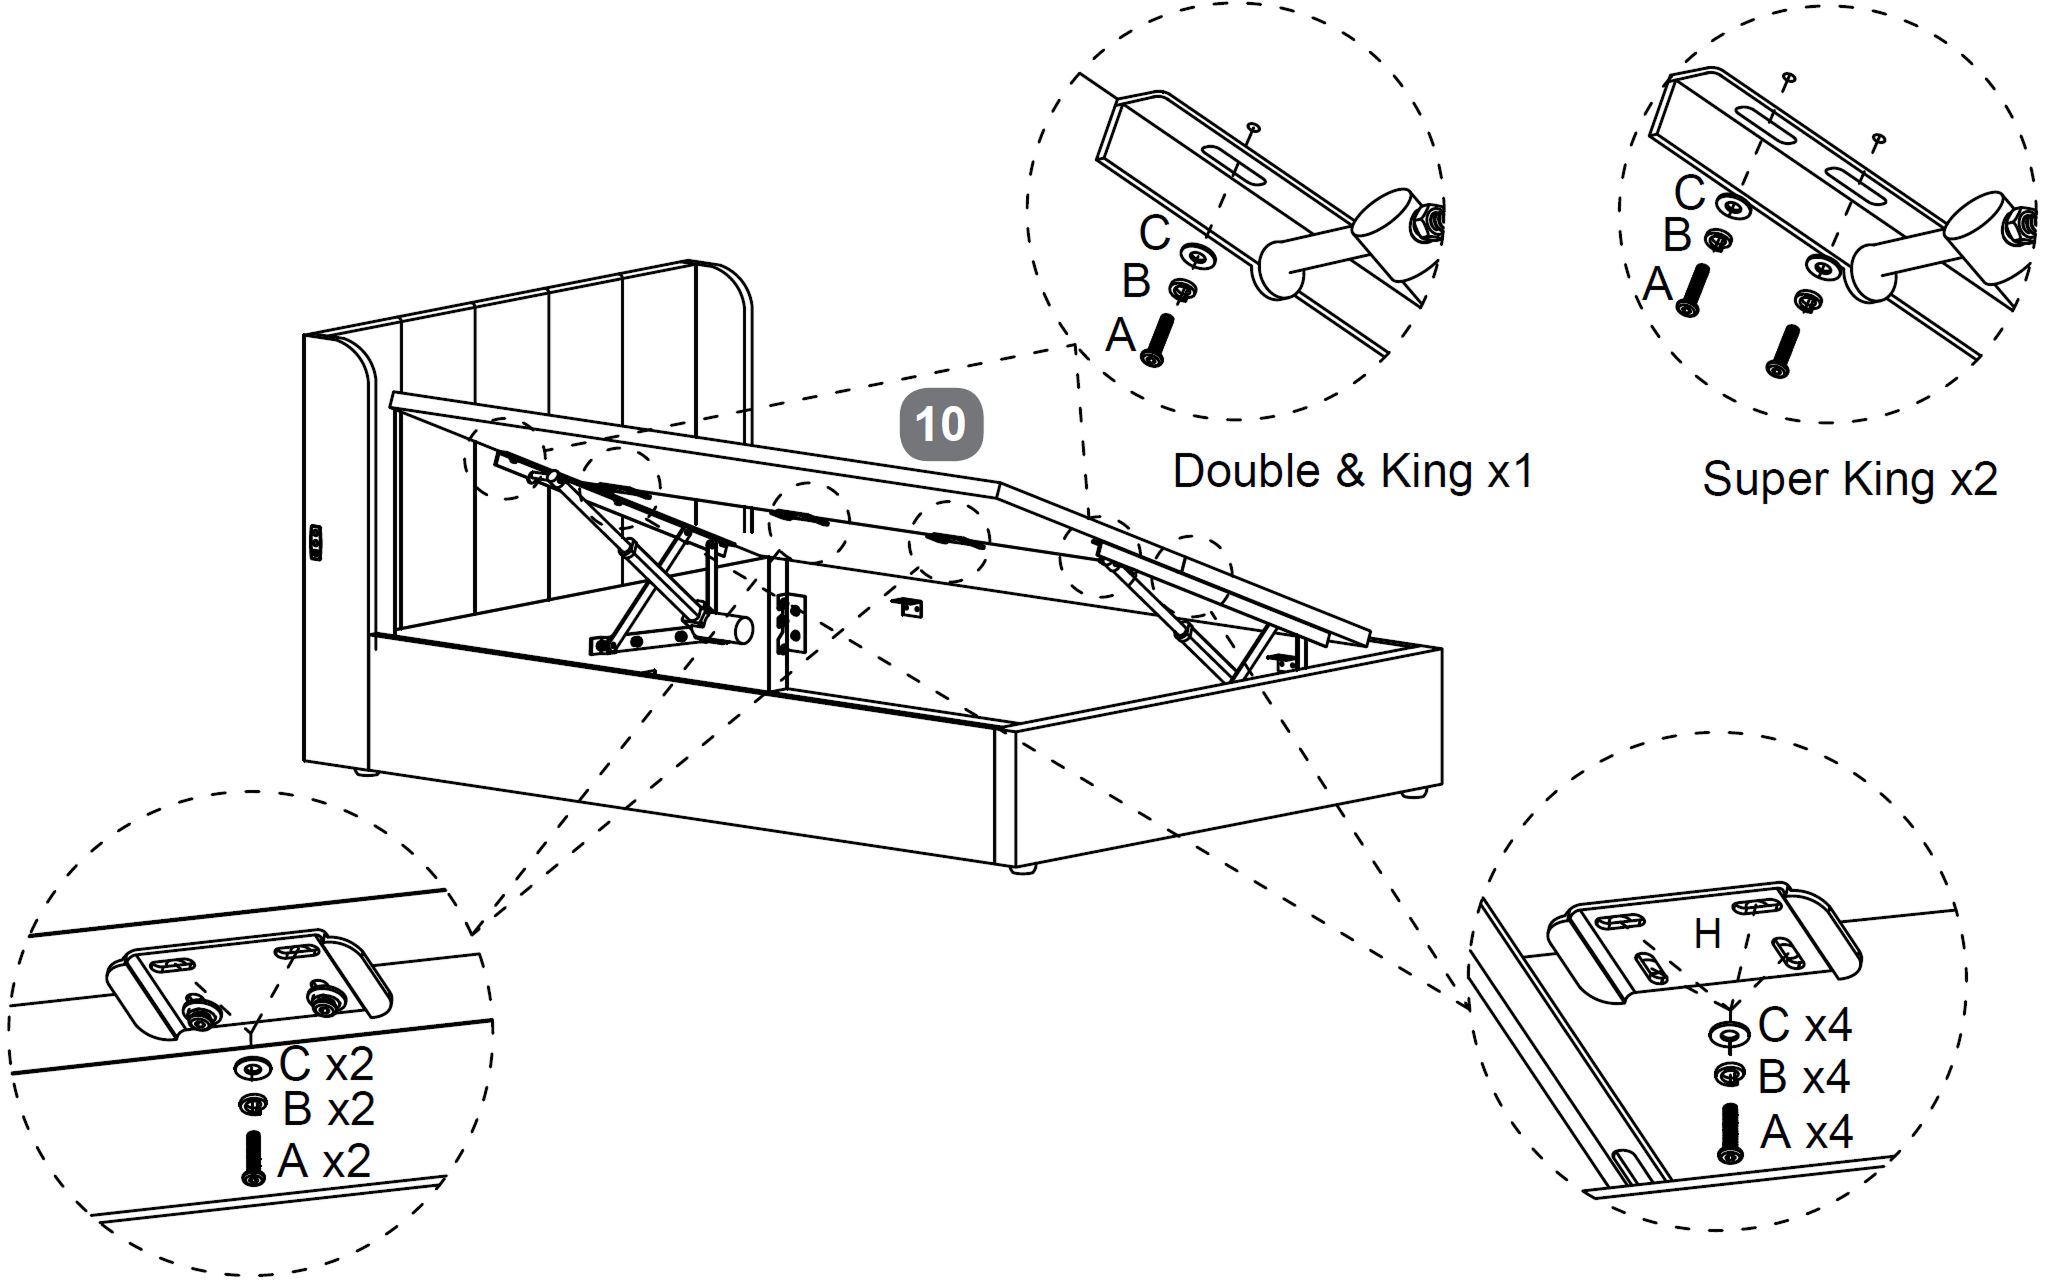
11. Secure the Mattress Base Board - Upper
Lift the Mattress Base Board - Upper (10) into position and align it with the lift mechanisms as shown.
Fix the board to the lift arms using Bolt (A) with Spring Washer (B) and Flat Washer (C) in the indicated fixing points.
Use 1 fixing point for Double and King beds.
Use 2 fixing points for Super King beds.
Attach the Metal Plates for Connecting Mattress Boards (H) to the underside of the mattress base board using the remaining bolts and washers, ensuring they are correctly aligned with the slots.
Tighten all bolts securely using the Allen Key (D), making sure the mattress base board is firmly fixed and moves smoothly with the lift mechanism.
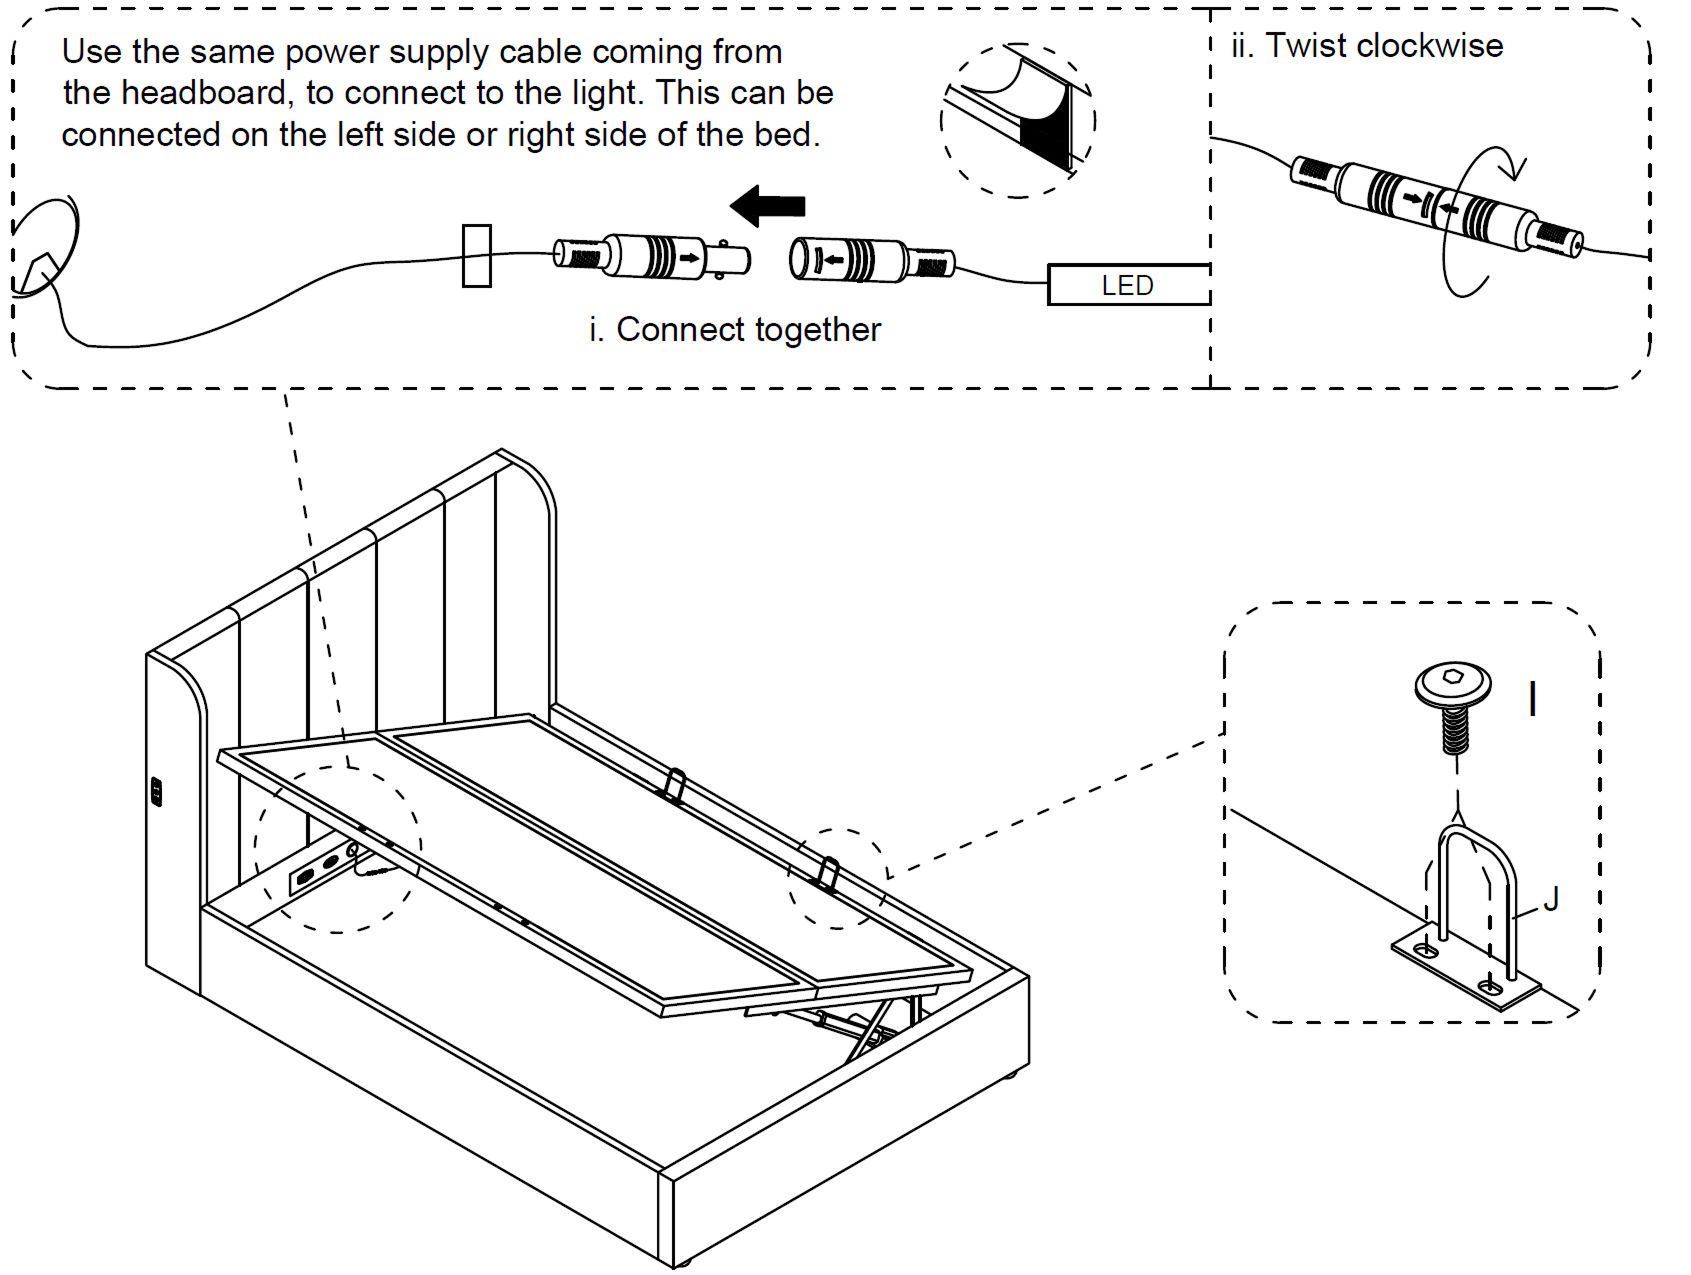
12. Connect the LED Power Cable and Fit Mattress Stoppers
Take the power supply cable coming from the headboard and connect it to the LED light cable on the chosen side of the bed.
Push the connectors together firmly, then twist them clockwise to lock the connection in place.
Position the Mattress Stoppers (J) at the indicated points on the mattress base.
Secure each mattress stopper using Big Head Bolts (I) and tighten fully with the Allen Key (D).
Check that the cable connection is secure and that all mattress stoppers are firmly fixed.
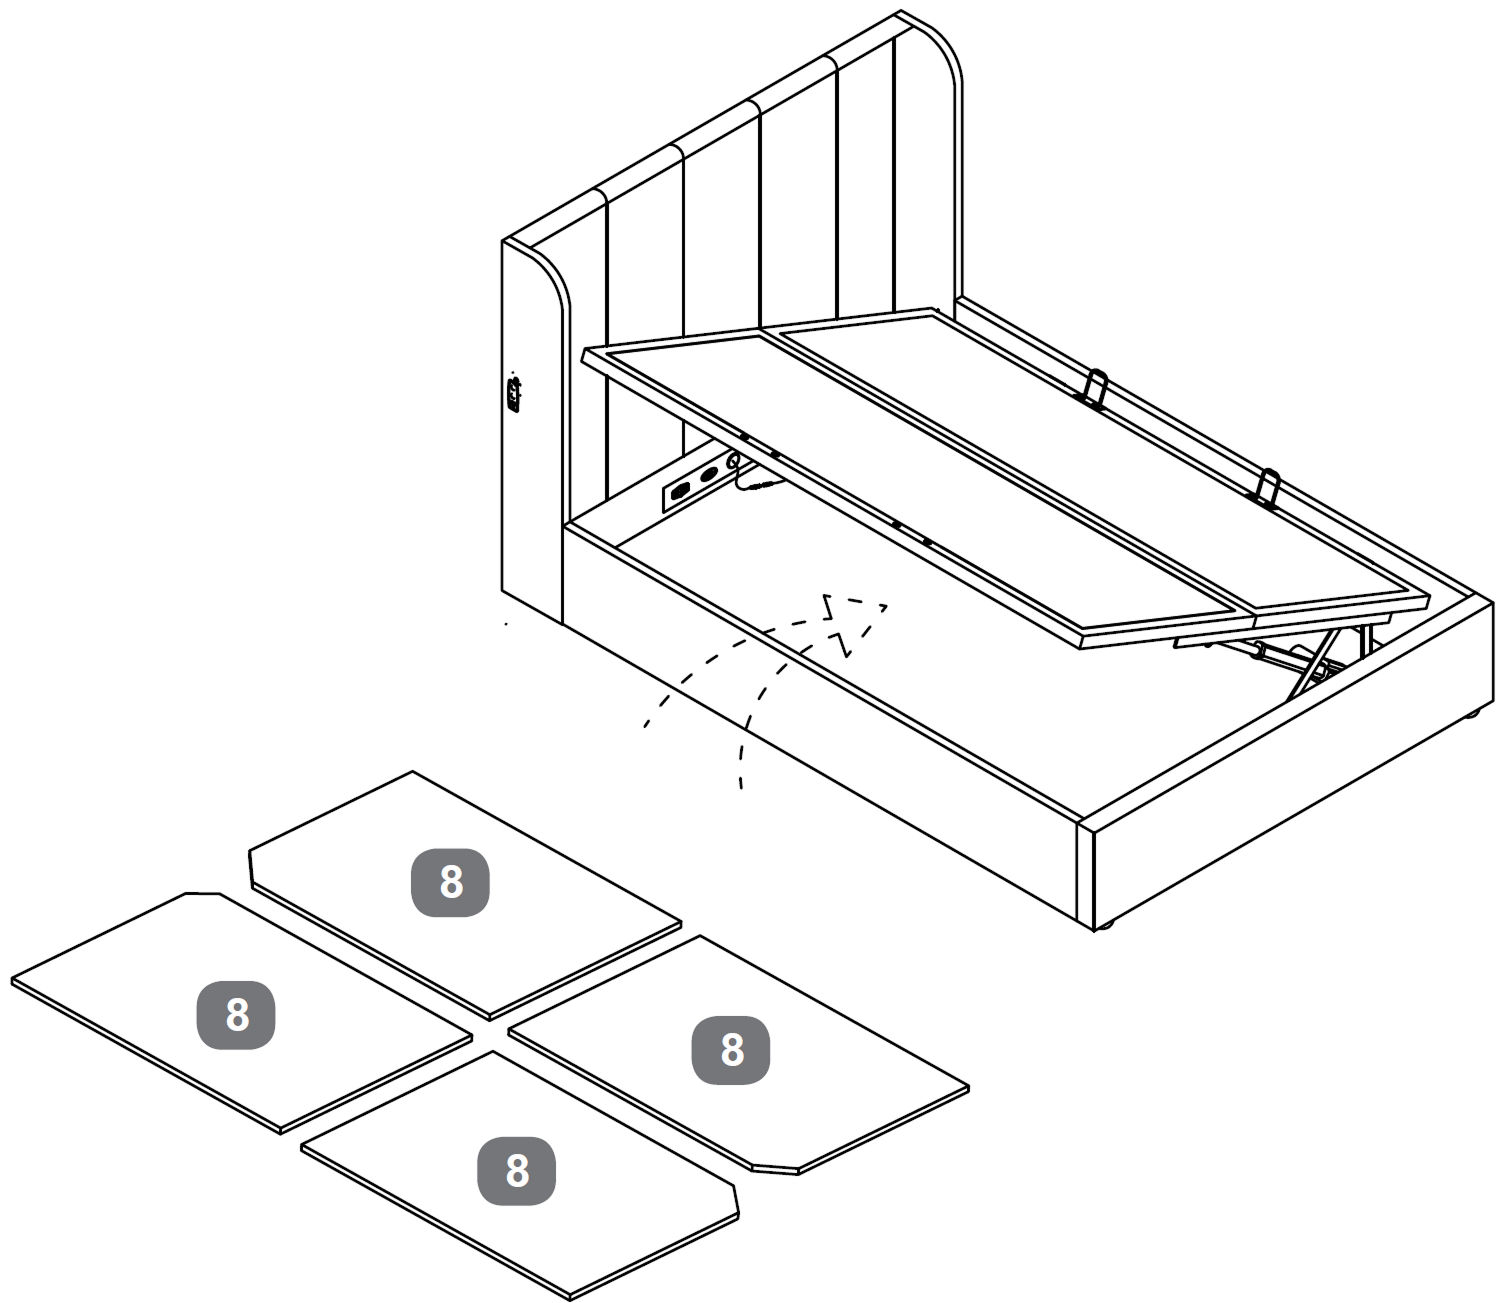
13. Install the Storage Base Boards
Place the Storage Base Boards (8) inside the bed frame.
Position the boards flat on the base, aligning them to cover the entire storage area as shown.
Make sure all boards sit evenly and securely on the base supports, with no gaps or overlaps.
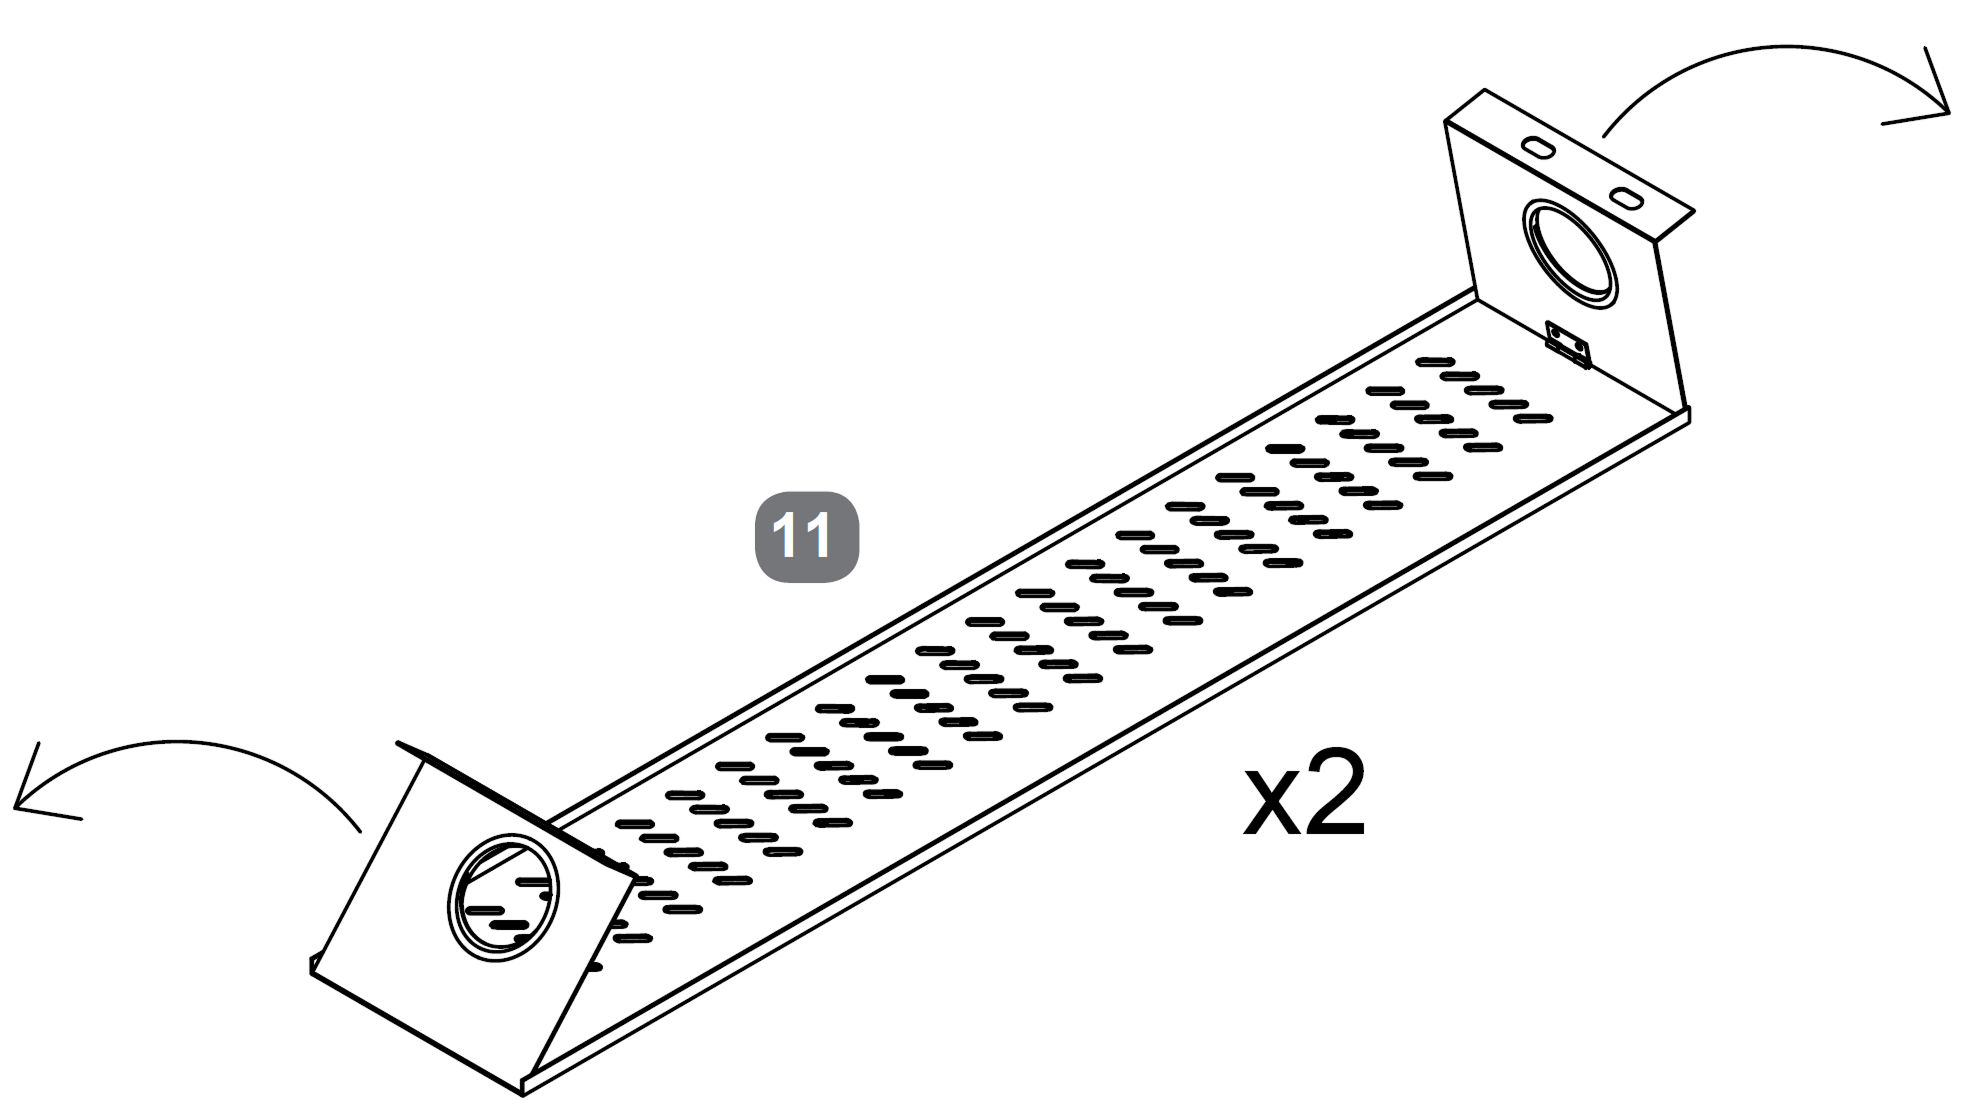
14. Fit the Metal Cable Guards
Take the Metal Cable Guards (11) and fold the end tabs upward as shown, creating a right angle at each end.
Ensure both guards are shaped evenly and ready to be fitted over the cables in the following steps.
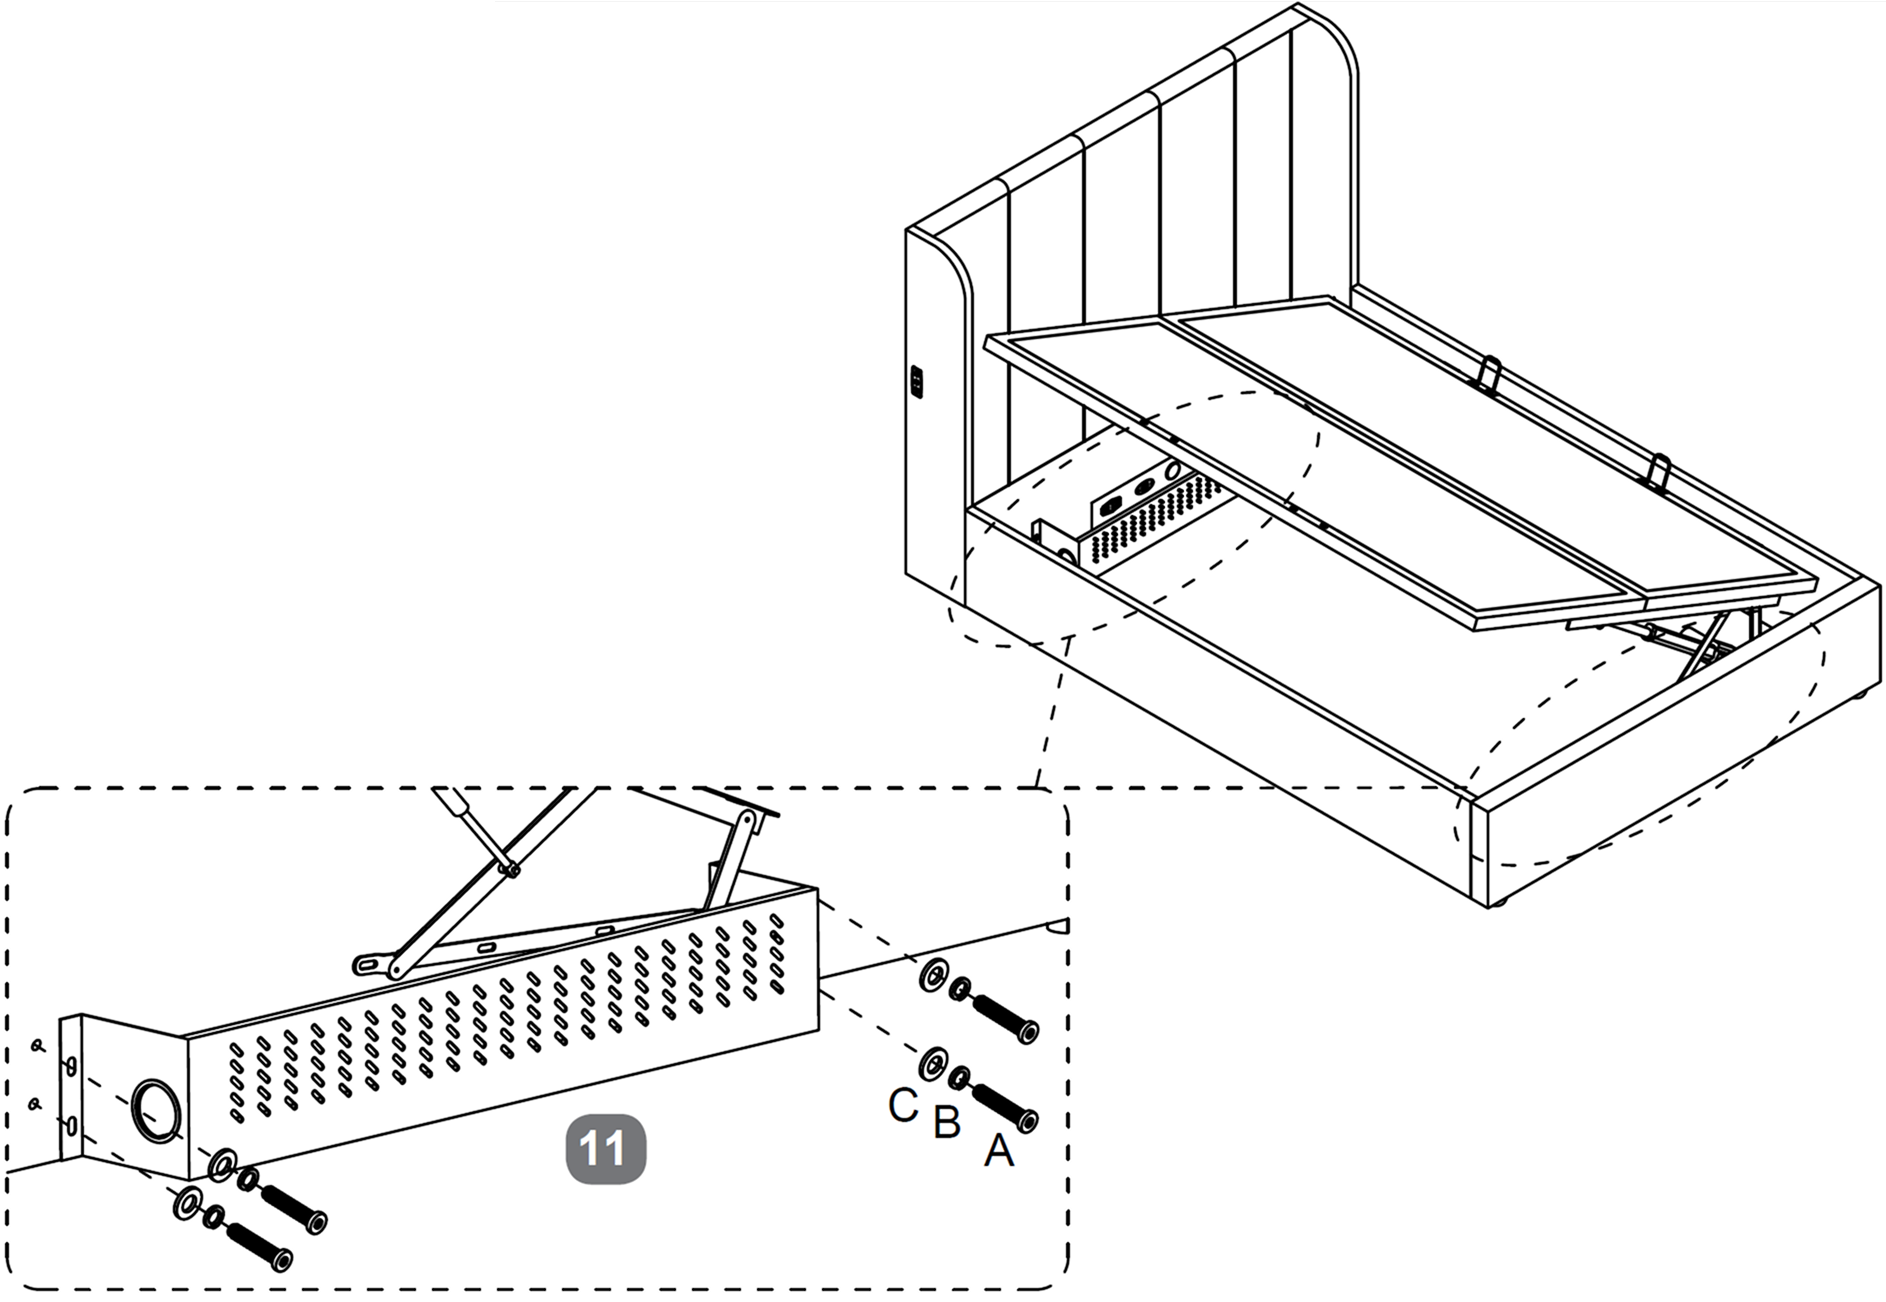
15. Install the Metal Cable Guards
Position the Metal Cable Guards inside the bed base, aligning them with the pre-drilled holes near the lift mechanism and control unit.
Secure each cable guard using Bolt (A) with Spring Washer (B) and Flat Washer (C).
Tighten all fixings using the Allen Key (D), ensuring the guards are firmly in place and do not interfere with the movement of the lift mechanism or cables.
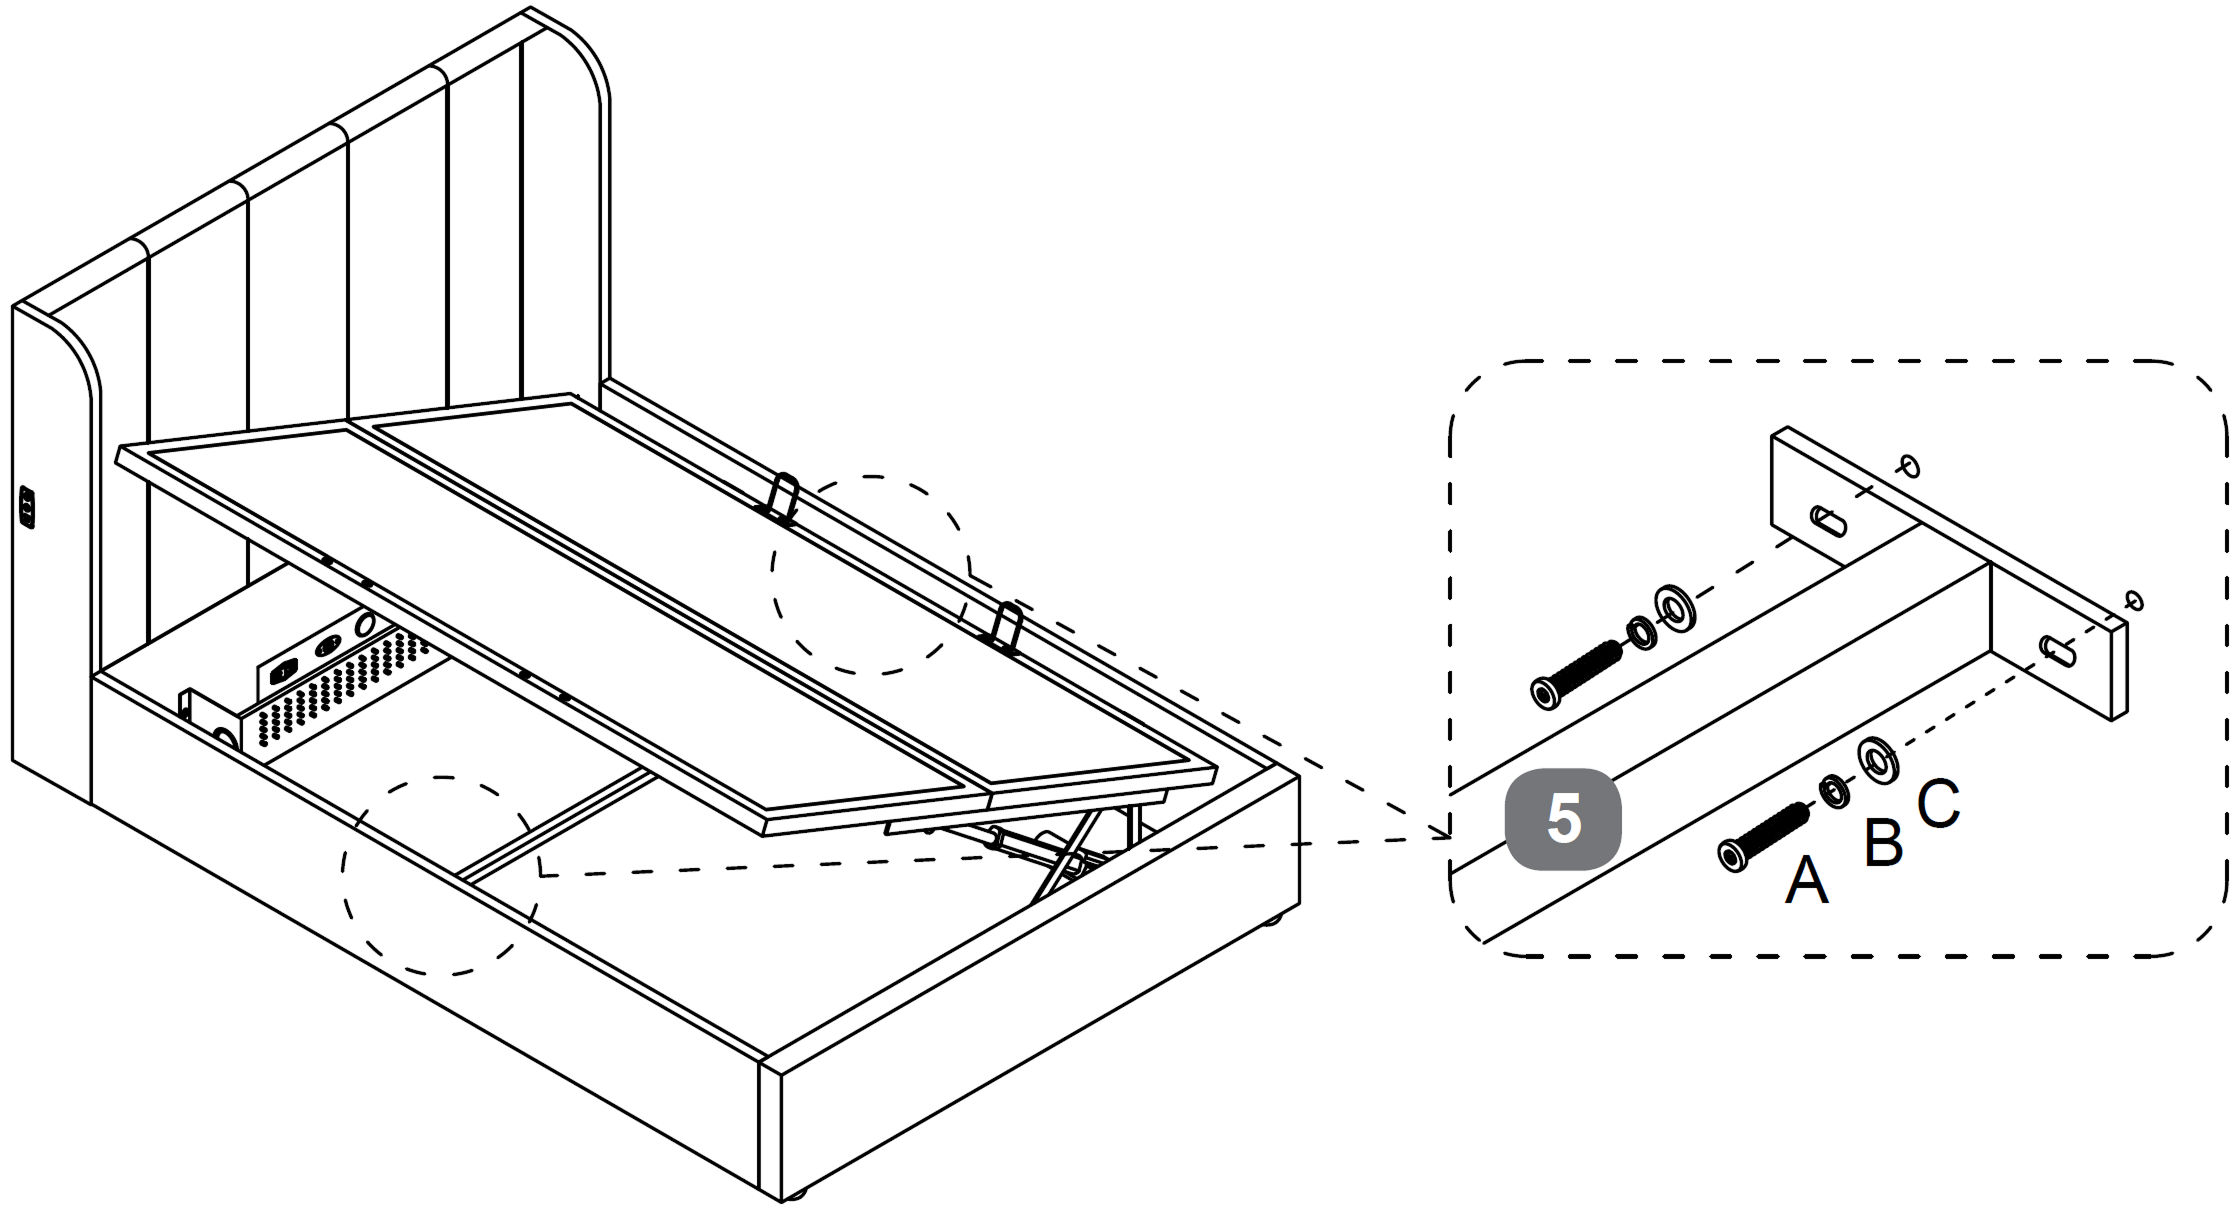
16. Fit the Side Rail Cross Bar
Position the Side Rail Cross Bar (5) between the side rails, aligning it with the pre-drilled holes as shown.
Insert Bolt (A) with Spring Washer (B) and Flat Washer (C) through the cross bar into the side rail fixings.
Tighten all fixings using the Allen Key (D), ensuring the cross bar is securely fixed and sits straight.
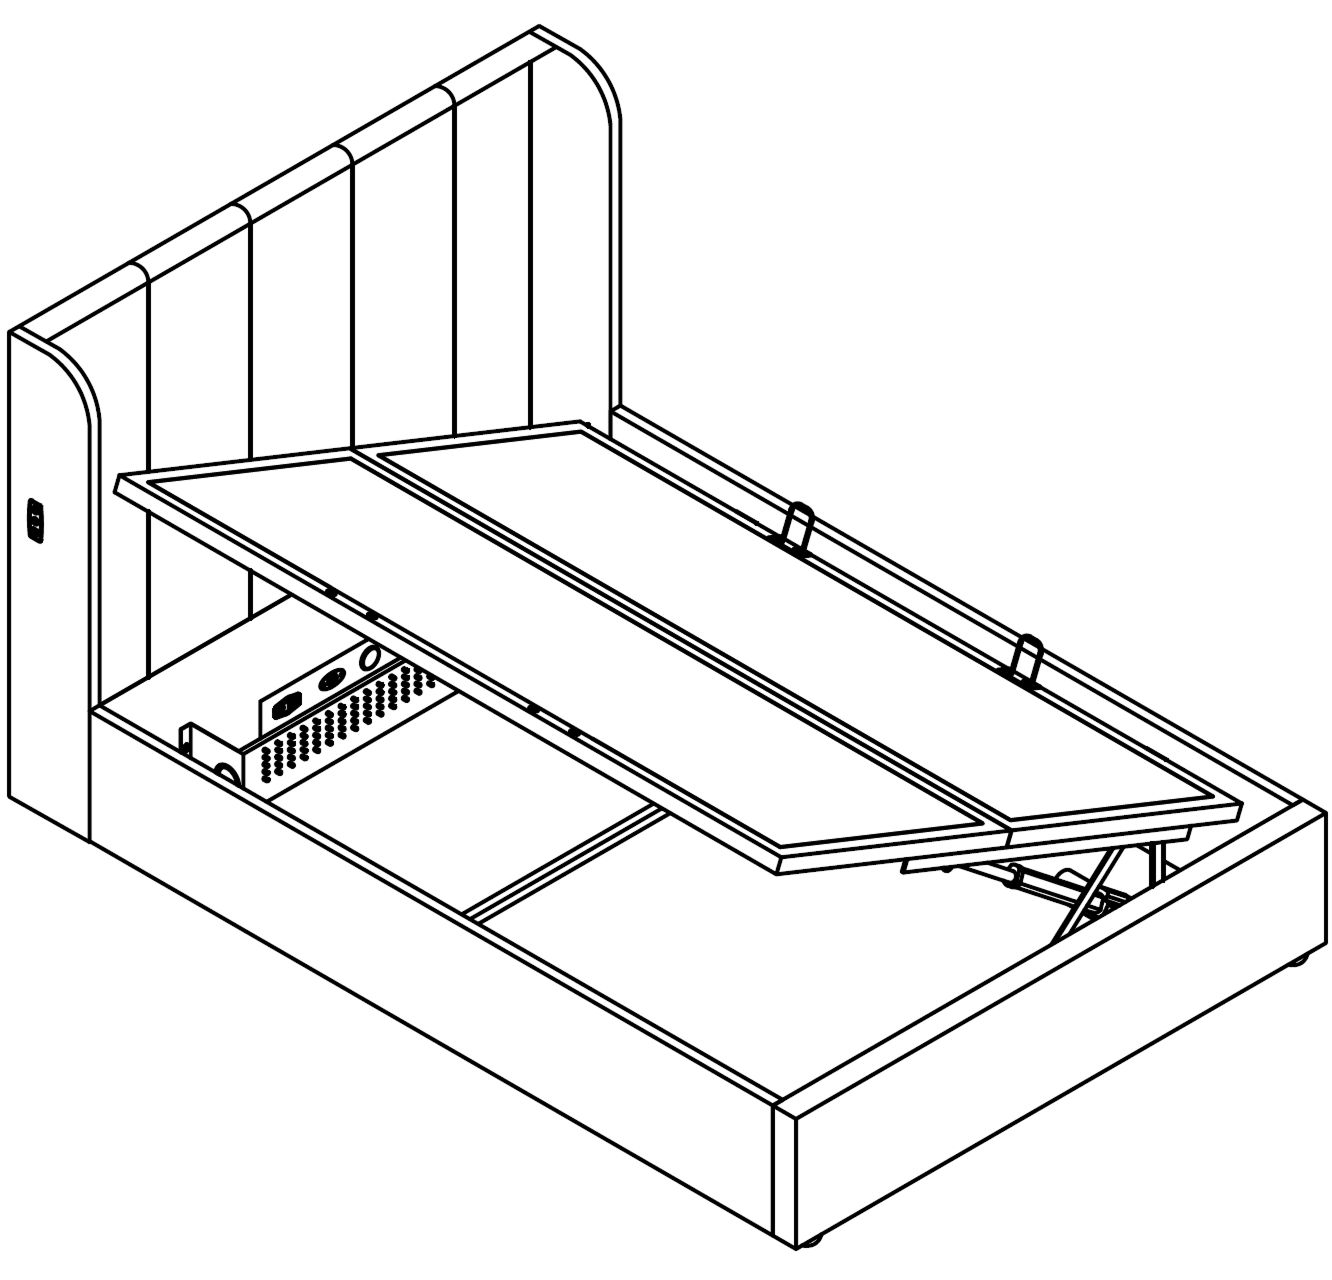
17. Operate the Electric Ottoman Lift
Make sure the power cable is connected and the bed is plugged into a grounded wall socket.
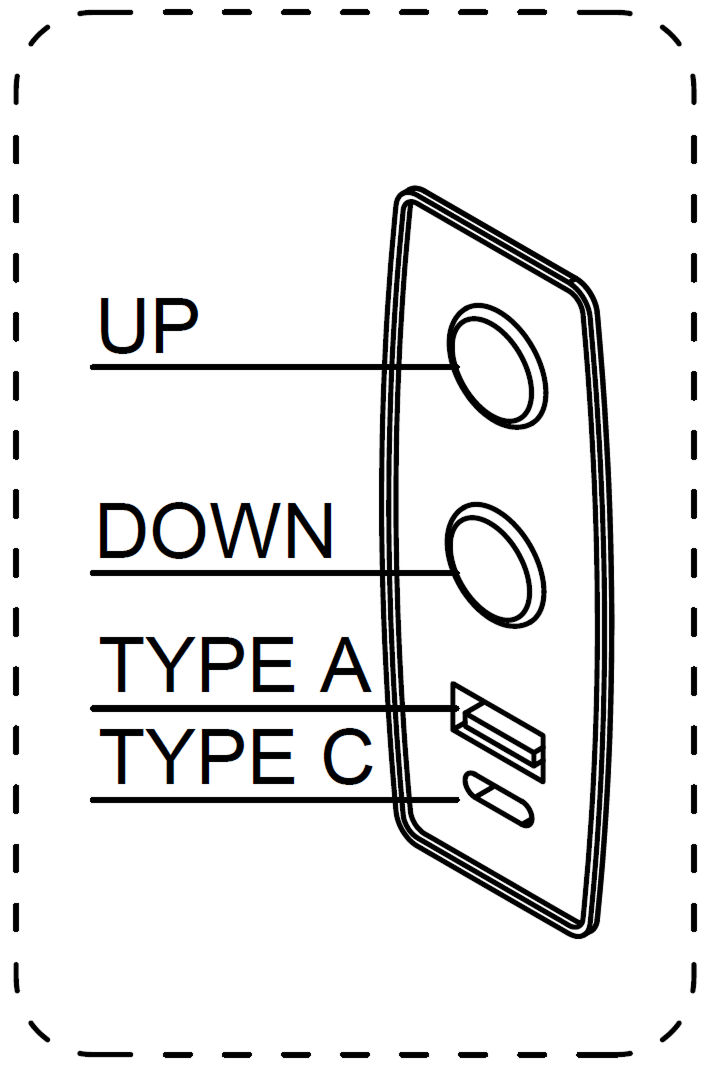
On either side of the headboard, locate the control panel with two buttons.
Press and hold both buttons at the same time for 3 seconds until you hear a beep. This unlocks the system.
Press and hold the UP or DOWN button to raise or lower the mattress platform.
Release the button to stop the movement at any point.
After one minute of inactivity, the system will lock automatically. To operate again, repeat the unlocking process.
18. Safety and Storage Guidelines
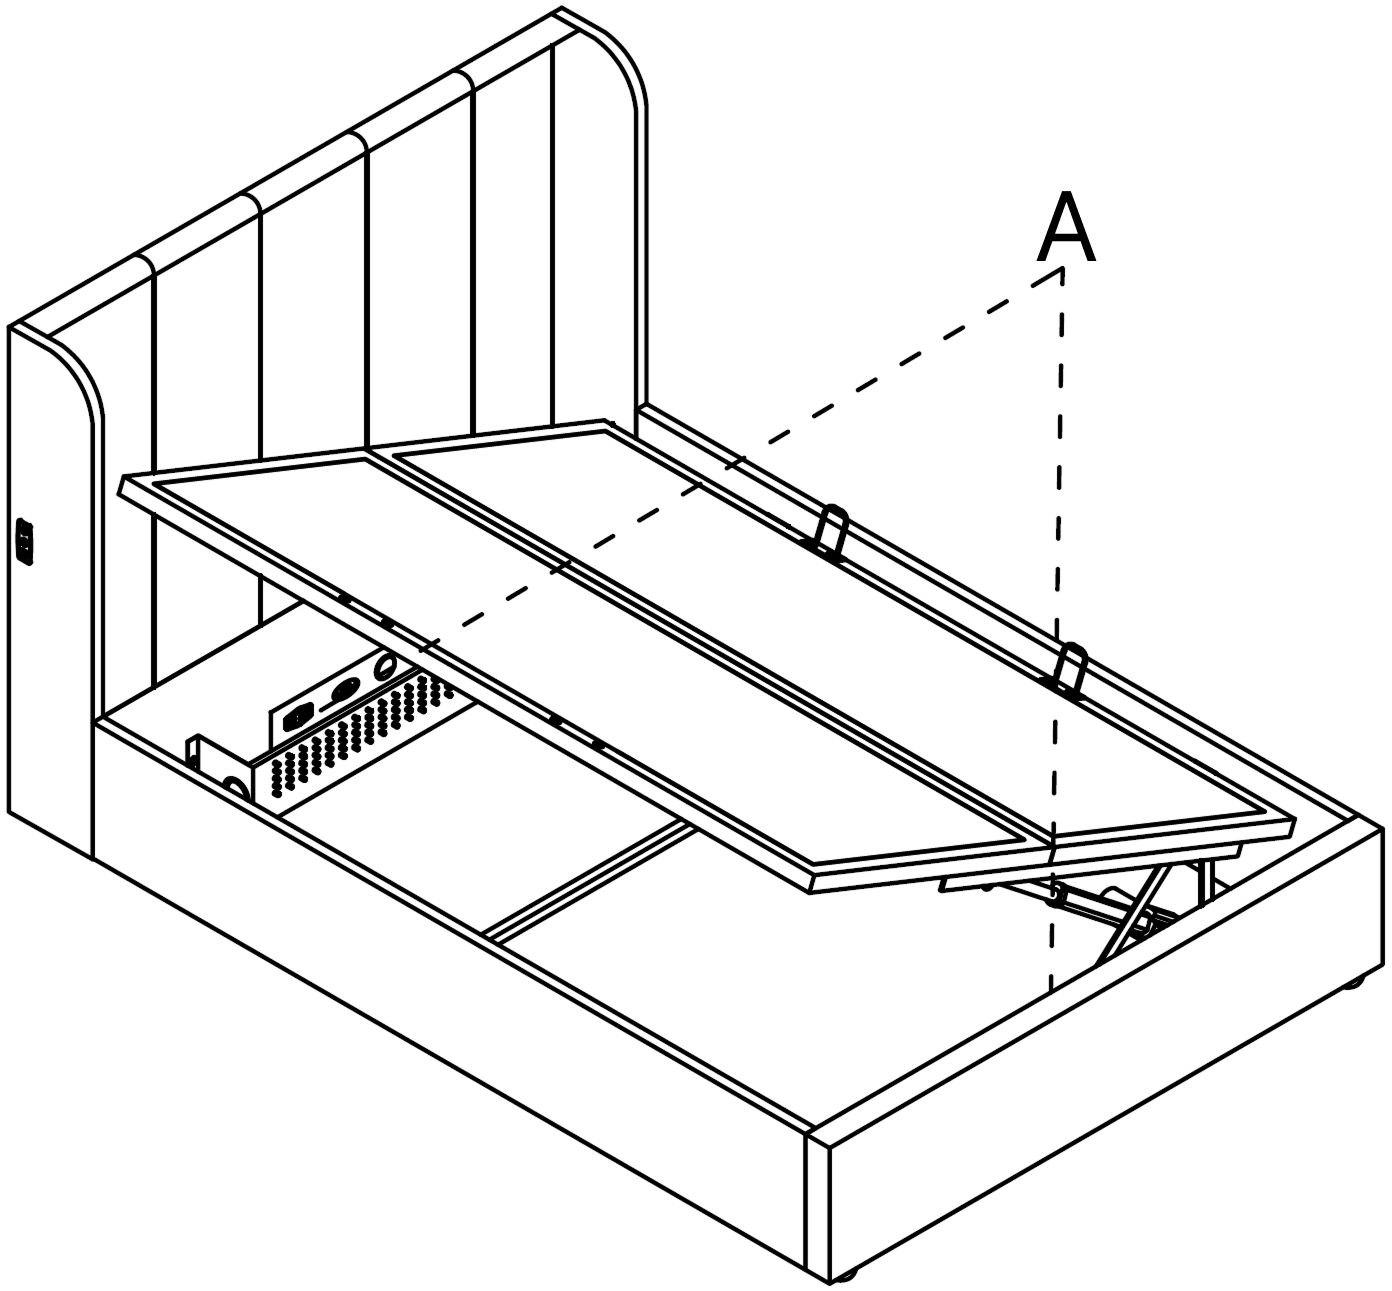
(A) -Do not store any items inside the motor guard compartment, as this may damage the motor.
Caution:
Operate the ottoman bed only as instructed and by adults only.
Keep children and pets away from the storage area at all times.
Do not stand on the internal storage base panels or overload the storage area.
Do not sit or lie on the bed while the lift mechanism is in operation.
19. Storage and Safety Warnings
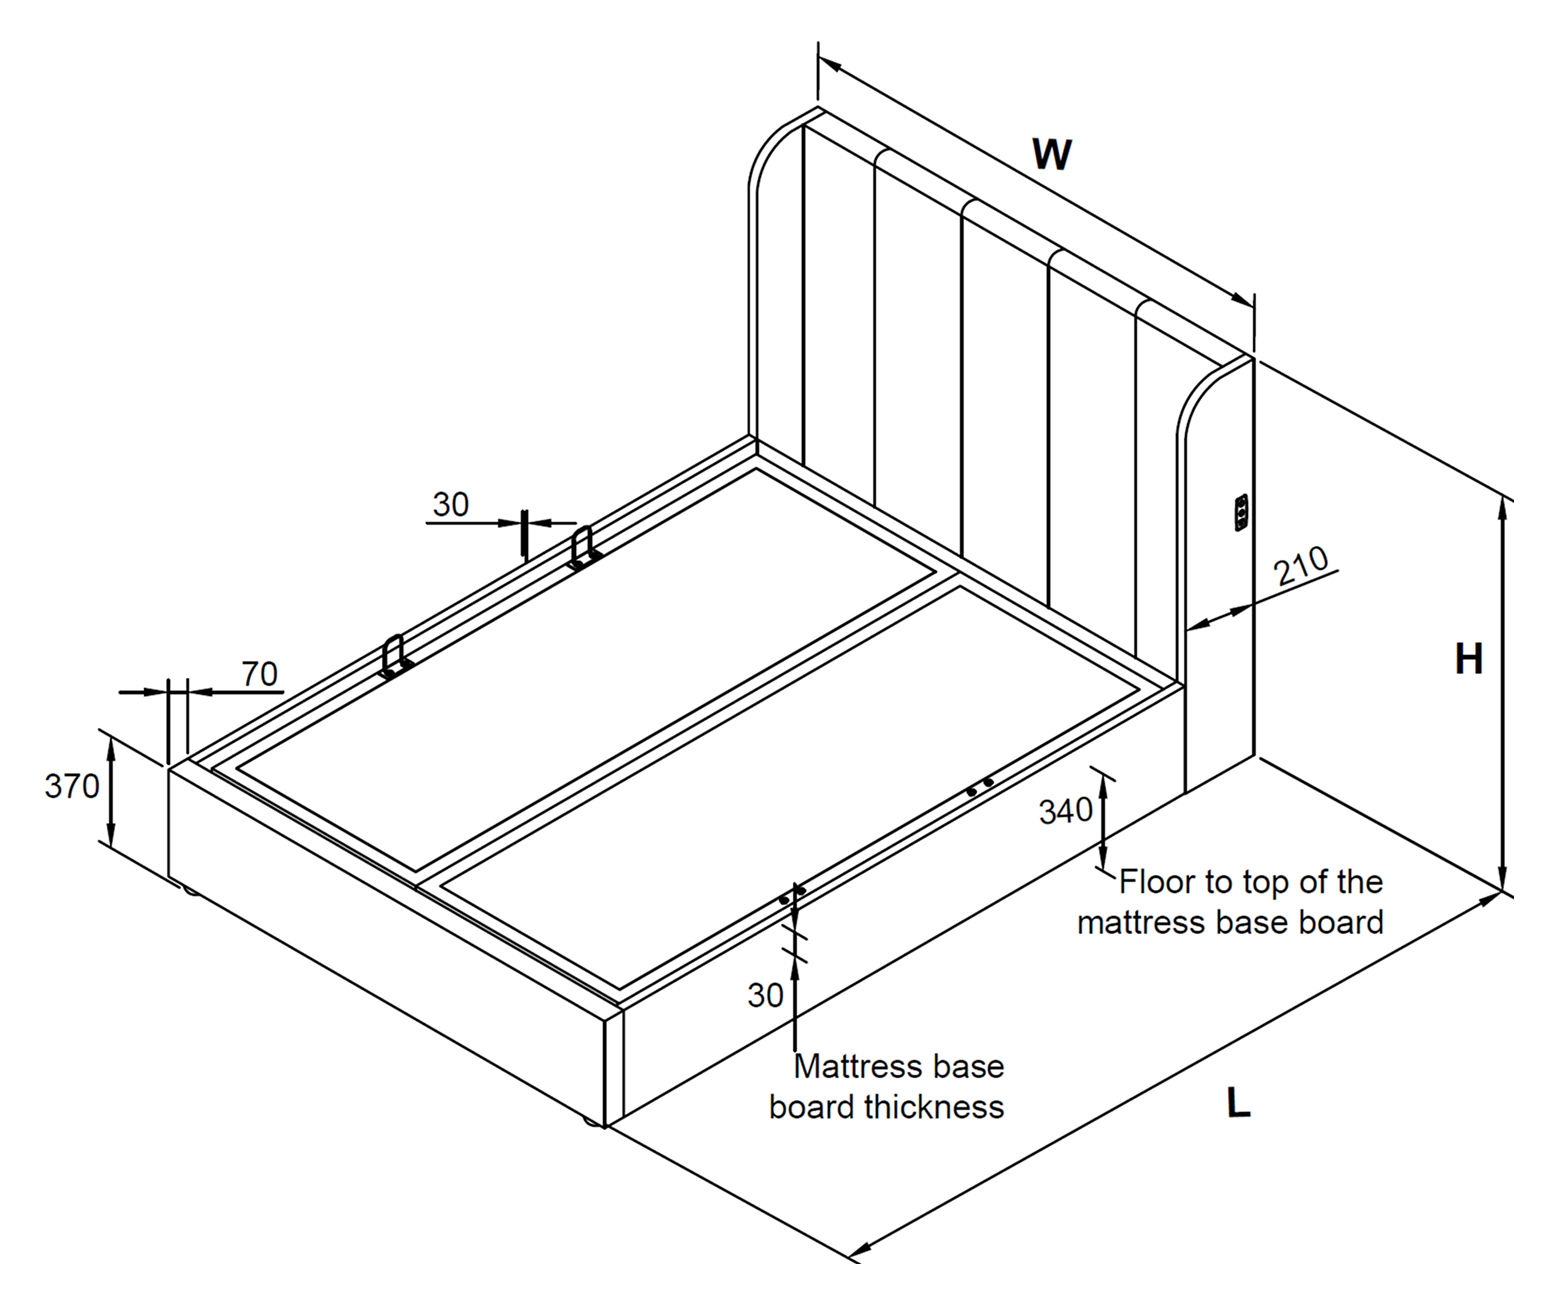
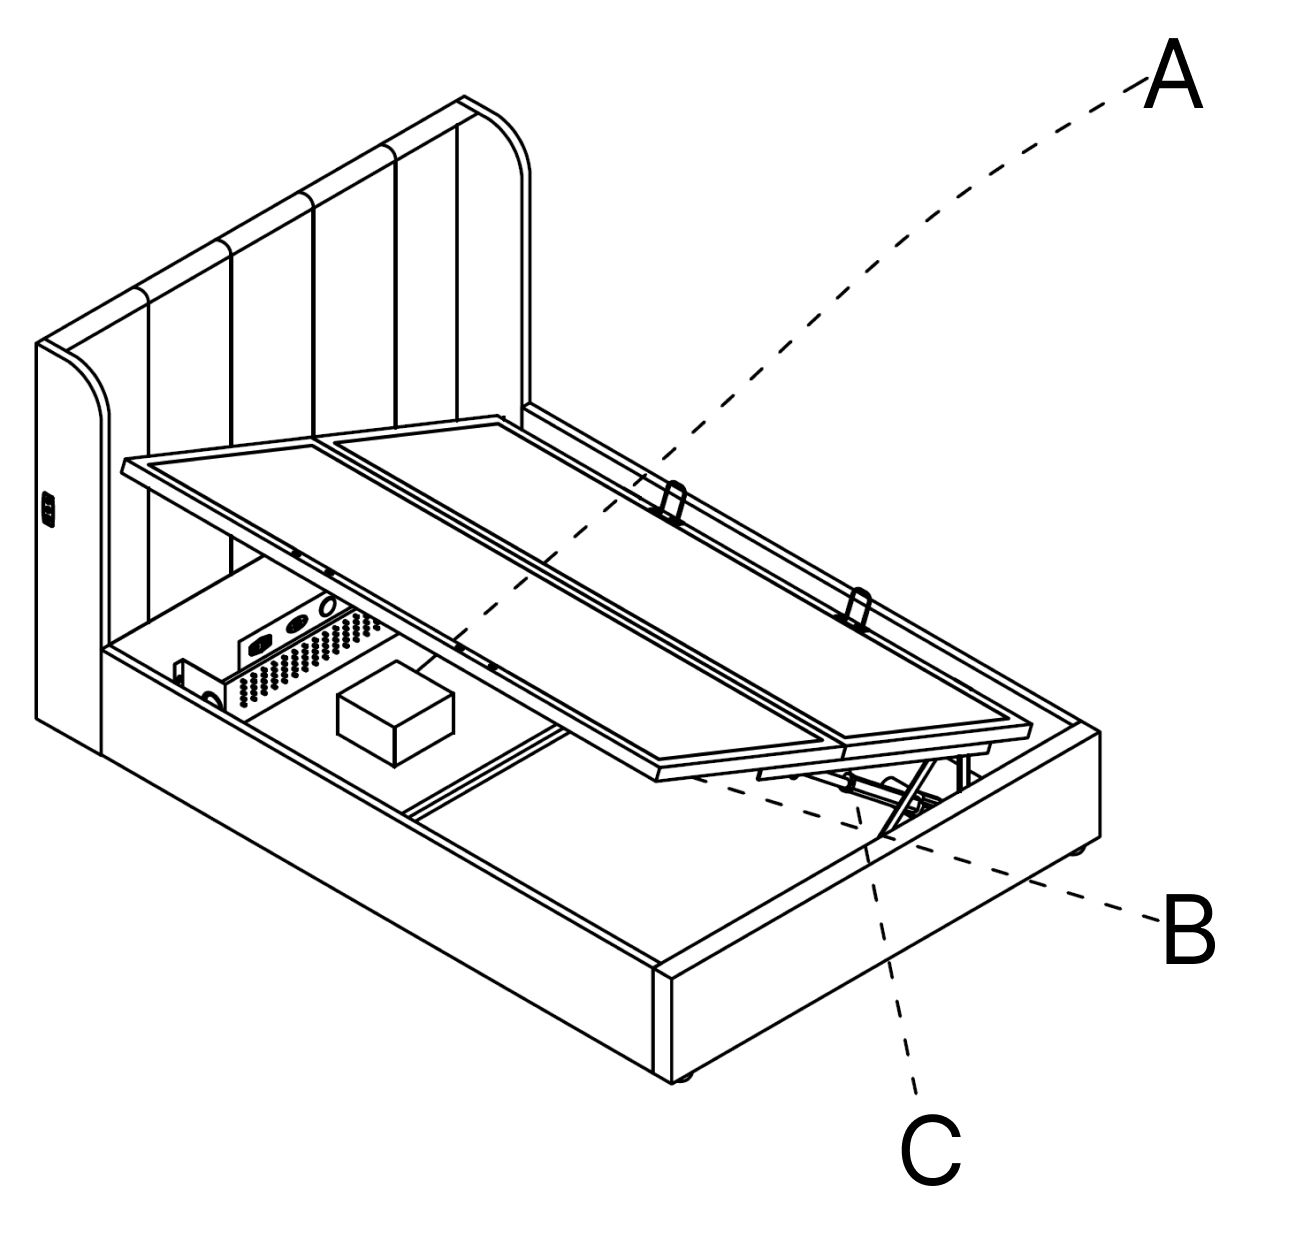
(A) - Only store items under the bed that do not touch the underside of the mattress base boards.
Ensure stored items are no taller than 265 mm to prevent damage to the lift mechanism and mattress base.
(B) - Never reach into the storage area through the hinge or lift mechanism.
(C) - Fully open the ottoman before accessing the storage area and fully close it afterwards.
Keep children and pets away from the storage area at all times.
Do not stand, sit, or place weight on the mattress base boards while the lift is in operation.
Always follow the recommended weight limits for safe operation.
20. Assembly Complete
Check that all bolts and fixings are fully tightened and that the bed frame is square and stable.
Make sure all electrical connections are secure and that cables are routed safely, away from moving parts.
Your Smart Lift Electric Ottoman Natural Bed Frame is now fully assembled and ready for use!
21. Emergency Lowering
In the event of an emergency, such as a power cut, when the bed is already in the raised position, the bed frame can be lowered manually.
For safety, this procedure requires two people.
Disconnect the power supply by unplugging the cable from the wall.
Remove the mattress and all bedding from the bed.
The first person must support the mattress base board. If the base is low, it may be lifted to a safe working height. If necessary, place a suitable prop under the frame to support it securely.
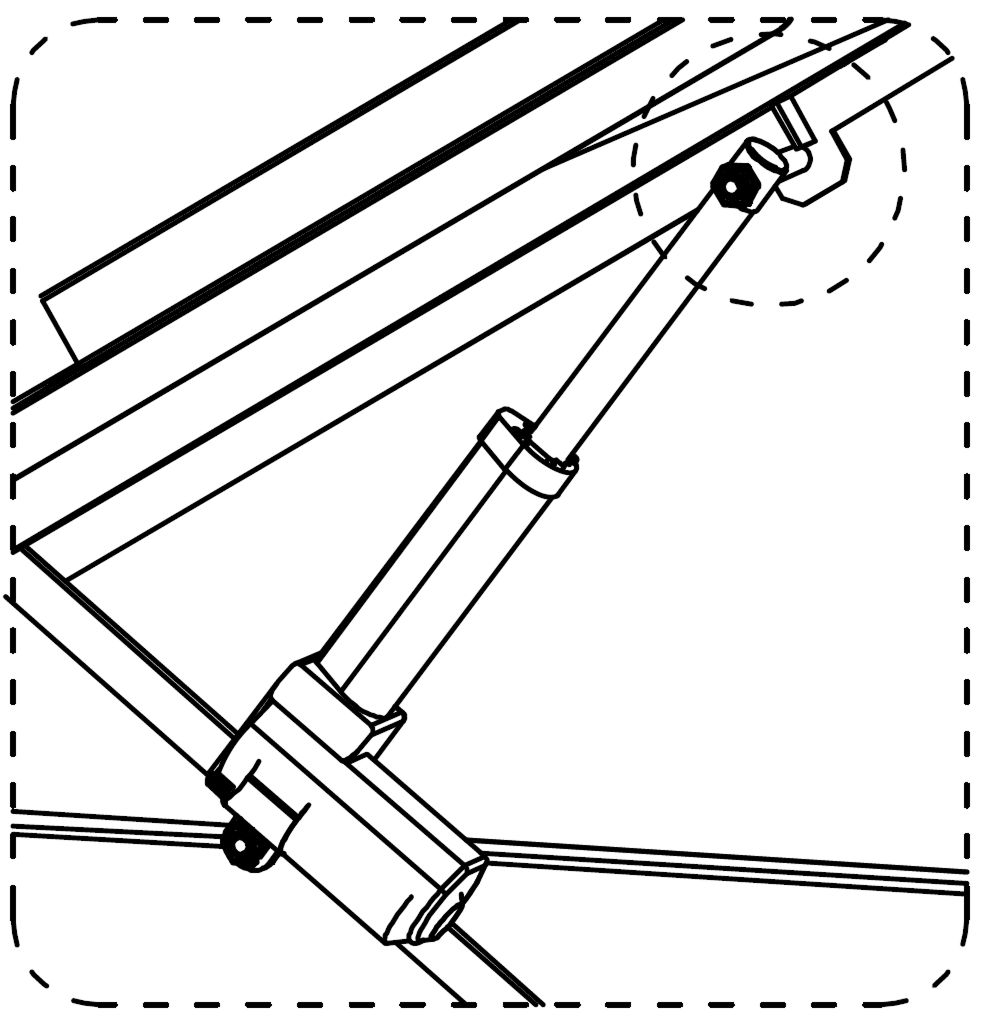
The second person removes the two upper M10 motor nuts using the 17 mm spanner supplied in the hardware kit.
Do not stand inside the bed or on the internal storage base boards during this process.
Carefully push the motor link off the pivot pins, keeping both sides even, and gently rest the motor link on top of the storage base board.
Using the hand straps, gently lower the mattress base into its lower resting position. Keep hands clear of the side rails while lowering, as the base is heavy.
If you are unable to raise or lower the bed safely, contact Customer Services for assistance.
22. Remove Pre-fitted Bolts from Mattress Base Board (Upper)
Remove the four pre-fitted Big Head Bolts (M8 × 20 mm) from the Mattress Base Board - Upper (10).
Locate the four bolts fitted to the upper mattress base board.
Using the appropriate tool, fully unscrew and remove all four bolts.
Keep the bolts safe, as they will be reused in the following steps.
Important: Do not stand or apply weight on the storage base boards while removing the bolts.
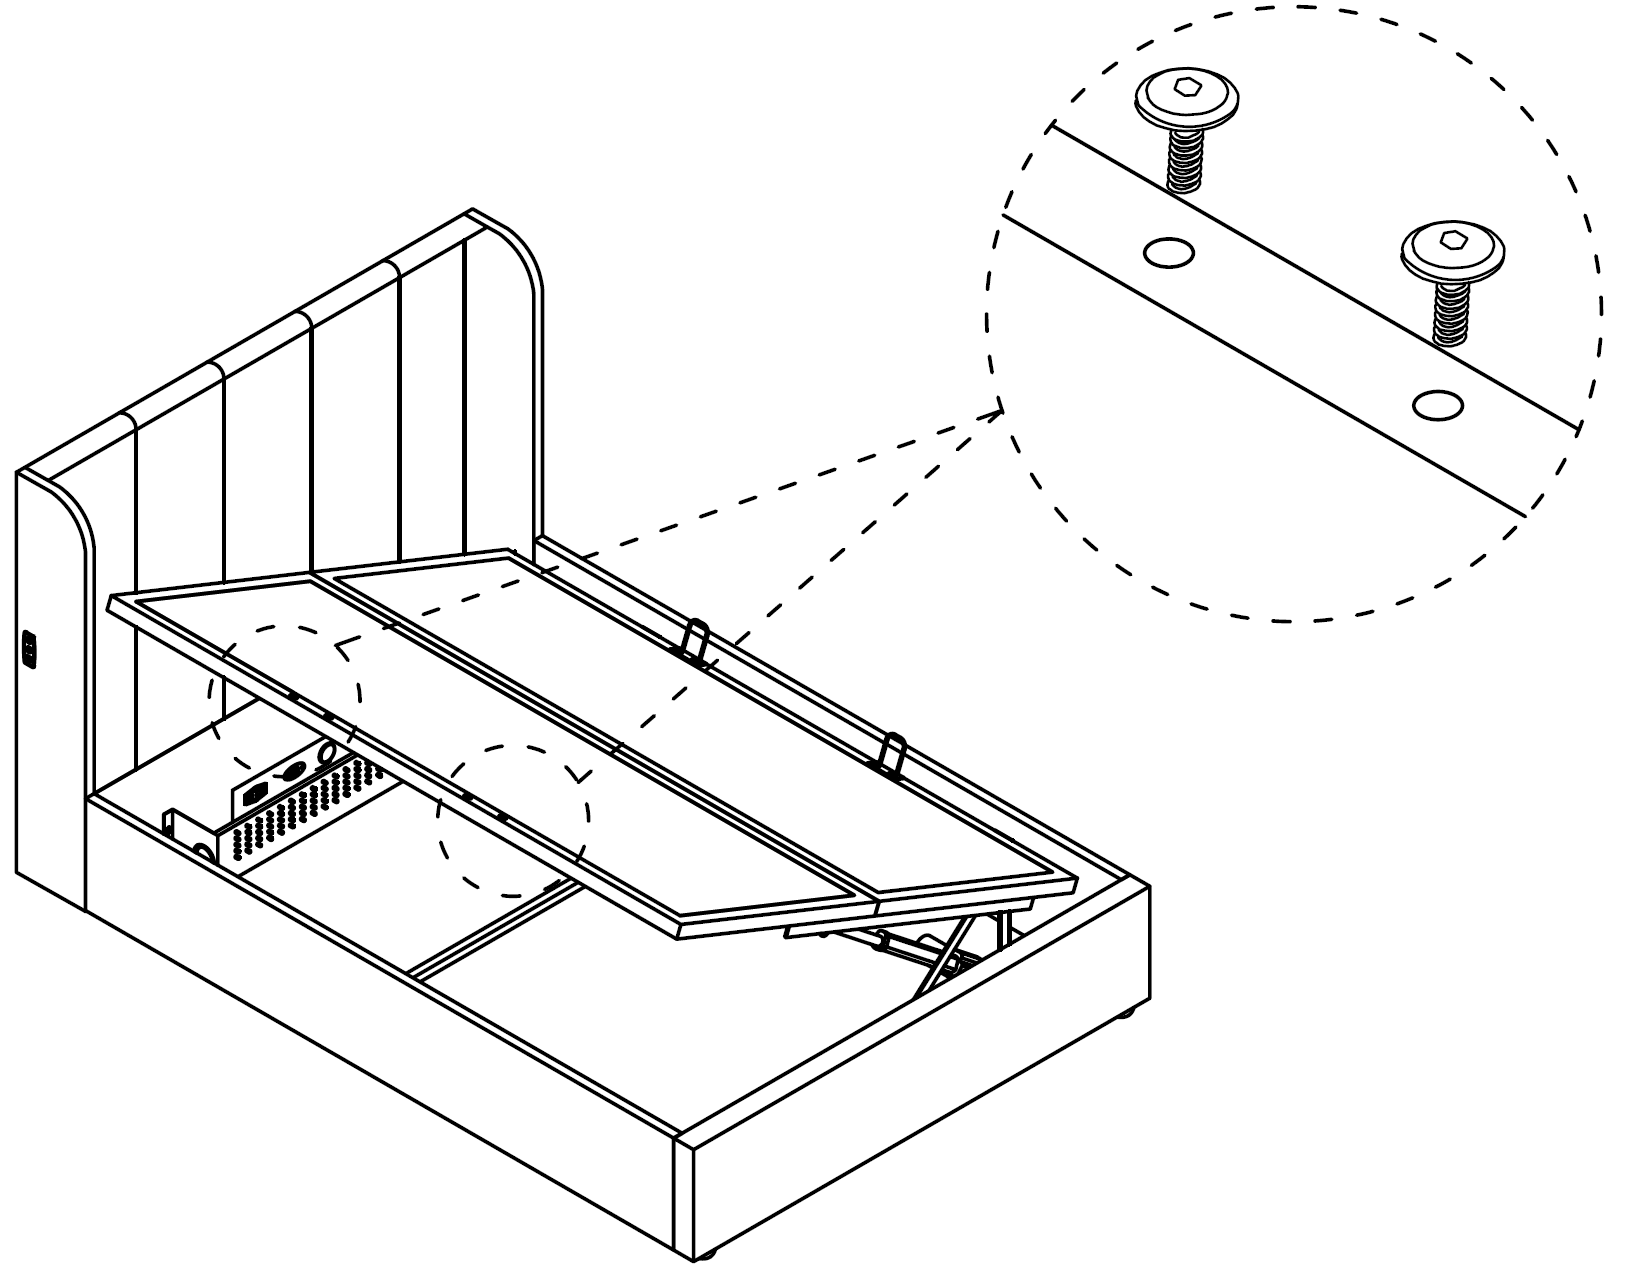
23. Fit the Hand Straps
Assemble each hand strap by attaching Plate X to Strap Y.
Position the assembled hand straps onto the mattress base frame as shown.
Secure each strap using the supplied bolts.
Tighten all bolts fully using the Allen key (D) until they are 100% secure.
Note: Ensure both hand straps are firmly fixed before proceeding with emergency lowering.
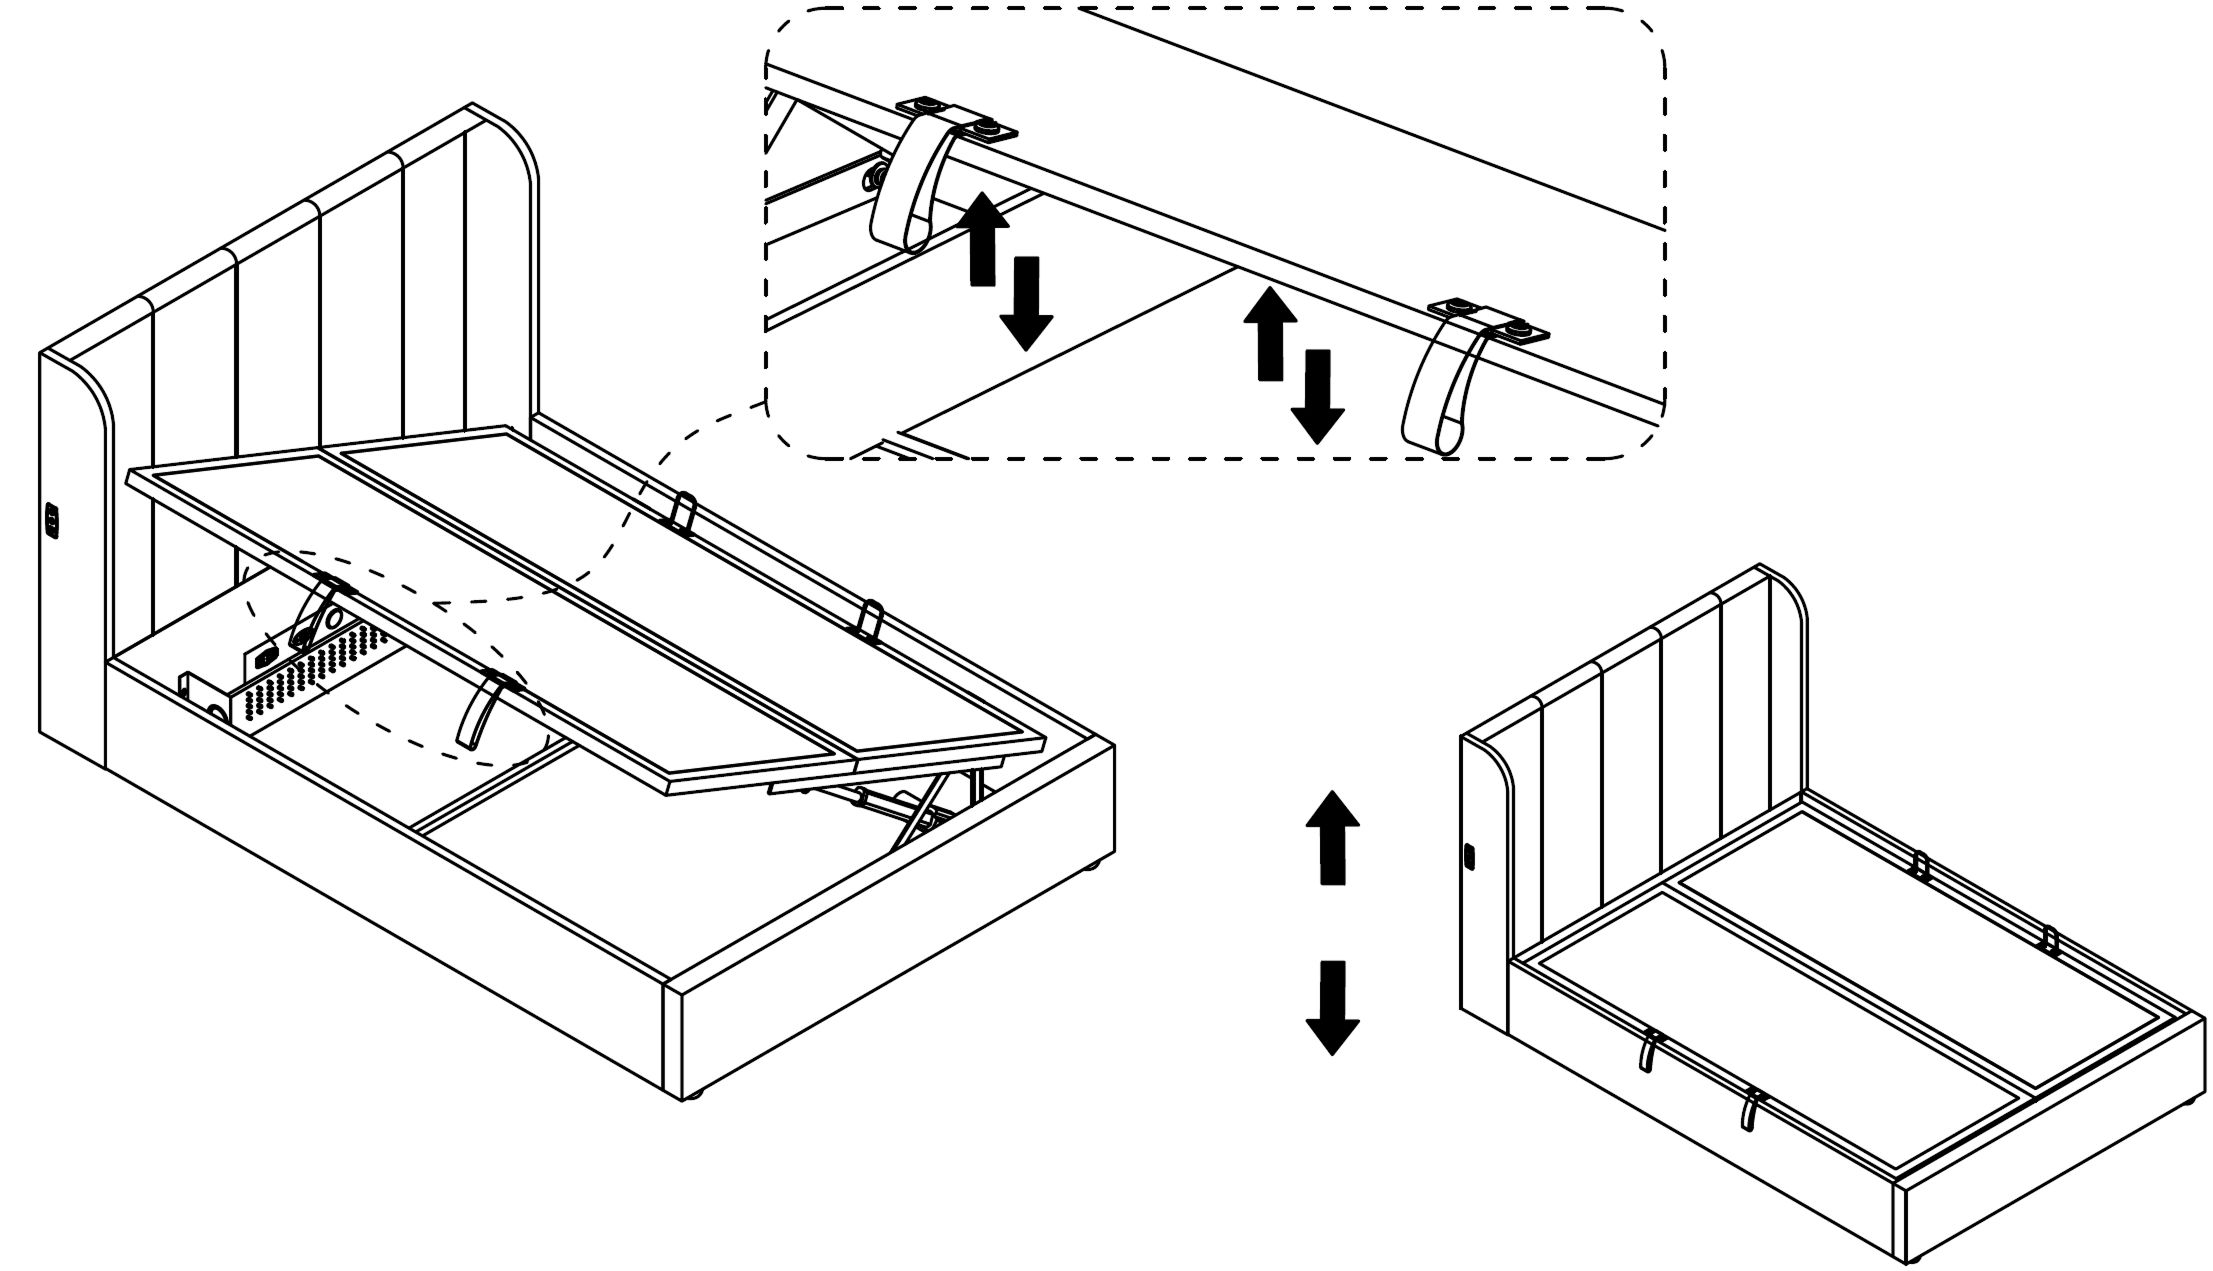
24. Prepare for Manual Lowering
Remove the mattress and all bedding from the bed.
Ensure the hand straps are securely fitted to the mattress base frame.
Stand clear of the storage area and keep hands away from the side rails and hinge mechanisms.
Carefully support the mattress base using the hand straps, ready for controlled manual lowering.
Once prepared, follow the instructions in the next step to fully lower the mattress base safely.
Warning: The mattress base is heavy. Always maintain full control during lowering and ensure two people are present.
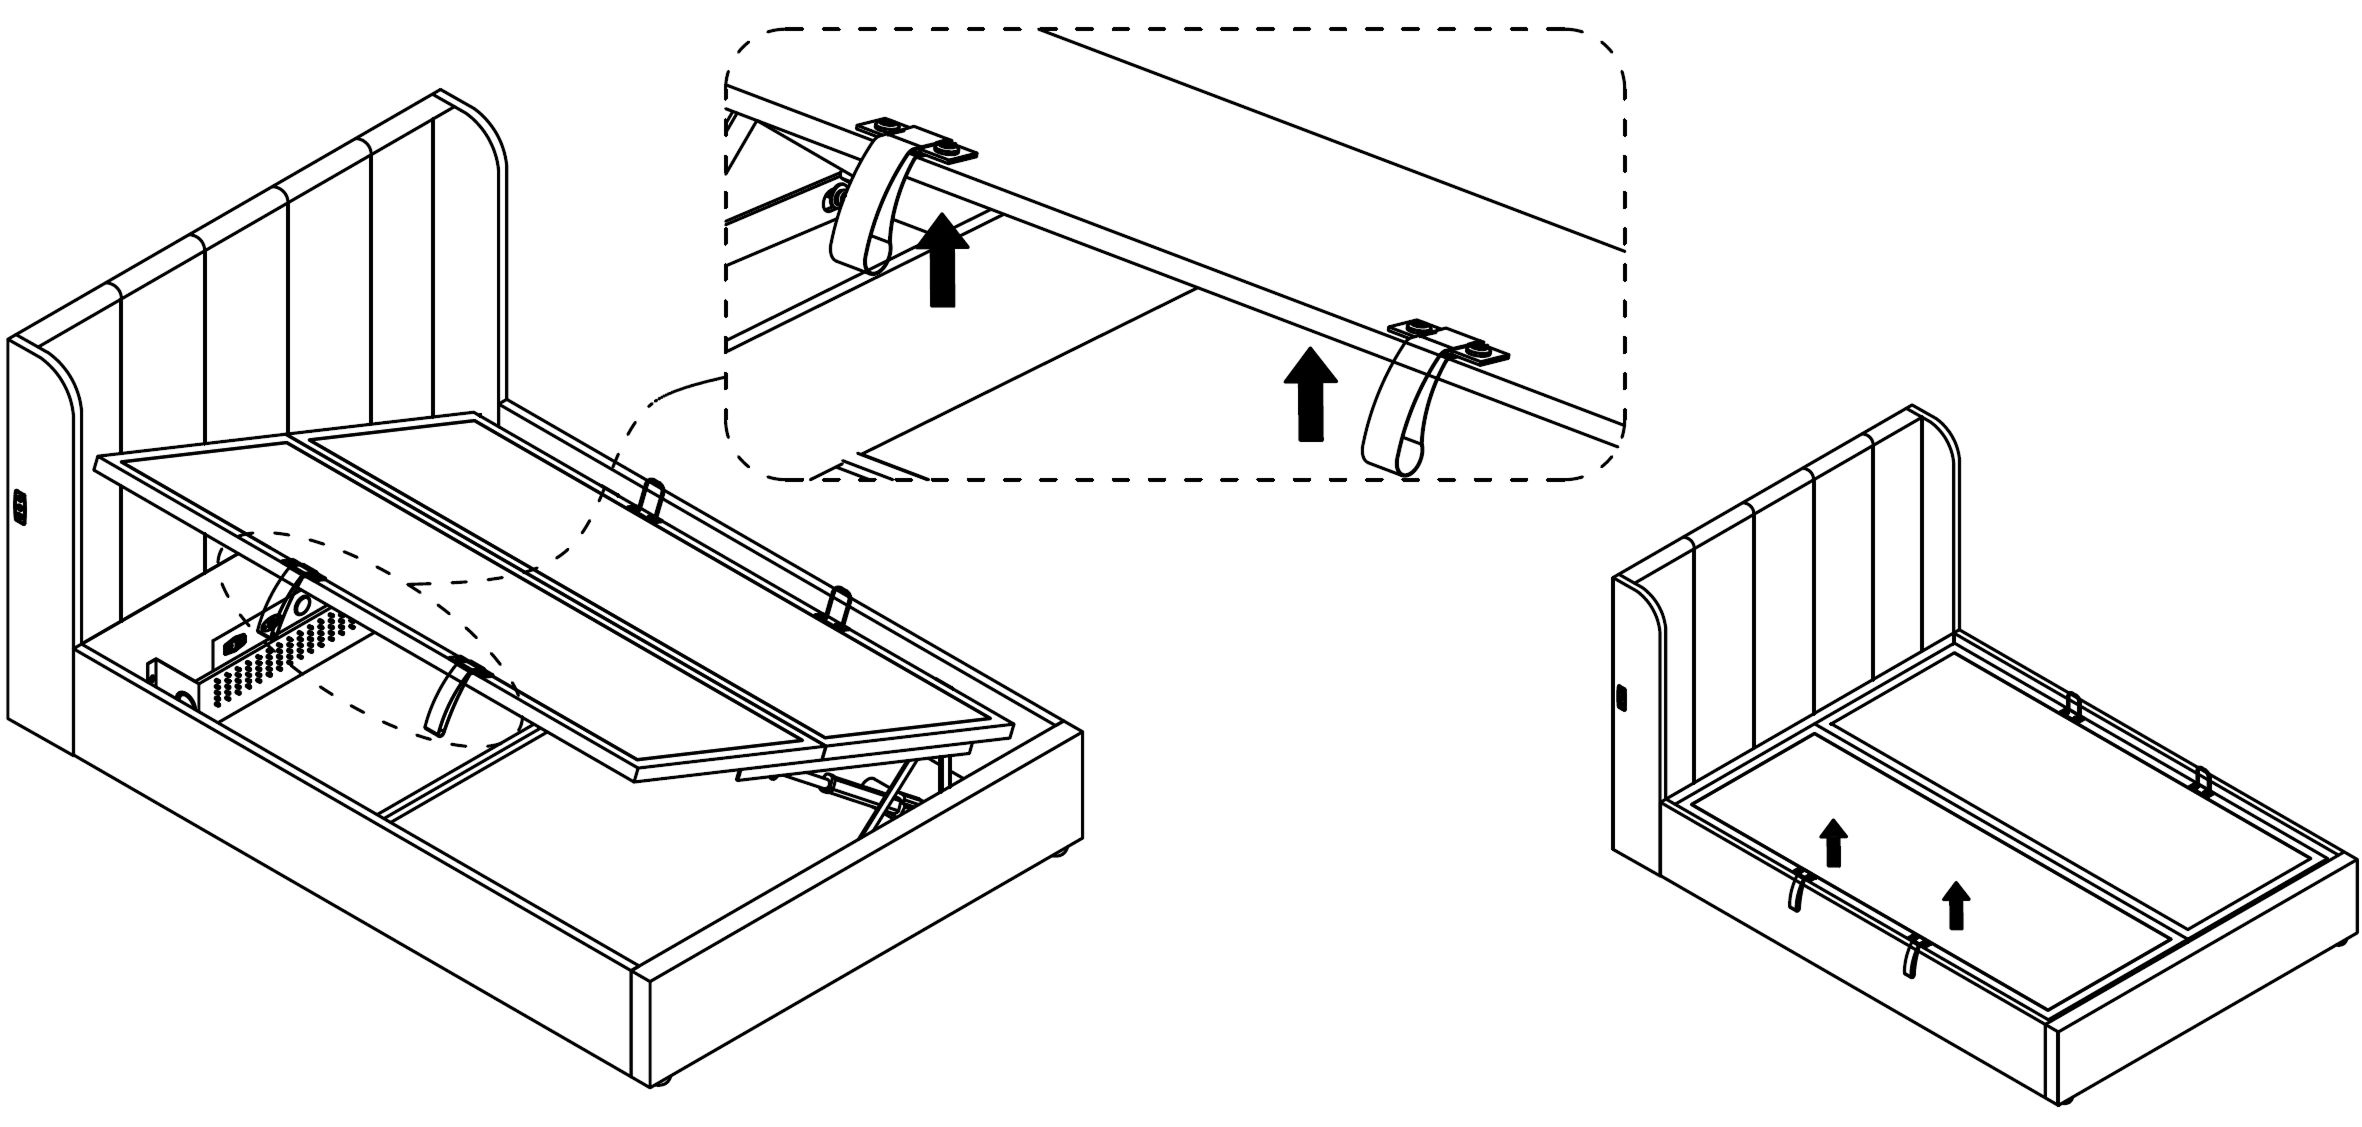
25. Emergency Lifting
When emergency access to the storage area is required, for example if the bed does not lift or there is a power cut, follow the steps in the "Emergency Lowering" section.
Caution:
Lift the mattress base using the fabric hand straps only.
This operation requires two people.
When the mattress base is raised, ensure it is fully supported by a second person at all times.
Once access to the storage area is complete and items have been removed, carefully lower the mattress base back to its closed position using the hand straps.
Previous stepCopy link to sharePrint / PDFNext step