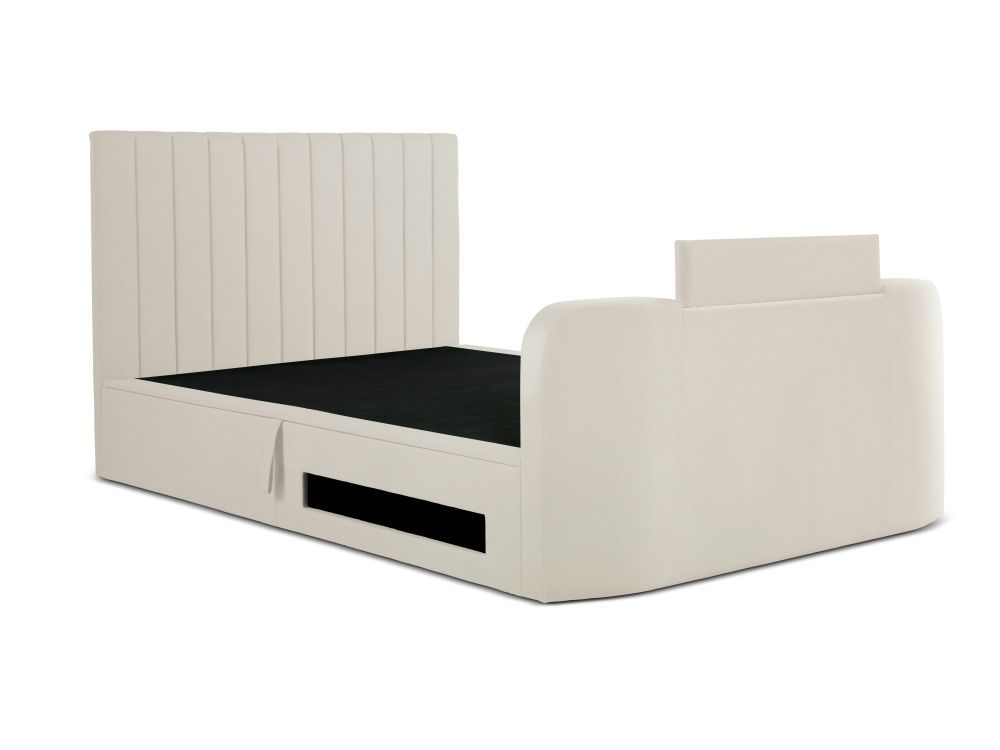
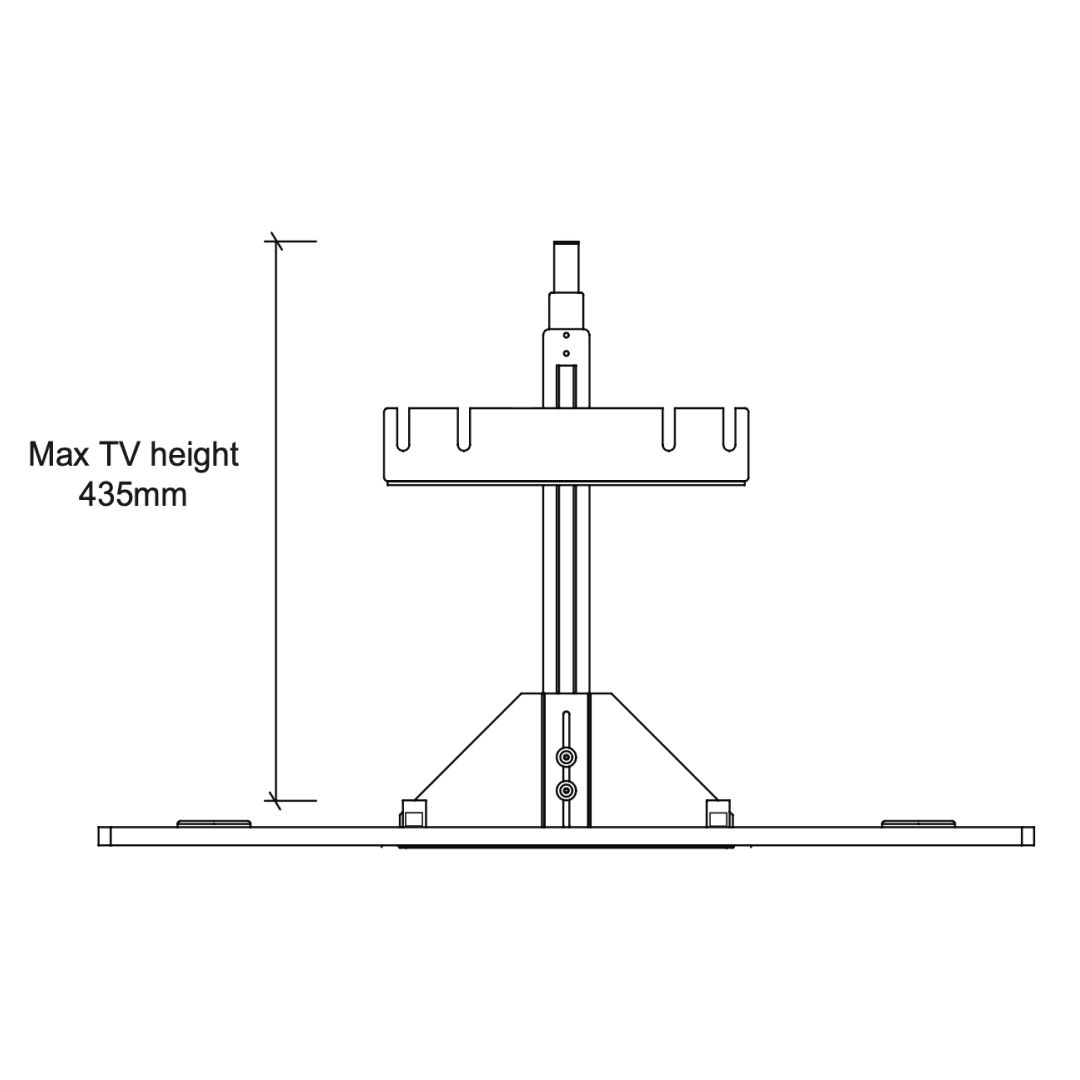
TV Lift system has a maximum load capacity of 12 Kg
Compatible with slimline LED television with a screen size of 32"
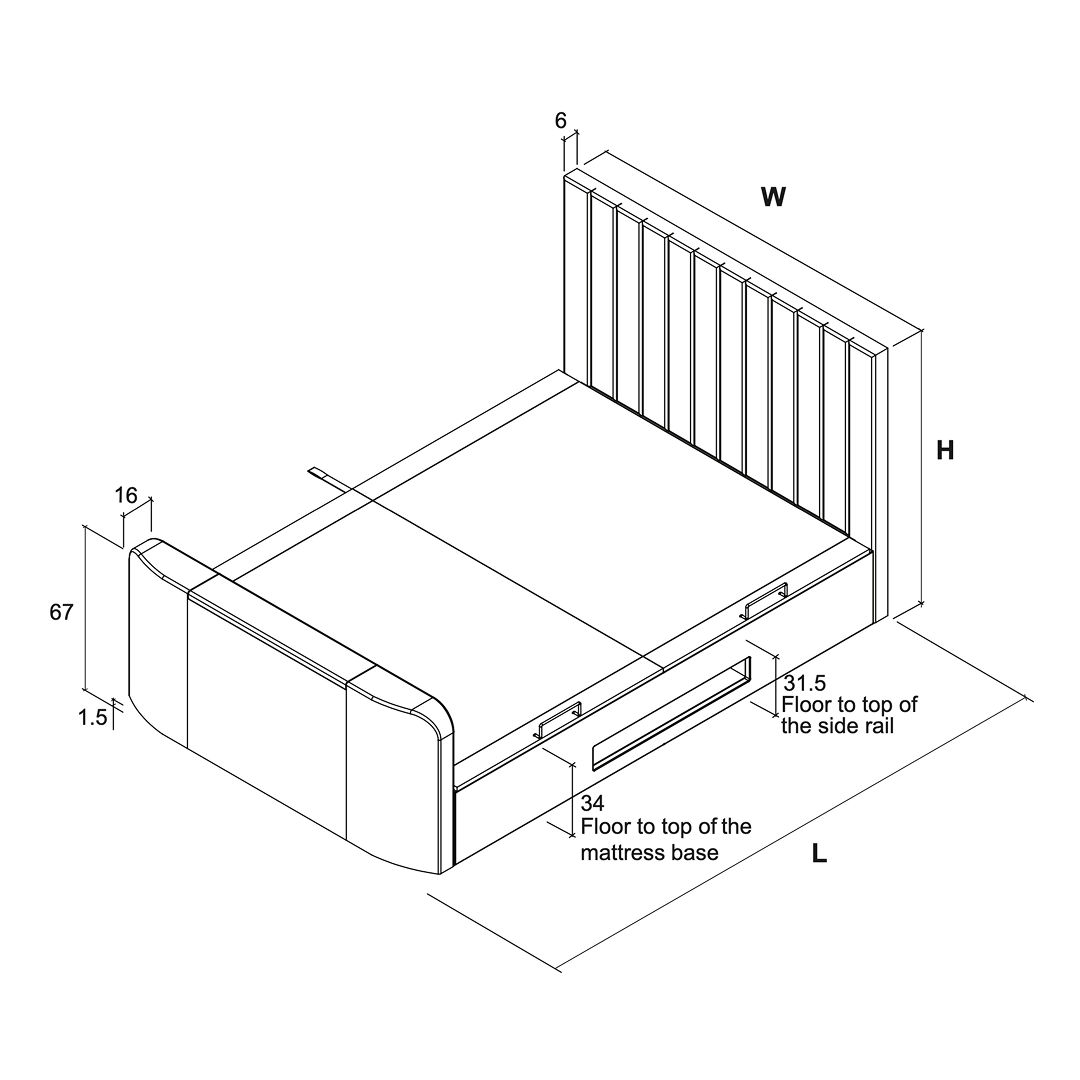
Maximum TV dimensions: W735 × H435 x D65 mm
Maximum TV Dims (WHD cm)
73.5 x 43.5 x 6.5
Tools
Parts
1
Headboard
1
2
Footboard
1
3
Side Rails With Media Tray
1
4
Side Rail Without Media Tray
1
5
Mattress Base Board
1
6
Mattress Base Board
1
7
Angled Side Rail Fixing Bracket
4
8
Mattress Stopper
2
9
Fabric Base Cover
2
10
Lift Mechanism
1
11
Lift Mechanism
1
12
Gas Lift Piston
2
13
Support Rail for Mattress Base Board
3
14
Fixing Bracket for Media Tray - LH
1
15
Fixing Bracket for Media Tray - RH
1
16
Cross Bar
1
17
Fabric Hand Strap
1
18
Metal Plate for Fabric Hand Strap
1
19
Media Tray LH Side
1
20
Media Tray RH Side
1
21
Media Tray Base
1
22
Media Tray Support Leg
2
23
TV Lift Remote Control
1
24
Main Power Lead 3 mt
1
25
Cable Clip
3
26
Cable Tie
3
1. Bed mechanism orientation
Choose wich side of the bed you want to lift up.
The mechanisms are labeled (10) & (11).
Please carefully follow the diagram below and if access is needed from left side of the bed, fit both mechanisms to right side of the headboard & footboard.
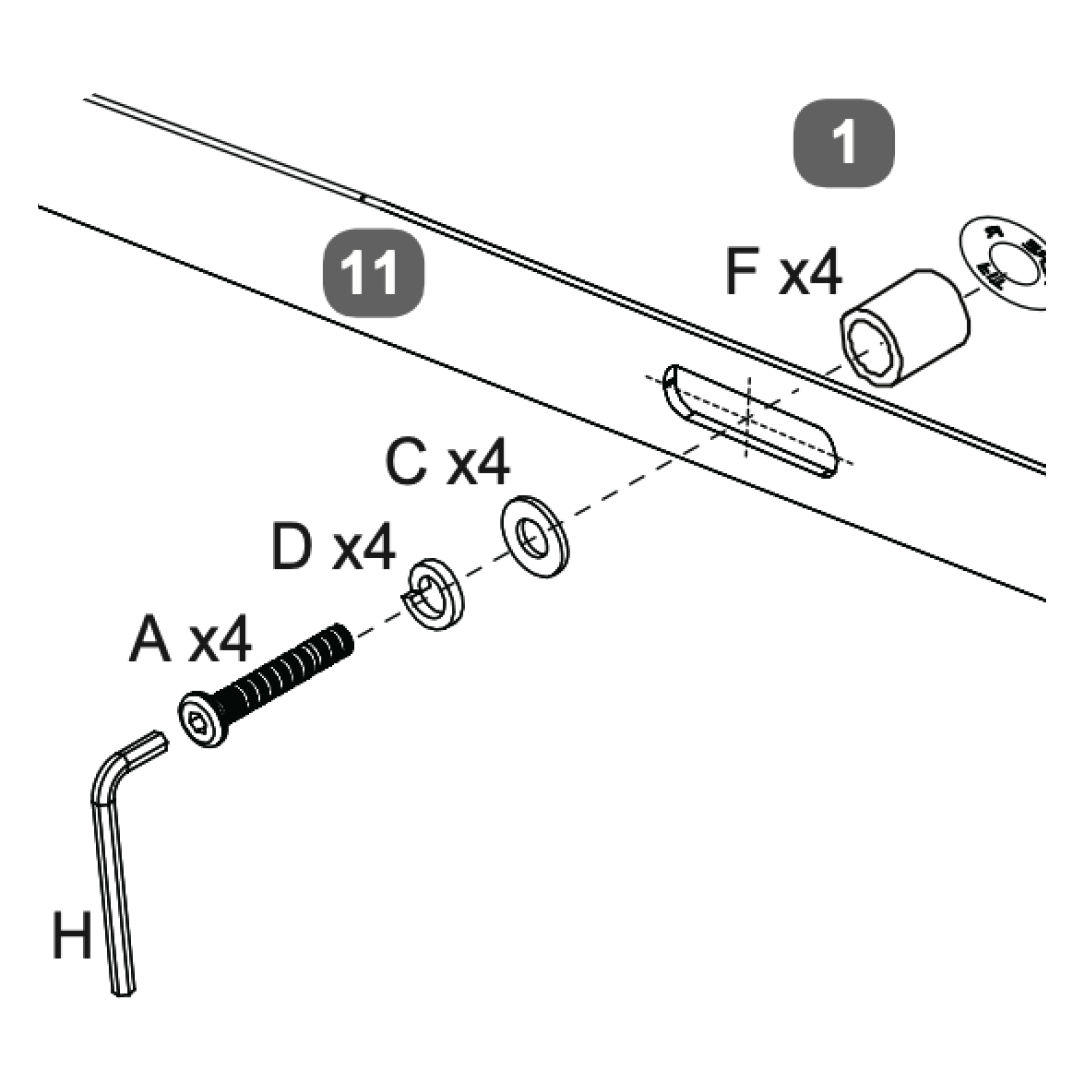
2. Headboard - Open from Left
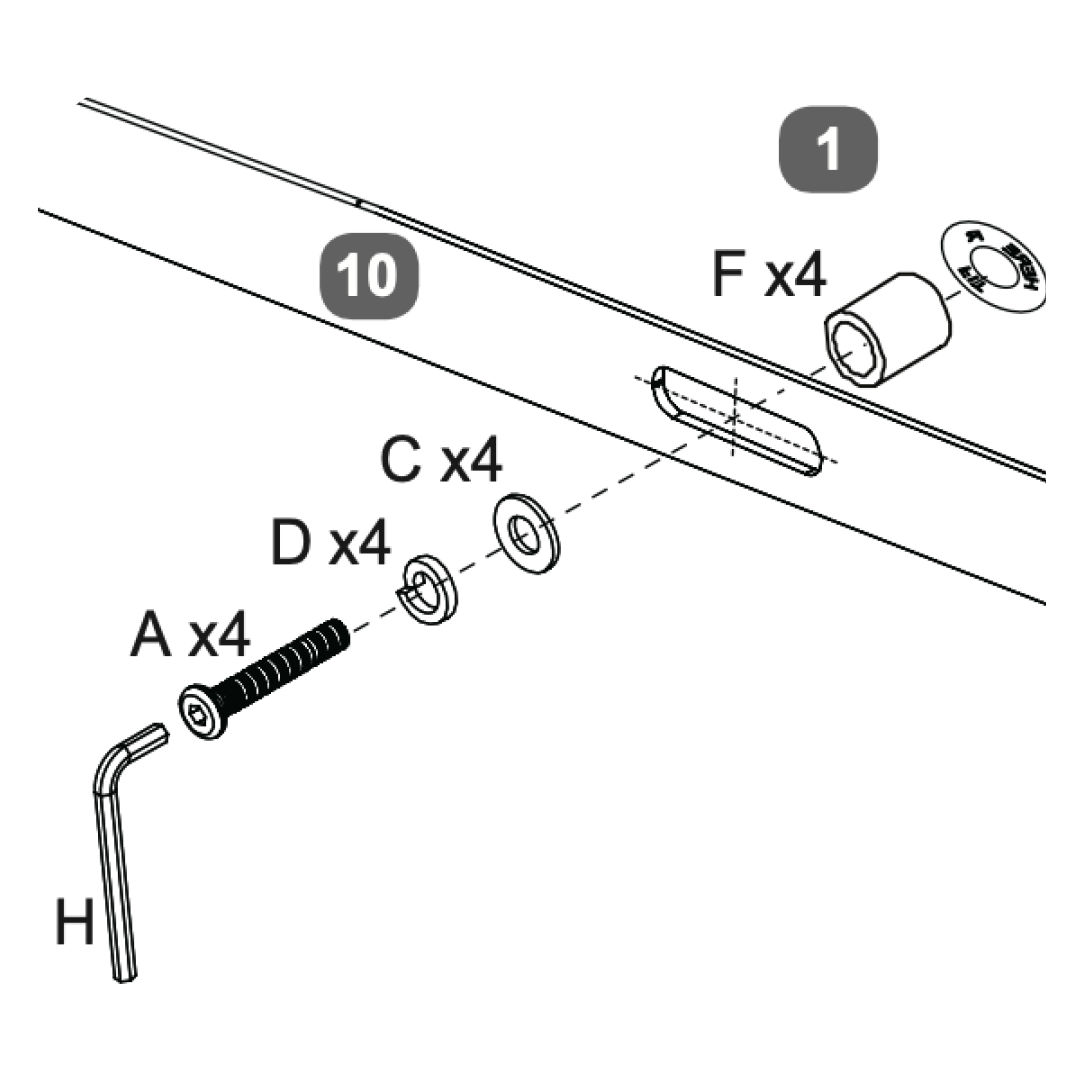
Ensure you have all necessary parts: headboard (1) and lift mechanism (10)
Gather the required tools: bolts (A), washers (C and D), nuts (F), and an Allen key (H).
Attach the lift mechanism (10) to the headboard using bolts (A), washers (C and D), and nuts (F).
Bolt into the centre of the blue labeled holes marked (R), tighten x8 bolt sets 100%.
Use the Allen key (H) to tighten the bolts securely.
Position the lift mechanism as shown in the diagram, ensuring it is aligned correctly.
Secure it with the appropriate bolts and washers.
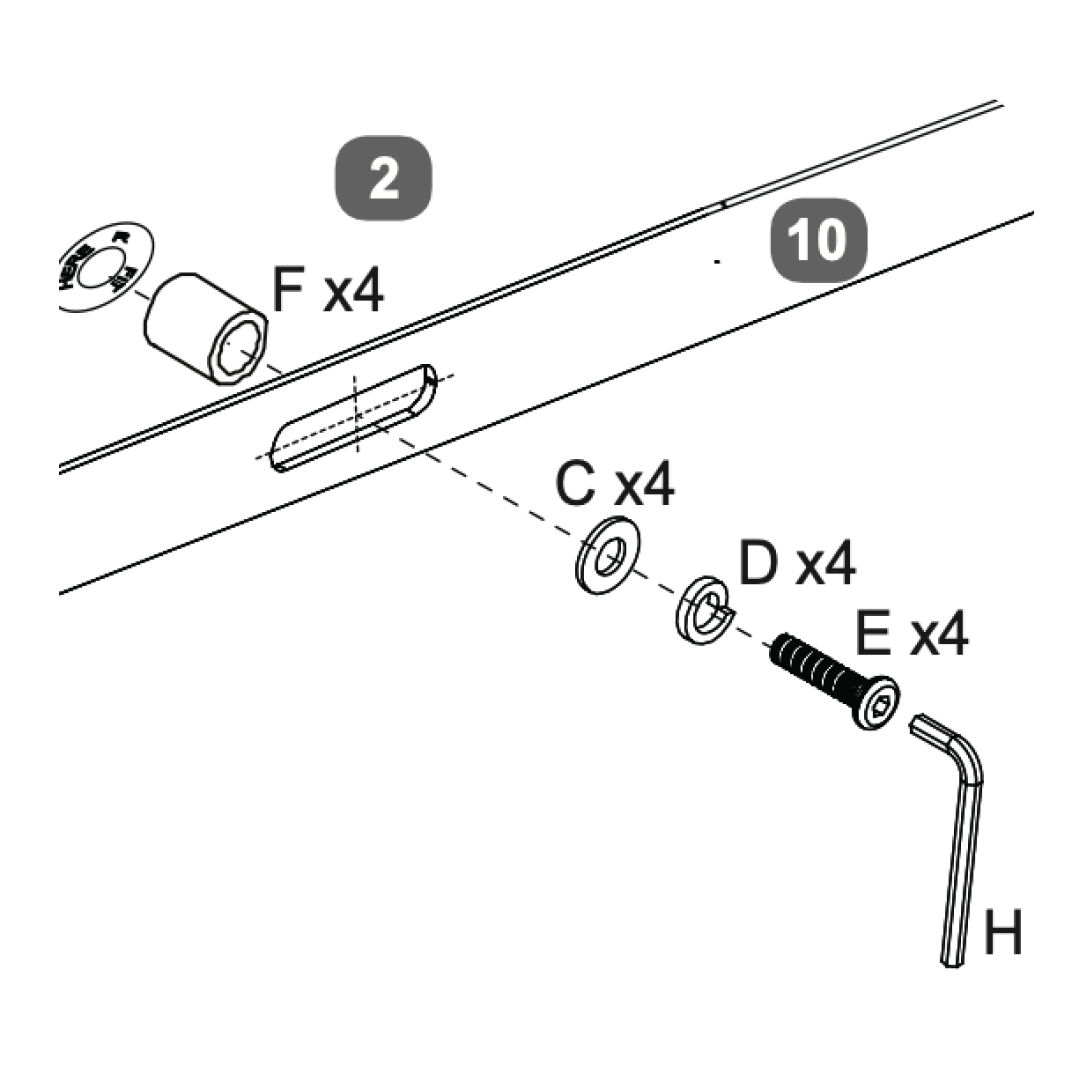
3. Footboard - Open from Left
Gather the necessary components: 4 bolts (E), 4 washers (C), 4 nuts (D), 4 spacers (F), and the Allen key (H).
Insert a spacer (F) into each of the designated slots on the footboard.
Align the lift mechanism (11) with the blue slots on the headboard.
Place a washer (C) on each bolt (E), then insert the bolts through the lift mechanism and into the spacers.
Secure each bolt with a nut (D) on the opposite side, ensuring all components are tightly fastened.
Use the Allen key (H) to tighten the bolts securely, ensuring the lift mechanism is firmly attached to the headboard.
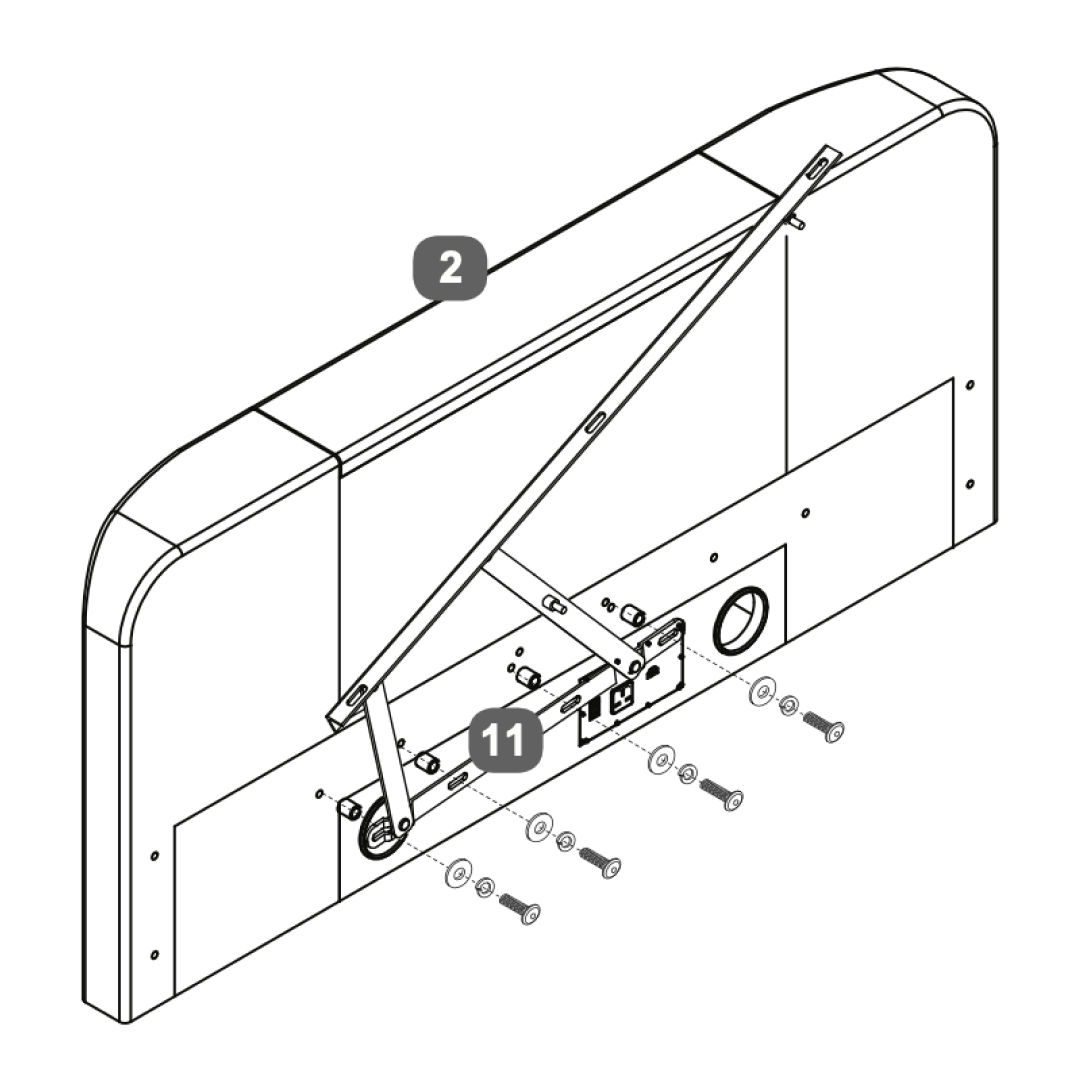
4. Headboard - Open from Right
Ensure you have all necessary parts: headboard (1) and lift mechanism (11)
Gather the required tools: bolts (A), washers (C and D), nuts (F), and an Allen key (H).
Attach the lift mechanism (11) to the headboard using bolts (A), washers (C and D), and nuts (F).
Bolt into the centres of the red labeled holes marked (L), tighten x8 bolt sets 100%
Use the Allen key (H) to tighten the bolts securely.
Position the lift mechanism as shown in the diagram, ensuring it is aligned correctly.
Secure it with the appropriate bolts and washers.
5. Footboard - Open from Right
Gather the necessary components: 4 bolts (E), 4 washers (C), 4 nuts (D), 4 spacers (F), and the Allen key (H).
Insert a spacer (F) into each of the designated slots on the footboard.
Align the lift mechanism (10) with the red slots on the headboard.
Place a washer (C) on each bolt (E), then insert the bolts through the lift mechanism and into the spacers.
Secure each bolt with a nut (D) on the opposite side, ensuring all components are tightly fastened.
Use the Allen key (H) to tighten the bolts securely, ensuring the lift mechanism is firmly attached to the headboard.
6. Attach Side Rails
Position the side rail with the media tray (3) in the oposite side of the lifth mechanism.
Attach side rails to the headboard and footboard using bolts (B), washers (C), and nuts (D).
Ensure proper alignment and secure with the Allen key (H).
Do not screw them in completely, as you will need clearance later to square the bed frame.
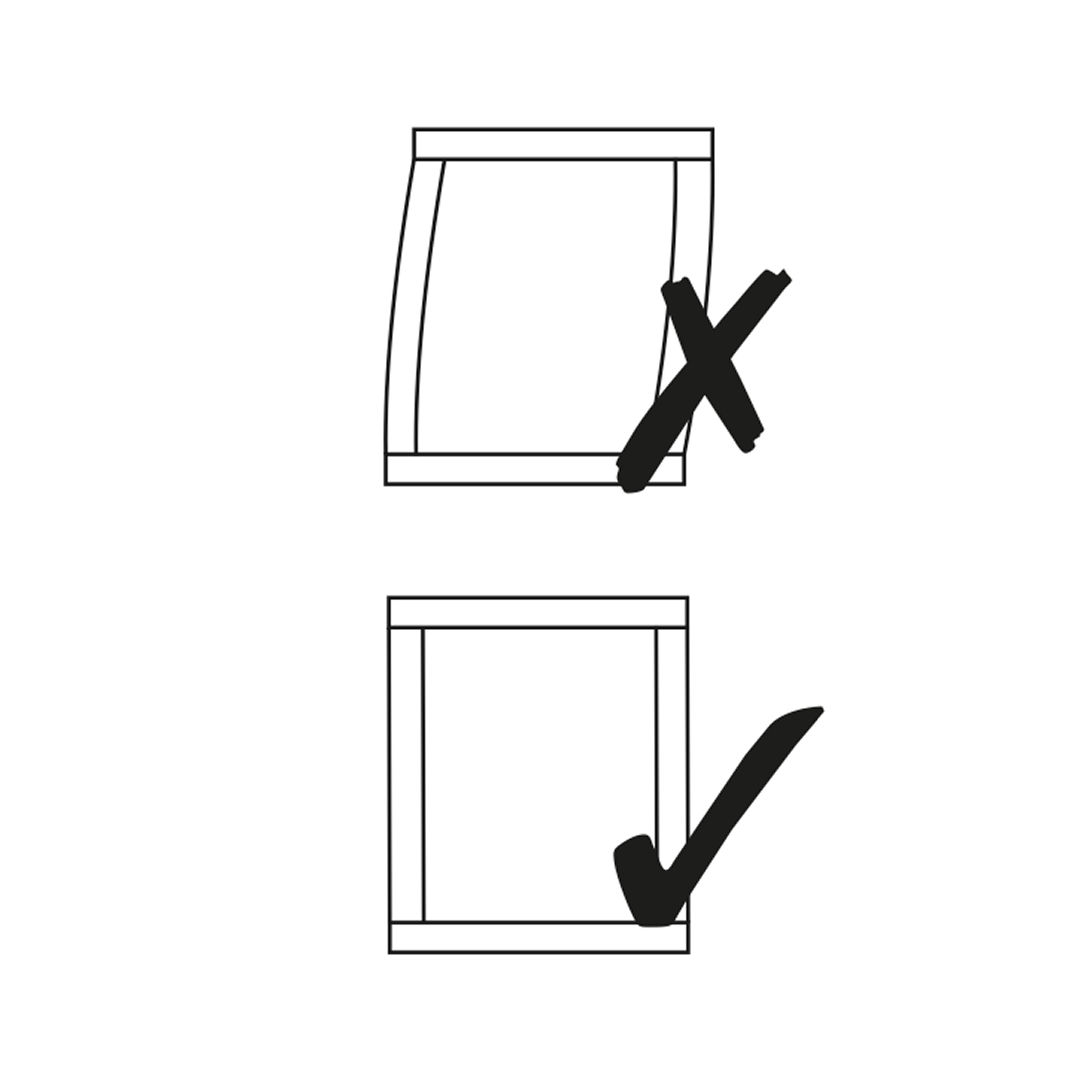
7. Cross Bar
Attach the cross bar (16) to side bards using bolts (B), washers (C), and nuts (D).
Make certain the bed is squared up as shown in the diagram then tighten all bed assembly bolts 100% using Allen key (H).
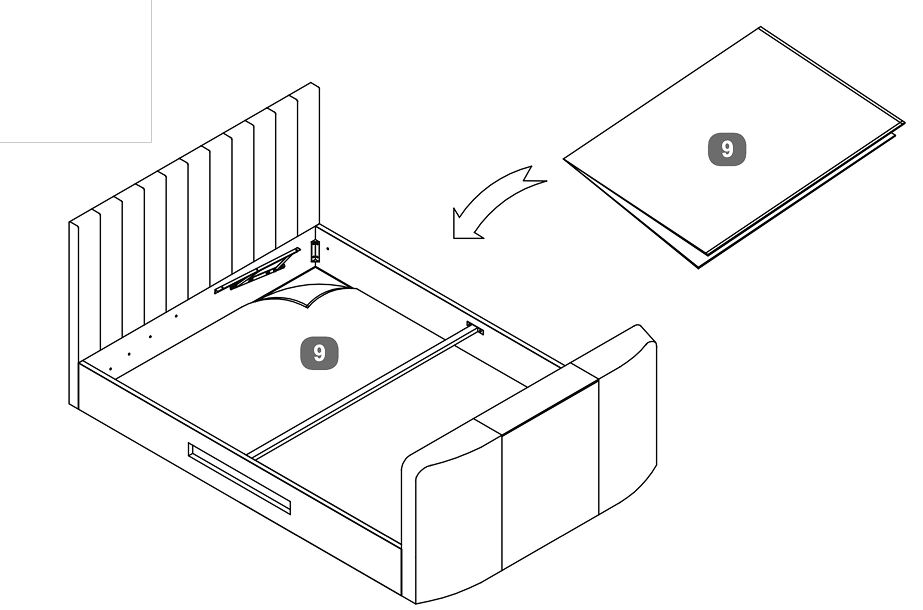
8. Fabric Base Cover
Position the fabric base cover inside the bed frame, ensuring they align with the frame's interior structure.
Gently lower the cover into place, ensuring they fit securely and evenly within the frame.
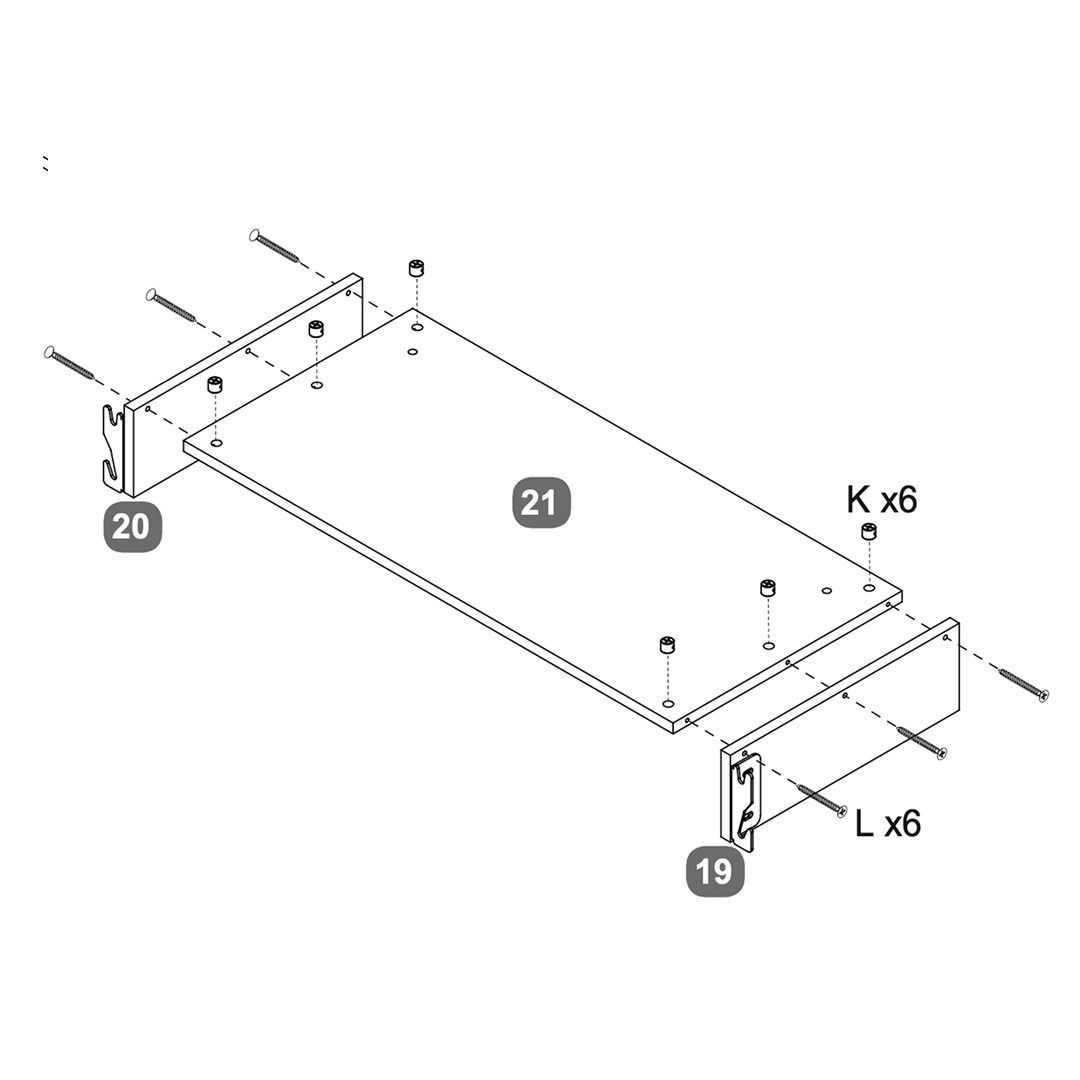
9. Media Tray
For each fixing bracked (14 and 15), use two bolts (B), two washers (D), and two nuts (C) to secure the brackets to the panels.
Align tray sides (19 and 20) with the media tray base (21).
Use six screws (K) to secure the panels together.
Ensure the brackets are properly aligned and fastened with six screws (L).
Attach tray support legs (22) to the assembly using two screws (E).
Ensure the media tray structure is securely fastened and aligned.
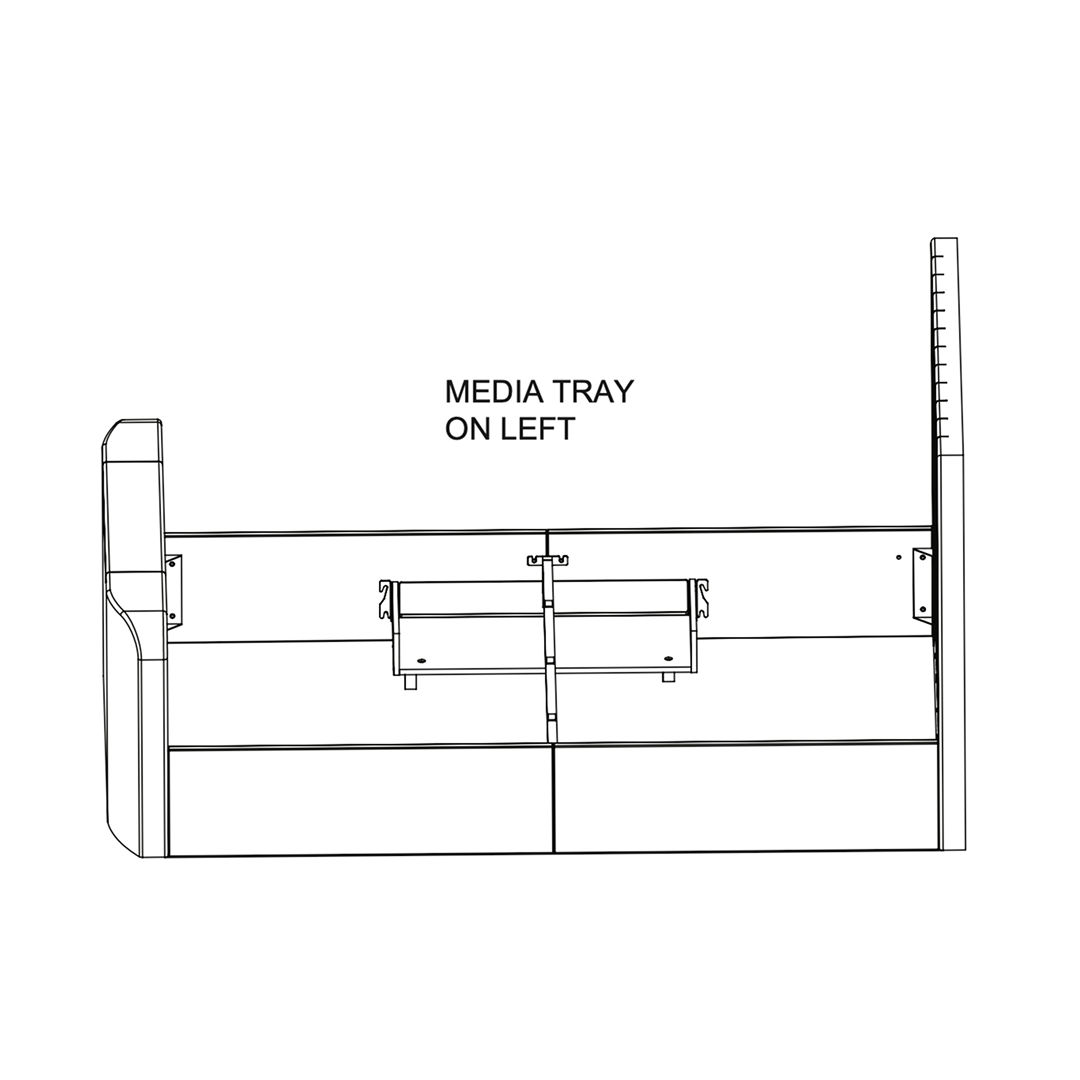
10. Attach Media Tray
Choose whether to place the media tray on the right or left side of the bed frame.
Secure the media tray to the chosen side using bolts (B) and washers (C) provided
Ensure all components are tightly fastened and properly aligned
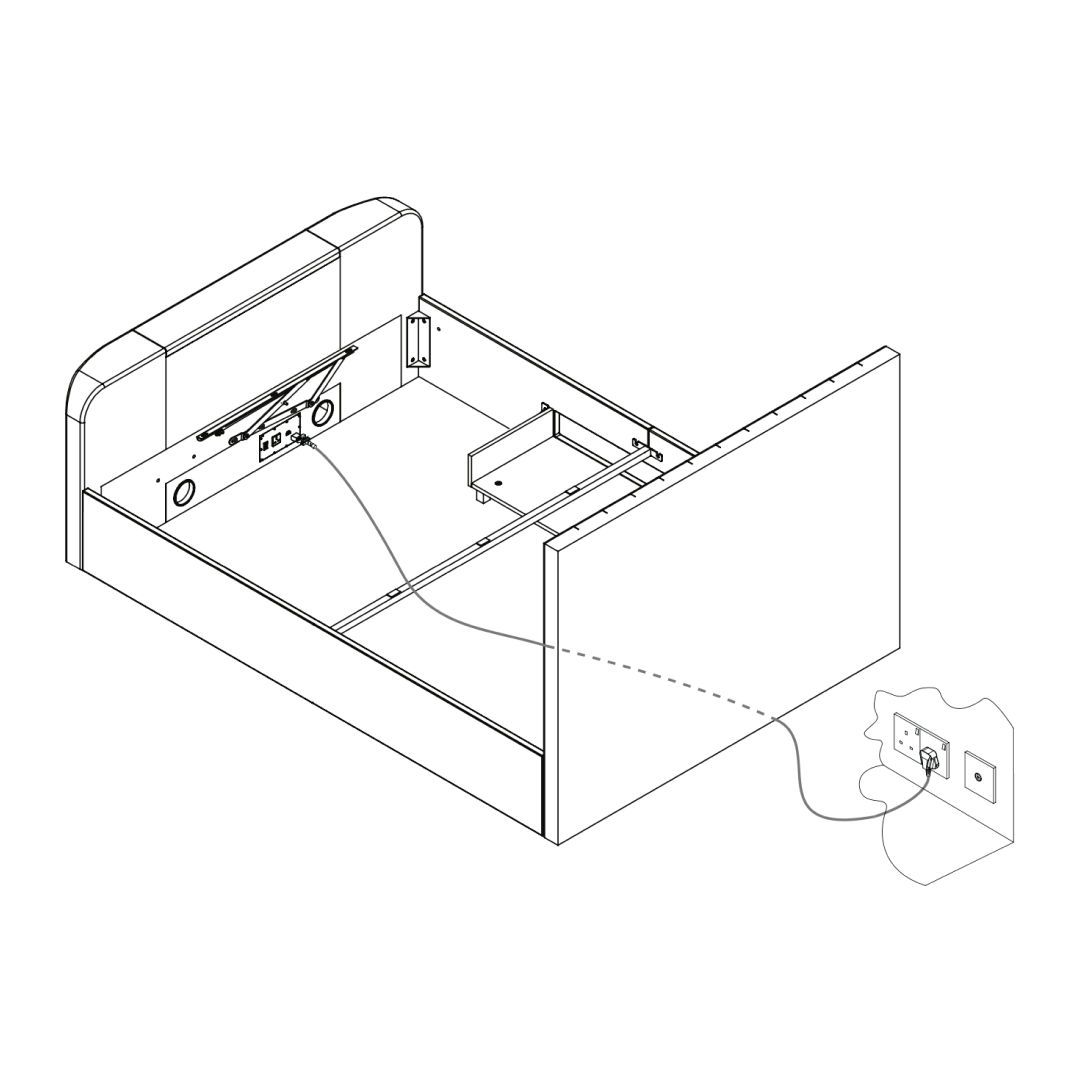
11. TV Lift Power Cable
Attach the power cable to the TV lift mechanism at the headboard.
Connect the power cable to the nearest electrical outlet - for safety, this must be an earthed supply.
Use the handheld remote control to operate the TV lift. Press the “UP” button to raise the TV lift.
12. Media Cables
Pass the TV power and media cables through the side holes of the footboard.
For illustration only, cables should be fitted to suit the positions of the ports in your own TV.
Media cables are not supplied.
13. Setting the TV Height
Height of TV is normally pre-set - follow this guide if it needs to be changed.
Loosen the two bolts.
Measure the height of the TV
Adjust the lid lifter column adding 5mm to height of the TV. Re-tighten the two bolts.
The upper part of each support (P) slides to hold front of TV in place.
Please follow the instructions on how to correctly set these supports the following step.
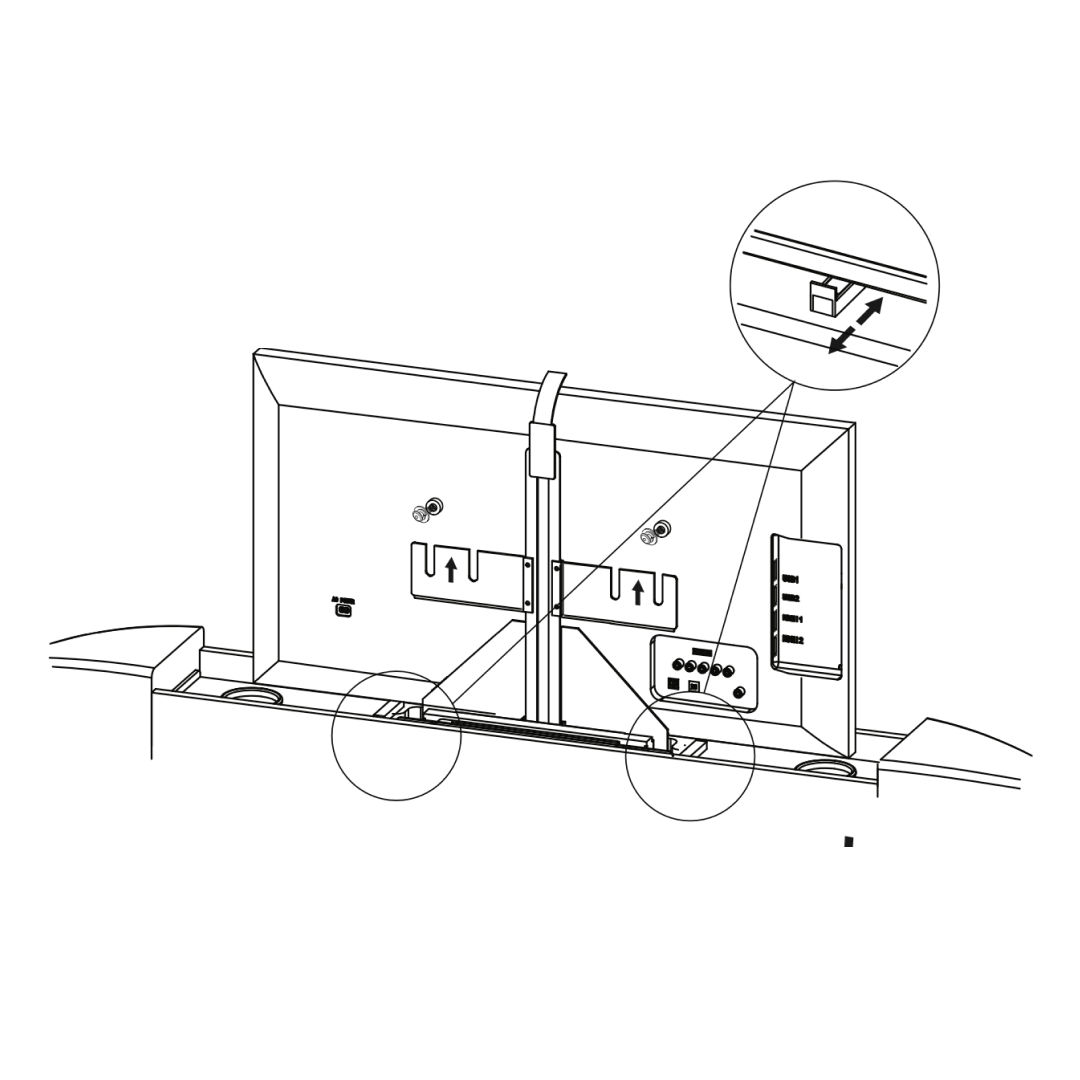
14. Fitting the Television
Check the hardware supplied with TV and if Vesa bolts and spacers are supplied please use these to fit your TV.
When spacers are provided it is very important that these are fitted in the correct place, fit between TV & TV bracket, as in this sketch. These are needed to keep the TV screen vertical.
To adjust the two TV supports (P), stand the TV in position and loosely secure it to the bracket using the relevant hardware.
Each slider should be set to just touch the front bezel of the television. To make sliding each support easier, lift the TV slightly, above the support being adjusted.
Once supports are set, lightly push down on top of centre of the TV and tighten the two Vesa bolts 100%, these should be in the centre of the long holes as shown.
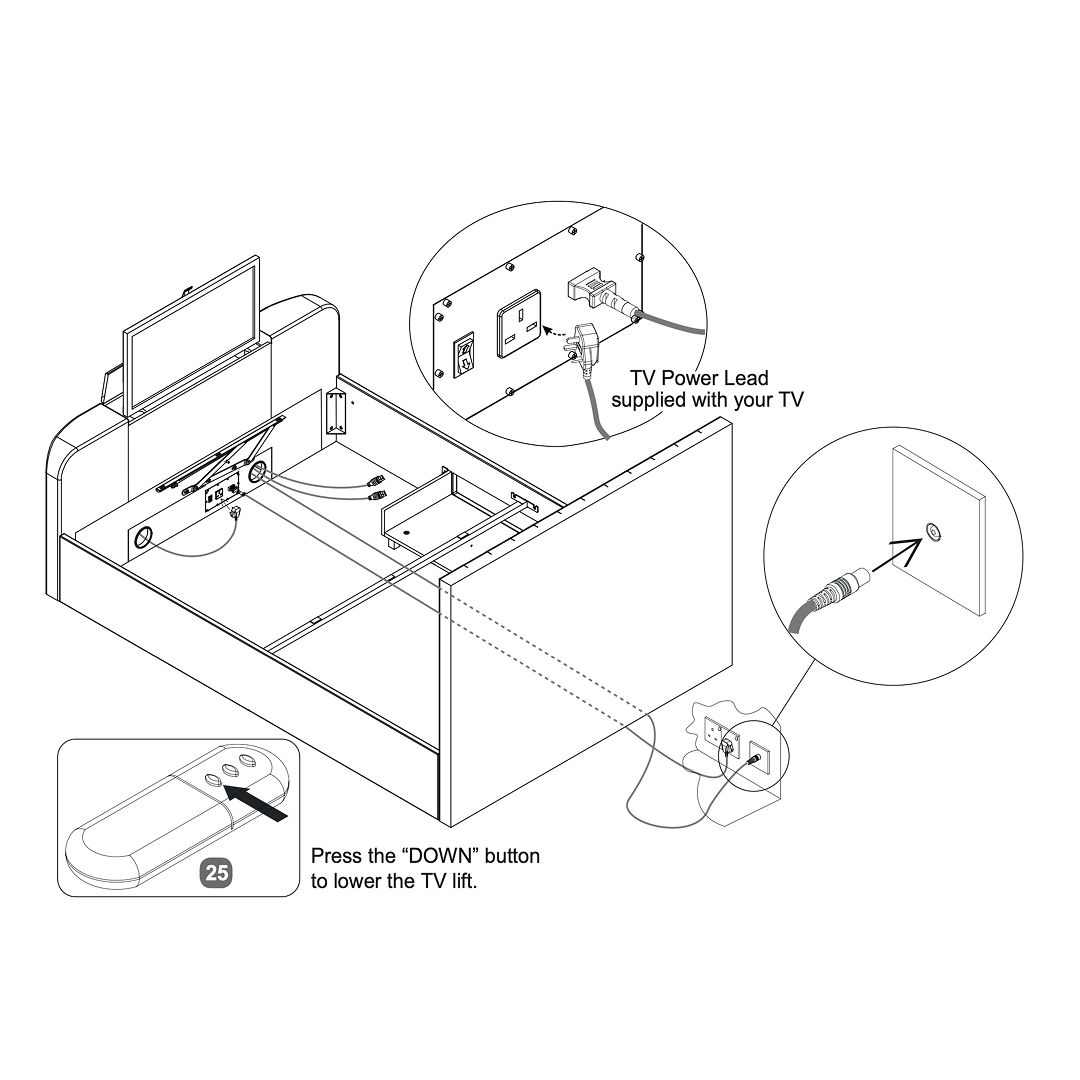
15. Connect the cables
Connect the TV power lead supplied with your TV to the power outlet.
Ensure the media cables are properly connected through the designated slots in the footboard.
Use the remote control to press the "DOWN" button, lowering the TV lift mechanism into the bed frame.
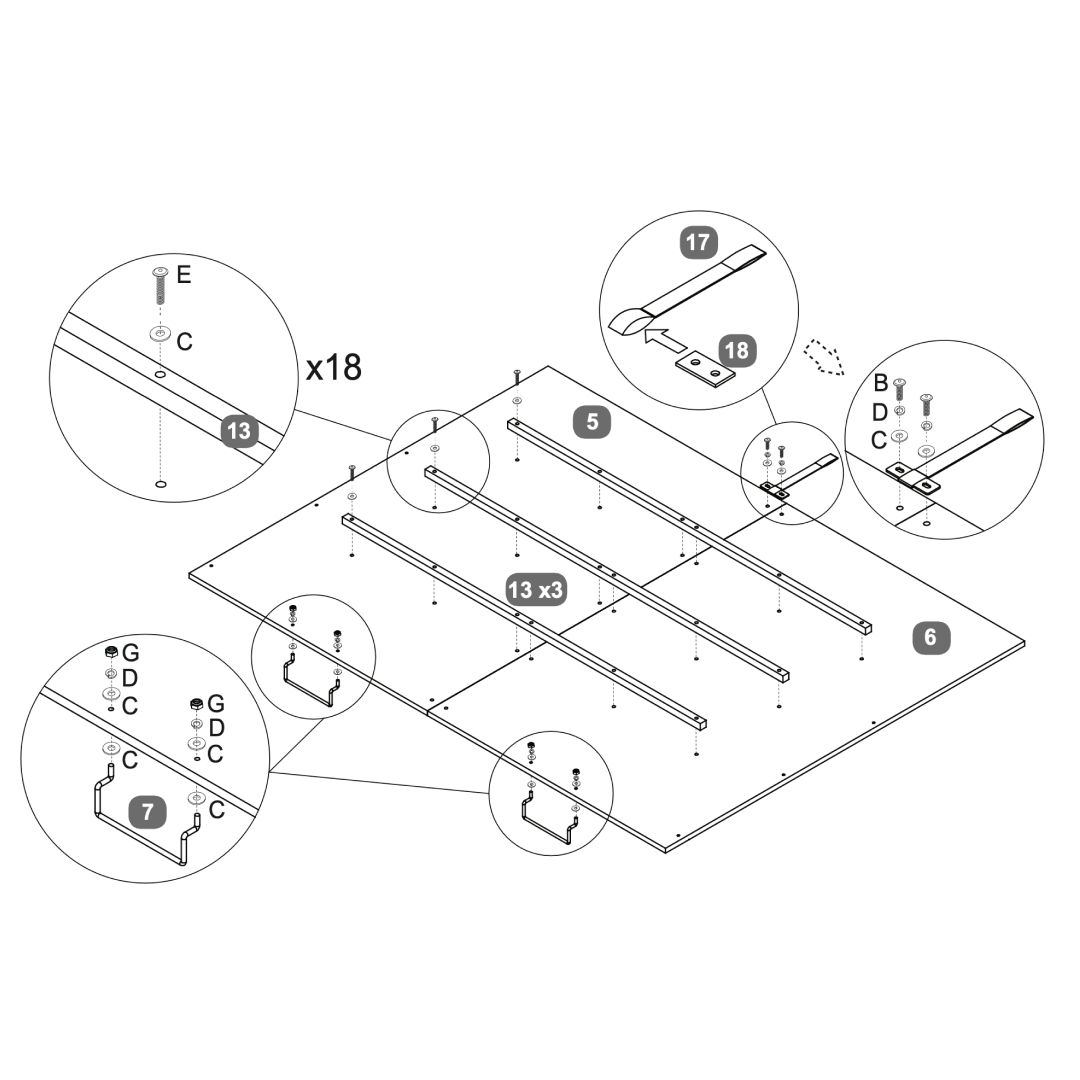
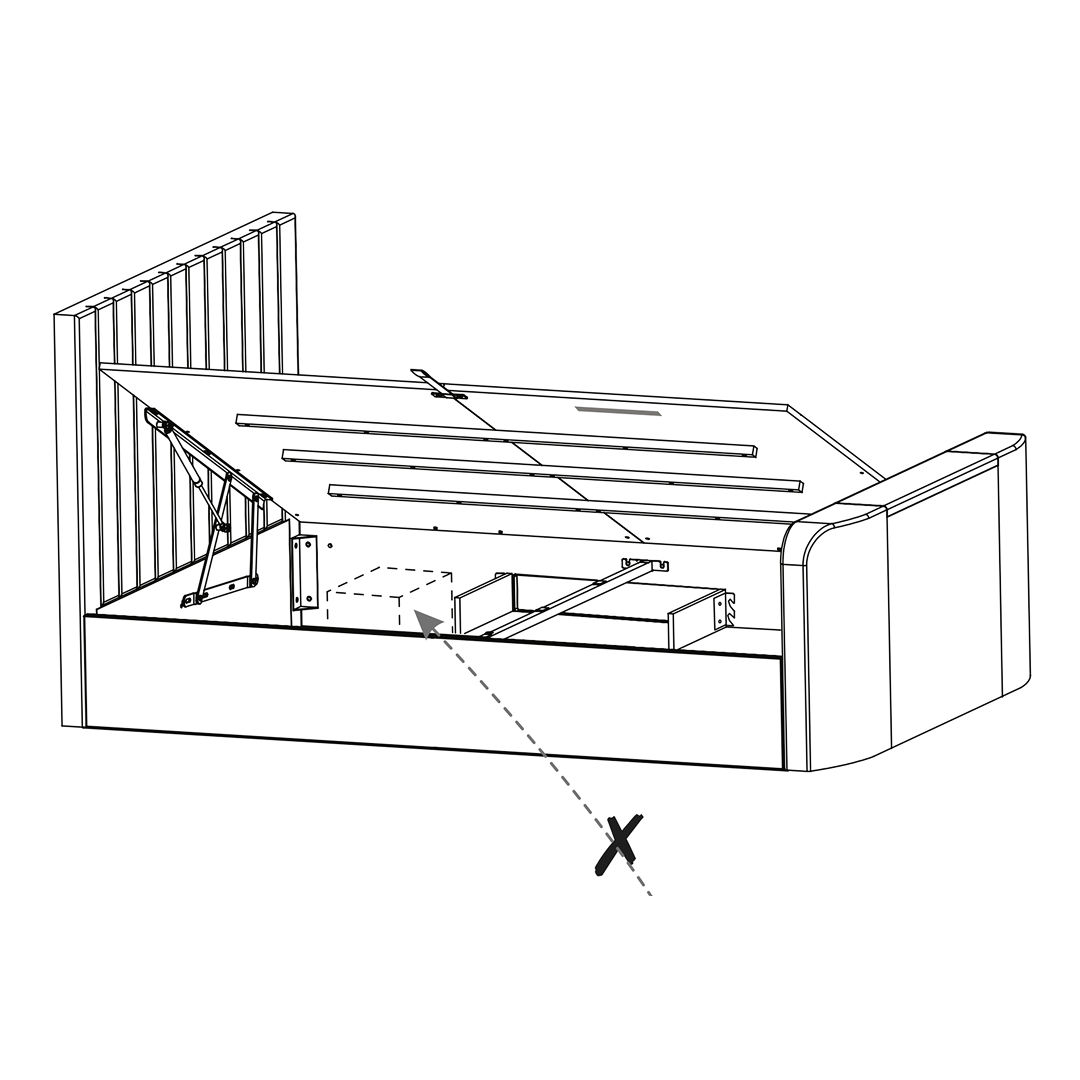
16. Assemble the Base
Place the base panel (6) on a flat surface.
Align the three support rails (5) on the base panel.
Secure each support rail using screws (13) and washers (C). You will need 18 screws in total, with 6 screws per rail.
Attach the brackets (7) to the base panel using screws (C), washers (D), and nuts (G).
Install the side support bars (17) by securing them with screws (B), washers (D), and nuts (C).
Ensure all components are tightly secured and properly aligned.
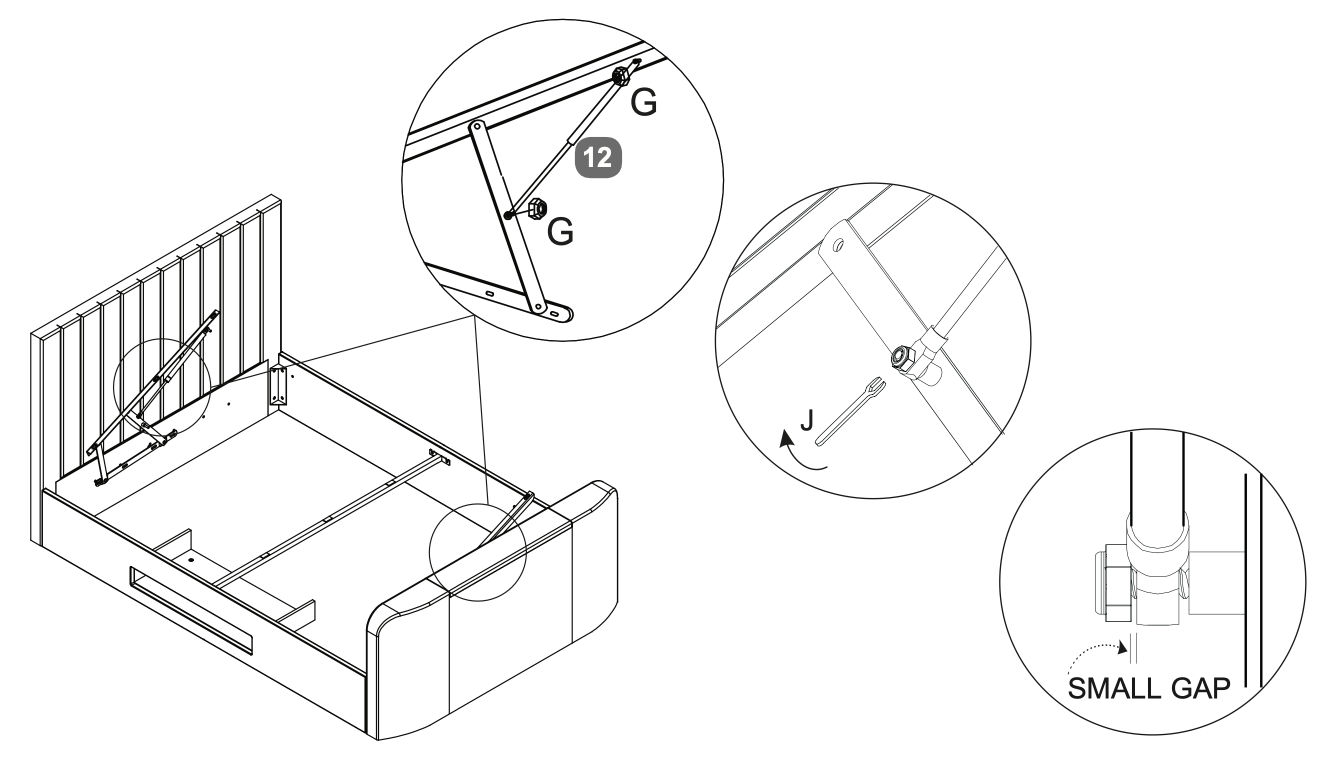
17. Secure the lift mechanisms
Secure the lift mechanisms using bolts (G) and ensure they are tightened with a wrench (J).
Check that the mechanisms are aligned correctly with the headboard and footboard.
Leave a small gap as indicated in the diagram to ensure smooth operation.
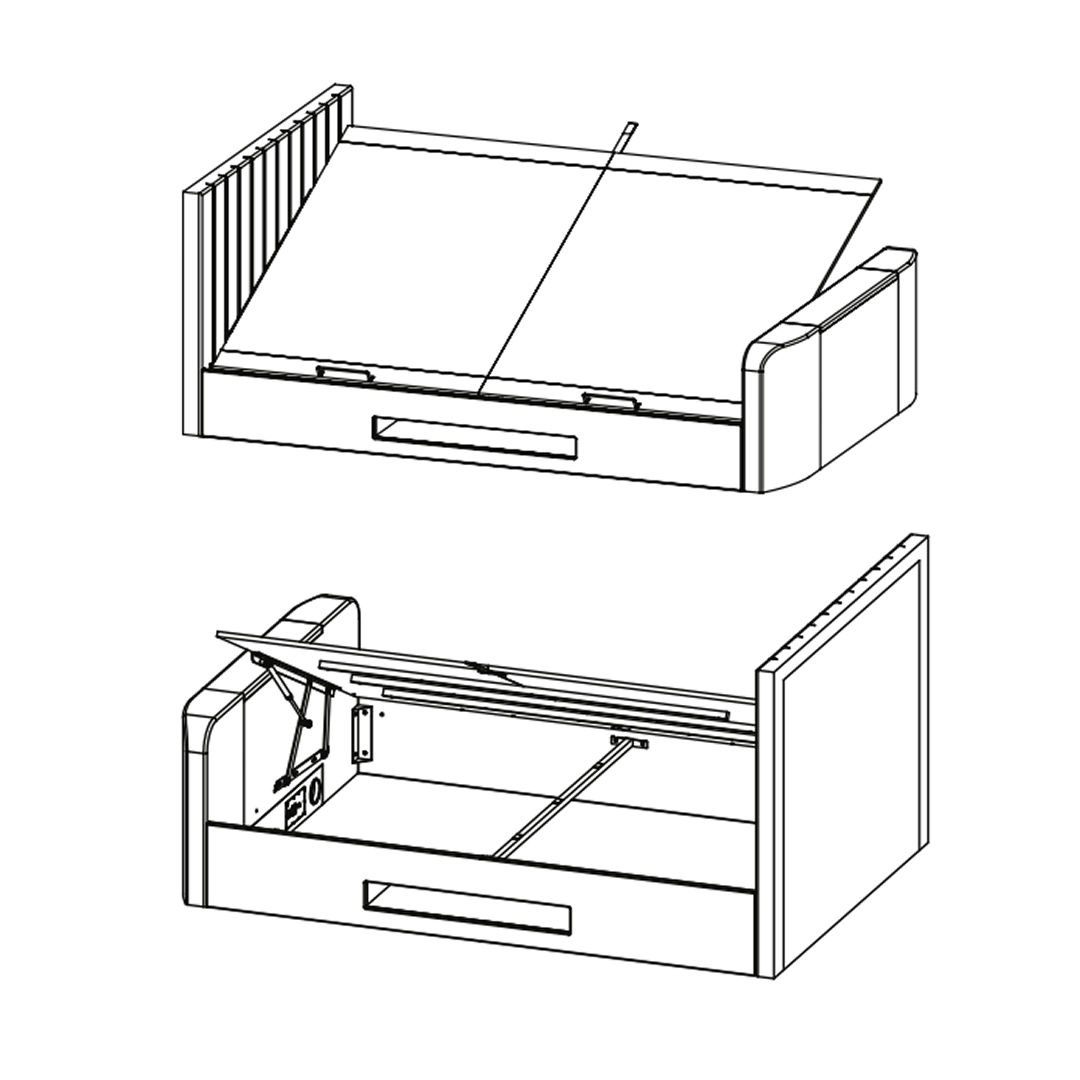
18. Attach the Mattress Platform
Position the lift mechanism on the side of the bed frame as shown in the first image.
Use the provided bolts (B), washers (C), and nuts (D) to secure the mechanism in place.
Tighten the bolts using the Allen key (H) to ensure the mechanism is firmly attached.
Align the mattress platform with the lift mechanism.
Ensure the platform is properly seated and secured to the lift arms.
Gently lift the mattress platform to test the lift mechanism, ensuring that the platform stays in place when lifted.
19. Final Checks
Before lifting the mattress base board, place a mattress in position.
Without a mattress in place, the speed of movement is quick and may cause injury so great care is needed.
Carefully lower the mattress base with the fabric hand-strap ensuring the edges of the boards are aligned with the outer edges of the side panels.
If not aligned, check bed is still square and if it is, but gaps are still not even, re-align.
Depending on the weight of the mattress, the rising speed will vary so be careful until you get used to the speed.
Always use the hand-strap to lift or lower the mattress base - keep fingers well away from the moving parts.
When the bed is fully assembled, and the mattress is in position, please raise & lower the ottoman slat-frame 4/5 times to ensure the gas pistons are fully lubricated.
Previous stepCopy link to sharePrint / PDFNext step