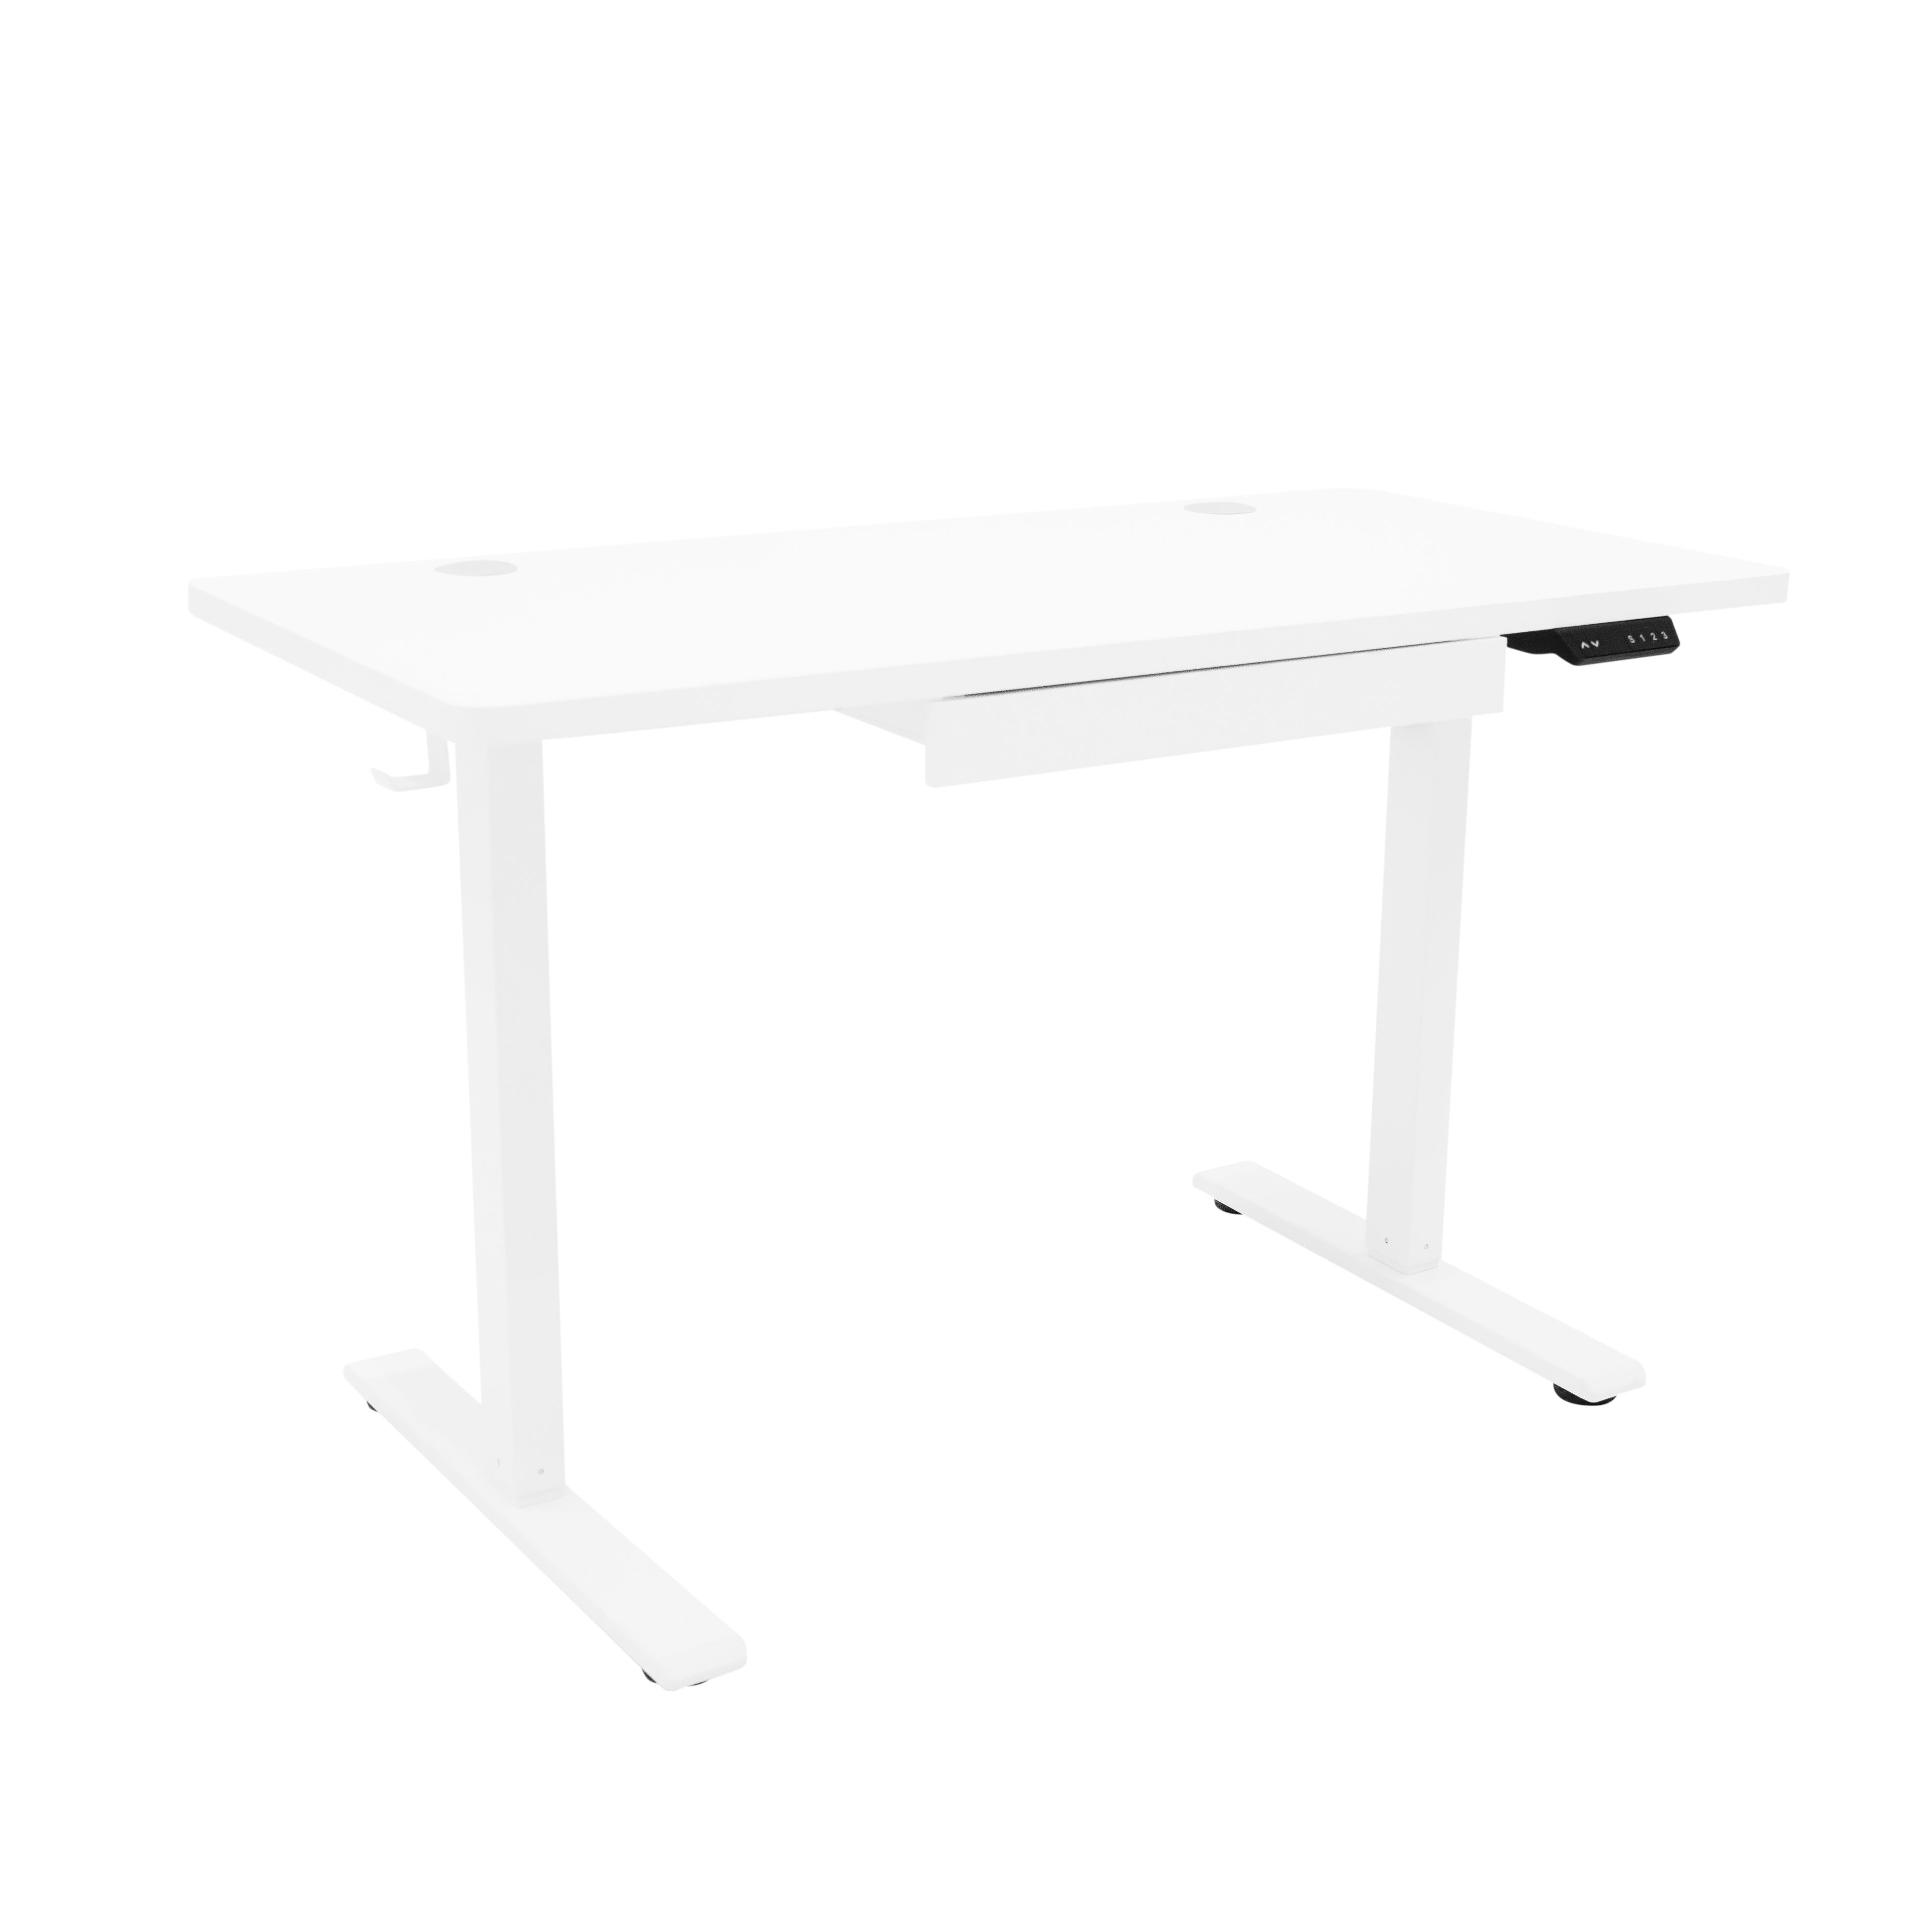
 Instructions by monstershop Standing Desk - 120/140 cm 214716, 214717 -
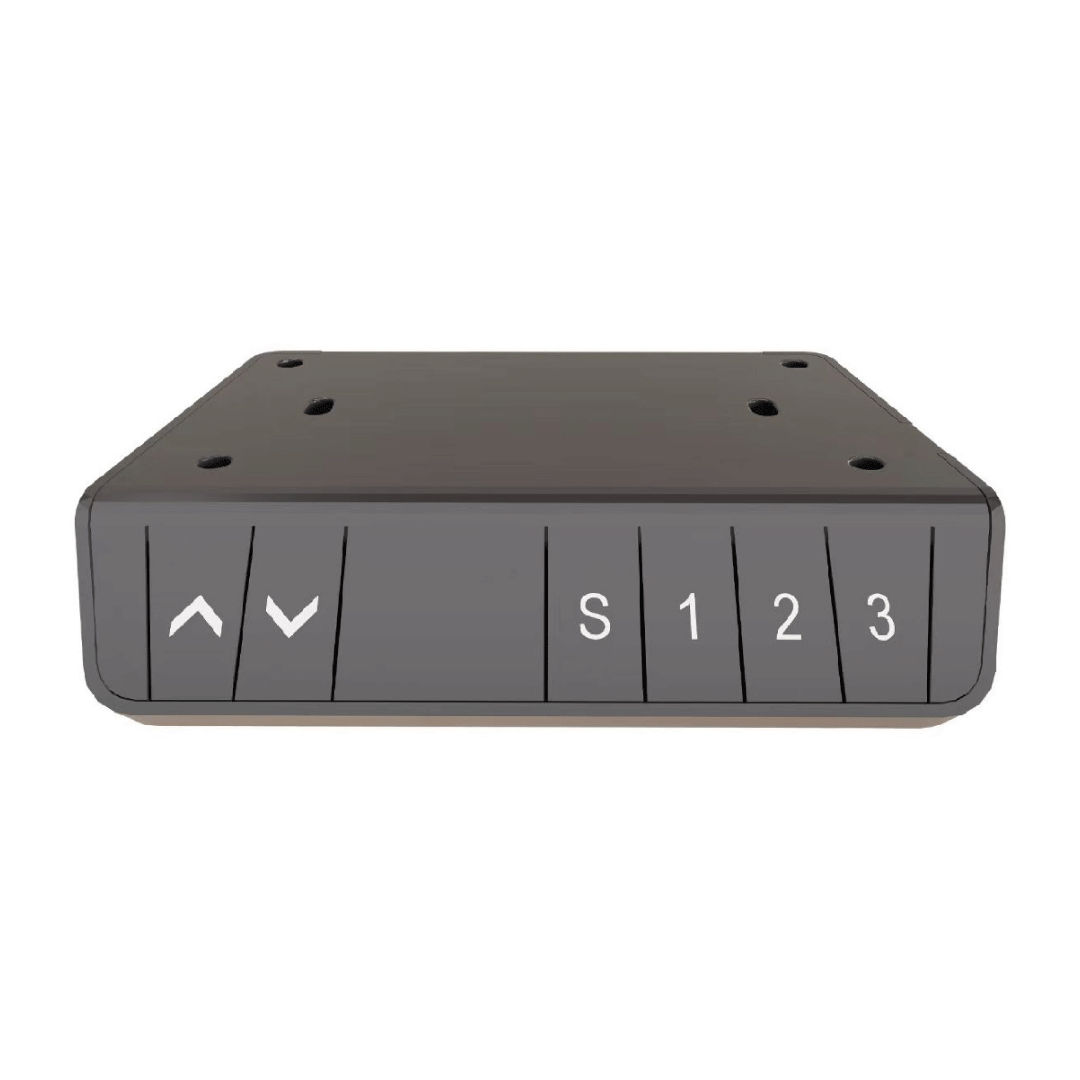
1. Operating Instructions Before using the desk for the first time, please follow these instructions to reset the desk (RST mode). Resetting the desk can help with certain error codes; please check the error code table.
- To reset the desk, press and hold the “DOWN” key until the motor stops, then release the key.
- Press the “DOWN” key again, and hold it for at least 5 seconds to enter the reset mode.
- Keep pressing the “DOWN” key until the buzzer beeps, which indicates that the reset was successful.
Please do not release the key early, as this will interrupt the reset of the desk.
-
2. Up and Down Keys
- When the “UP” key is pressed and held, the desk rises until it reaches the highest point possible.
- When the “DOWN” key is pressed and held, the desk lowers until it reaches the lowest point possible.
- When the “UP” or “DOWN” key is pressed only for a short time, the desk rises/lowers according to how long the key is pressed.
-
3. Setting Memory Height The system allows for 3 different memory heights to be stored at the same time.
- To have the system memorise a specific height, please start by raising/lowering the desk to the desired position.
- Then press the “S” key. The Digital Control Panel will show “S-”, and “-” will flash.
- Now you can press any key number 1/2/3 to memorise the current desk position.
Whenever you want the desk to reach a memorised height, you only need to press the corresponding number key. To interrupt this process, press any key.
-
4. Set Max and Min Height Limits
- Bring the desk to the height you would like to set as either the highest point (MAX) or the lowest point (MIN).
- Then press and hold the “UP” and “DOWN” keys at the same time for 5 seconds, until you hear a buzzer sound, indicating that the chosen height has been saved successfully as your MAX/MIN.
To delete the memorised height limits, you can either reset the system entirely or let the desk rise/lower to its height limit (MAX/MIN) and press and hold the “UP” and “DOWN” keys at the same time for 5 seconds, until the buzzer sound indicates that the height limit has been deleted successfully.
-
5. Factory Reset When the system needs to be restored to factory settings, press and hold “UP” and “DOWN” at the same time for 10 seconds to hear a long buzzer prompt.
Now, the parameters are restored to factory settings, and the system is forced to complete the reset.
-
6. Operating Instructions -
7. Lock and Unlock
- Lock: Press and hold “S” and “UP” at the same time for 5 seconds; when the Digital Control Panel shows “Loc”, it means that the system has been locked, so the desk cannot be raised or lowered.
- Unlock: Press and hold “S” and “DOWN” at the same time for 5 seconds; when the Digital Control Panel changes from “Loc” to the normal display, it means the system has been unlocked.
-
8. Set Timer
- Press the “1” and “3” buttons on the digital control panel to display “x.xh” on the Digital Control Panel.
- You can then use the “UP” or “DOWN” buttons to adjust the time in 0.5-hour increments.
- The system will automatically exit this setting mode after 2 seconds.
- Once the digital display turns off, a flashing decimal point will indicate that a timer is running.
- When the set time is reached, the buzzer will sound five times, and the Digital Control Panel will automatically wake up.
-
9. Automatic Testing The Digital Control Panel allows the system to run an automatic test cycle, where it operates for 2 minutes and then stops for 18 minutes. This test cycle moves between the storage positions S1 and S2.
- To enable automatic operation in this mode, you need to set the storage position control to active by setting S-6 to 1.
- Once activated, the system will cycle back and forth between S1 and S2 for 2 minutes, pause for 18 minutes, and repeat this process indefinitely.
- To enter this mode, press and hold the “UP,” “DOWN,” and “S” buttons simultaneously for 2 seconds.
- When all the decimal points on the display light up, it indicates the system is in automatic test mode.
- To exit, press and hold the “UP,” “DOWN,” and “S” buttons again for 2 seconds.
-
10. Setting Internal Parameters
- To access the settings menu, press and hold the “S” button on Digital Control Panel for 5 seconds.
- When “S-x” appears on the display and the “x” begins to flash, it indicates the parameter group number.
- Press “S” again to enter the selected parameter group and adjust the relevant settings.
- Use the “UP” or “DOWN” buttons to switch between parameter groups. After adjusting the settings, press “S” to return to the normal operating interface.
The available parameter groups are:
- S-1: Determines the unit of measurement: 0 for metric (cm) and 1 for imperial (inches)
- S-2: Adjusts the sensitivity level for obstacle detection when moving downward. A setting of 0 turns off the sensor, while 1 is the least sensitive and 8 is the most sensitive.
- S-3: Sets the sensitivity level for obstacle detection when moving upward. A value of 0 disables the sensor, while 1 is the least sensitive and 8 is the most sensitive.
- S-4: Configures sensitivity for detecting obstructions while moving downward, with the same scale as above (0 for off, 1-8 for sensitivity).
- S-5: Sets the adjustment increments, measured in centimetres.
- S-6: Controls the desk’s movement behaviour when using the preset position feature. A value of 0 requires holding the preset button to move the desk, and the desk stops when the button is released. A value of 1 makes the desk automatically move to the preset position when the button is pressed, and any button can stop it.
- S-7: Adjusts the duty cycle for desk operation. A setting of 0 disables the 2-minute-on, 18-minute-off cycle, relying only on temperature monitoring to protect the control box. A setting of 1 enables the 2-minute/18-minute duty cycle.
- S-8: Configures the sensitivity to detect desk tilt, helping prevent uneven leg movement caused by issues like a damaged screw rod. A value of 0 turns off tilt detection, while values from 1 to 8 correspond to an inclination angle range of 0.5° to 4°.
-
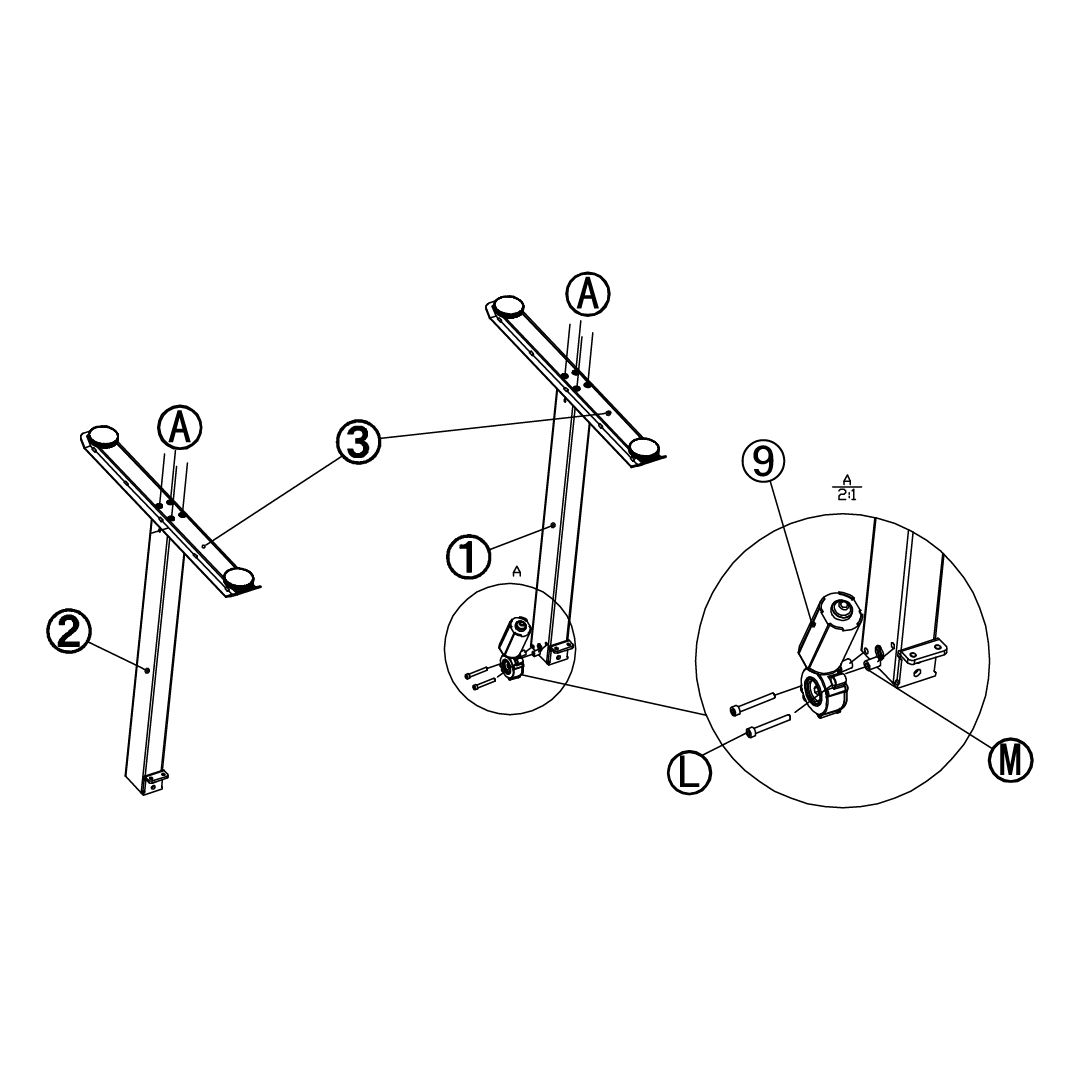
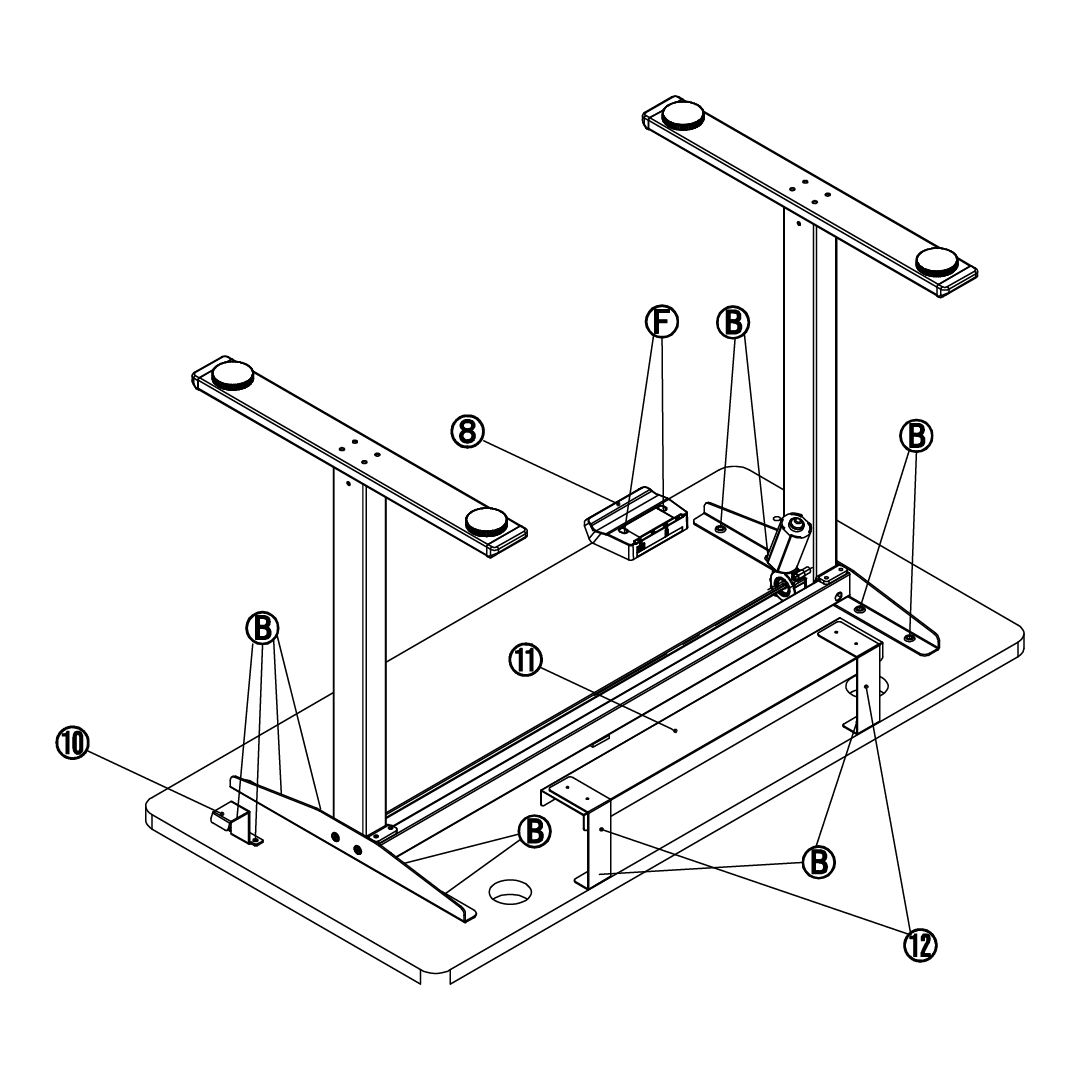
11. Assembly Instructions: Step 1 -
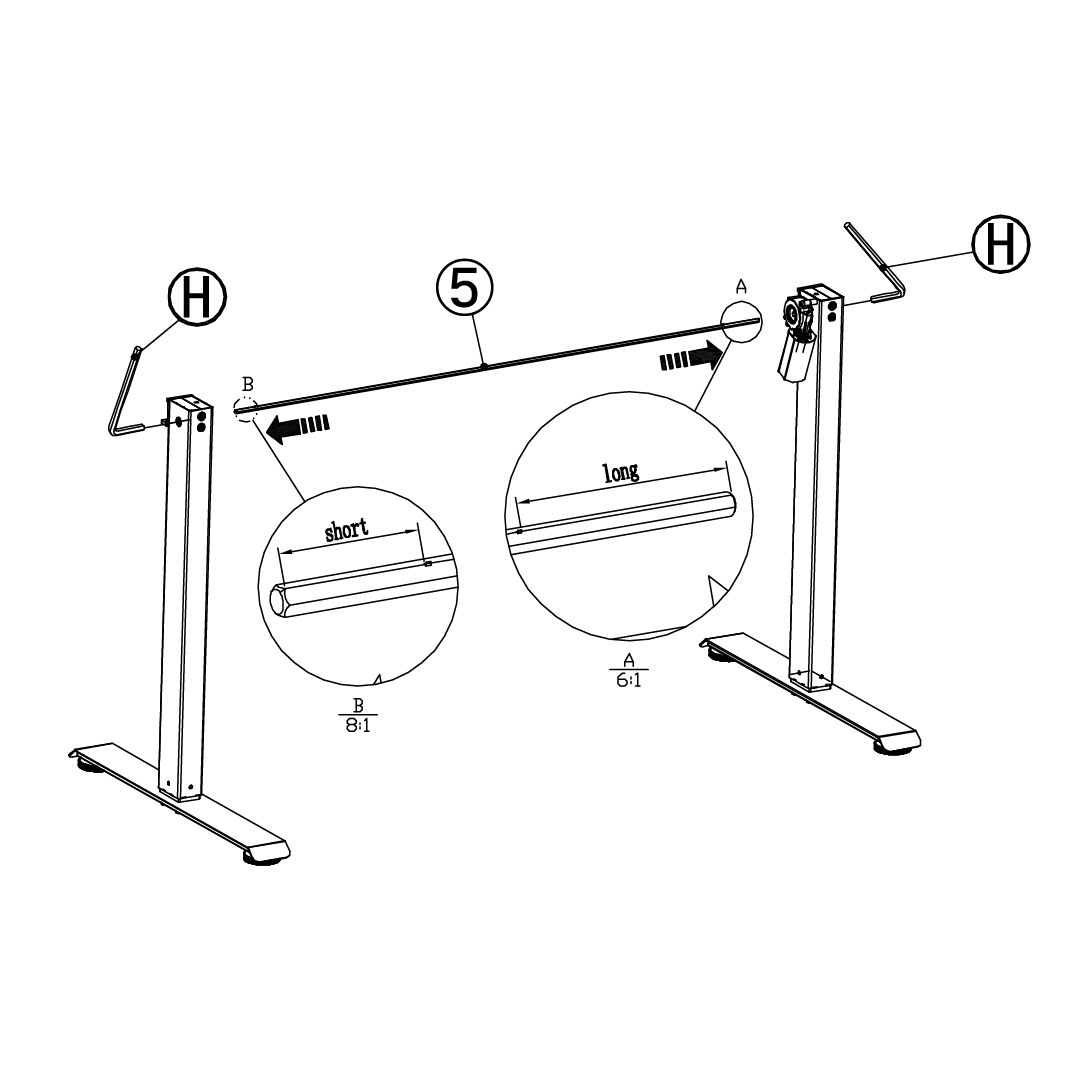
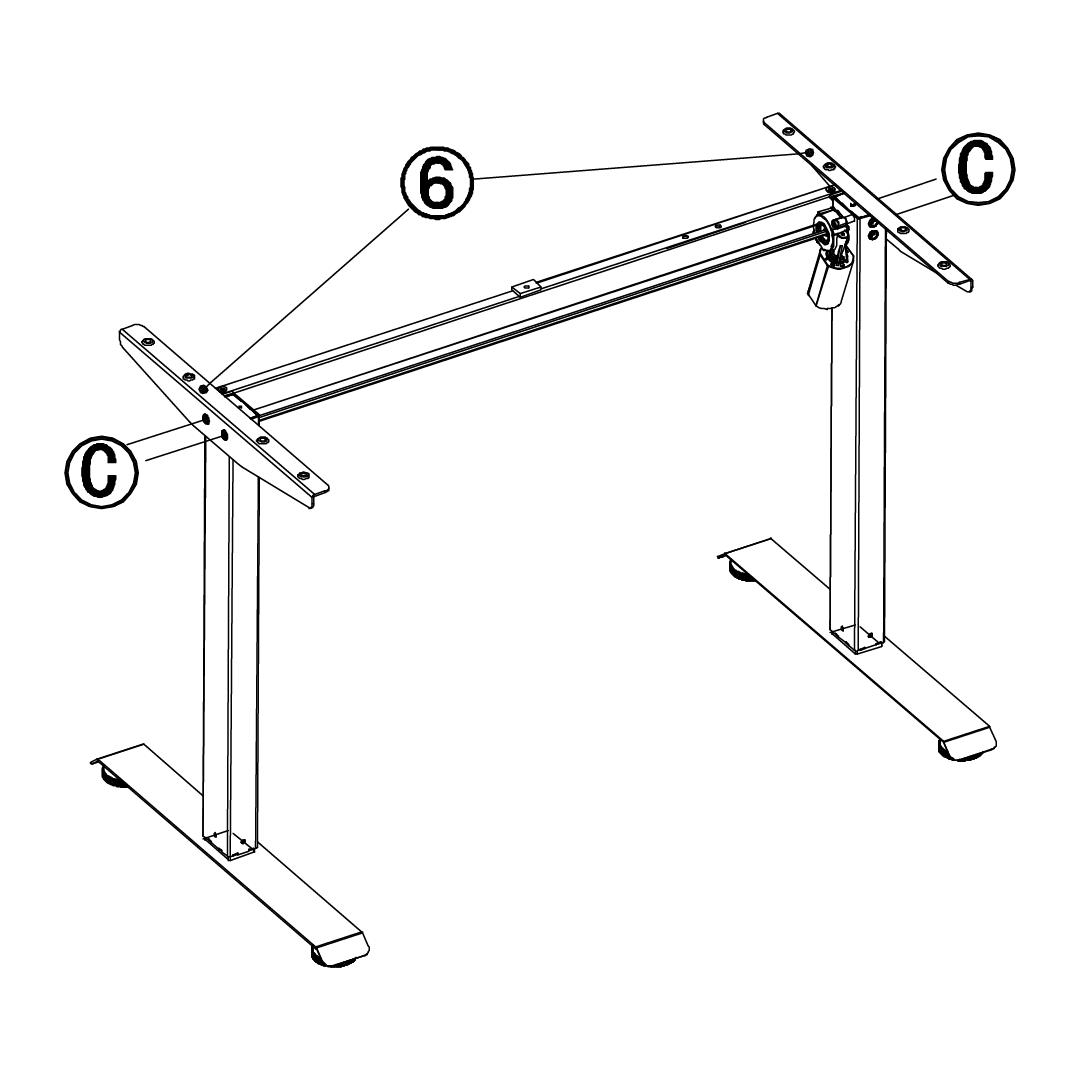
12. Assembly Instructions: Step 2 When inserting (5), gently rotate (H) and ensure you insert it fully.
Two people may be needed for this step, to prevent the table legs from toppling mid-assembly.
-
13. Assembly Instructions: Step 3 -
14. Assembly Instructions: Step 4 -
15. Assembly Instructions: Step 5 -
16. Assembly Instructions: Step 6 -
17. Fitting the Standing Desk Draw Secure the Standing Desk Draw to the Standing Desk by screwing Part O into the pre-drilled holes on the underside of the desk
-
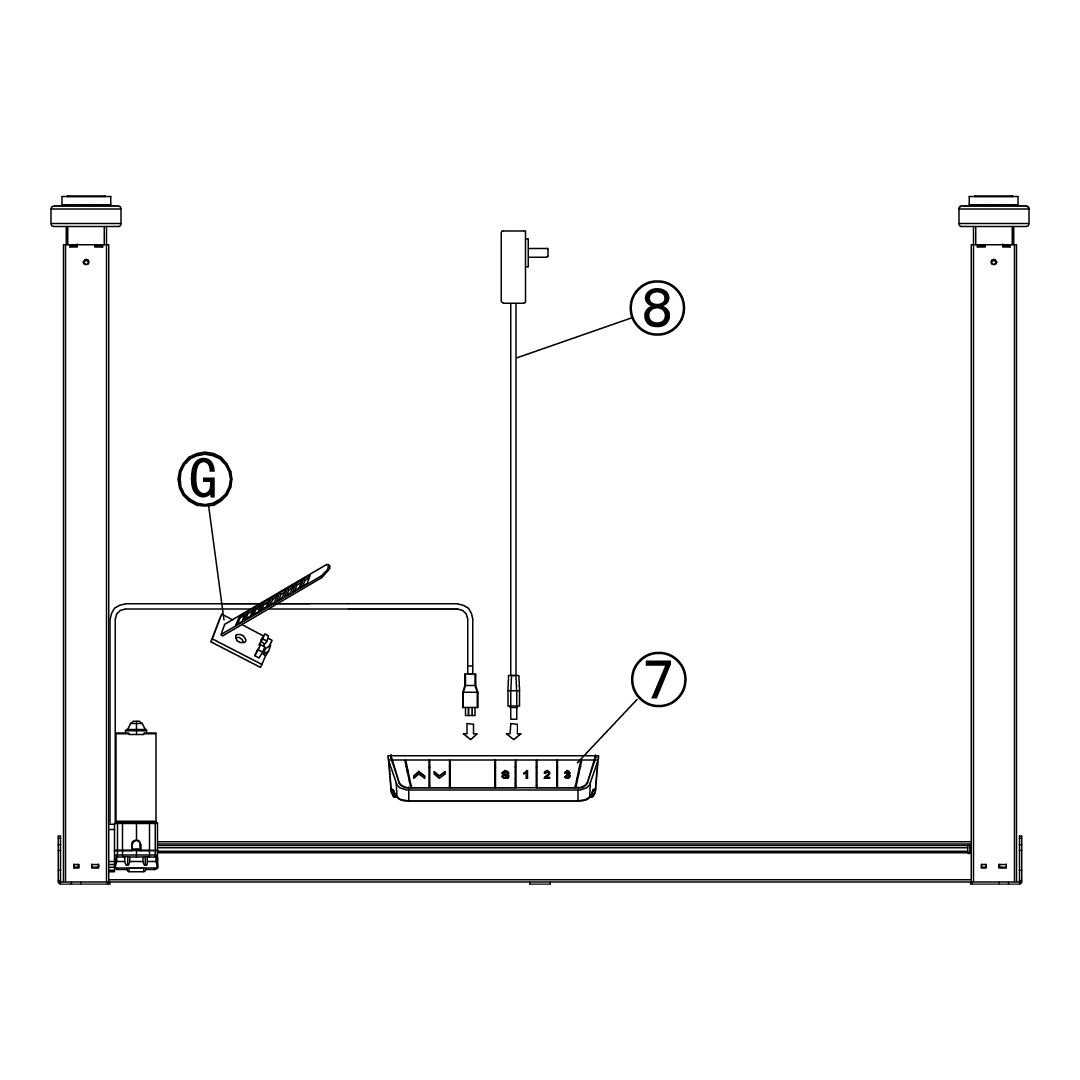
18. Connection Diagram -
19. Troubleshooting
- WHAT DO I DO IF THERE ARE MISSING PARTS FROM MY ORDER?
If there appears to be any part missing from your order, contact our friendly and helpful Customer Support Team within 7 days of receipt.
MY DESK IS GIVING ME AN ERROR CODE, WHAT DOES IT MEAN?
Please contact our Customer Support Team if you require assistance with an error code.
- E1 - Mains voltage exceeds 45V: Check main supply power
- E2 - The height deviation between the screw rods exceeds 1cm: Reset the system again
- E4 - System or Digital Control Panel panel error: Check Digital Control Panel cable
- E5 - Stops when encountering resistance: Release the key and restart
- E6 - The main power supply does not work/the voltage is lower than 20V: Replace the main power supply, or check the main power supply cable
- E7 - Protection when main power supply is running/the voltage is lower than 20V: Power on again
- E8 - Desk tilts when running: Reset the system again
- HOT - Power supply temperature is too high/desk runs for longer than 2 minutes in 18 minutes: Wait for power supply temperaure to cool down/let the system cool down for 18 minutes
- E11 - Motor 1 not connected: Check the connection cable
- E12 - Motor 1 current sampling channel error: Replace the control board
- E13 - Motor 1 phase loss/phase cable is not connected: Check the motor phase cable connection for any issues.
- E14 - Motor 1 hall error/hall cable is not connected: Check the hall signal/replace connection cable
- E15 - Motor 1 internal shortcircuit: Replace the motor
- E16 - Motor 1 stall: Reset the system again
- E17 - The running direction of motor 1 is wrong: Replace the motor cable/hall cable
- E18 - Motor 1 load is too large/overload: Reduce the load
- E21 - Motor 2 not connected: Check the connection cable
- E22 - Motor 2 current sampling channel error: Replace the control board
- E23 - Motor 2 phase loss/phase cable is not connected: Check the motor phase cable connection for any issues
- E24 - Motor 2 hall error/hall cable is not connected: Check hall signal/replace the connection cable
- E25 - Motor 2 internal shortcircuit: Replace the motor
- E26 - Motor 2 stall: Reset the system again
- E27 - The running direction of motor 2 is wrong: Replace the motor cable/hall cable
- E28 - Motor 2 load is too large/overload: Reduce the load
- E40 - The Digital Control Panel keeps disconnecting: Check the connection cable
- E41 - The serial signal is wrong: Check the connection cable/replace the Digital Control Panel
- E42 - Memory error: Replace the Digital Control Panel
- E43 - Sensor error (enabling desk to stop when encountering resistance): Replace the Digital Control Panel
FOR ALL OTHER ISSUES, PLEASE CONTACT OUR CUSTOMER SUPPORT TEAM.
|