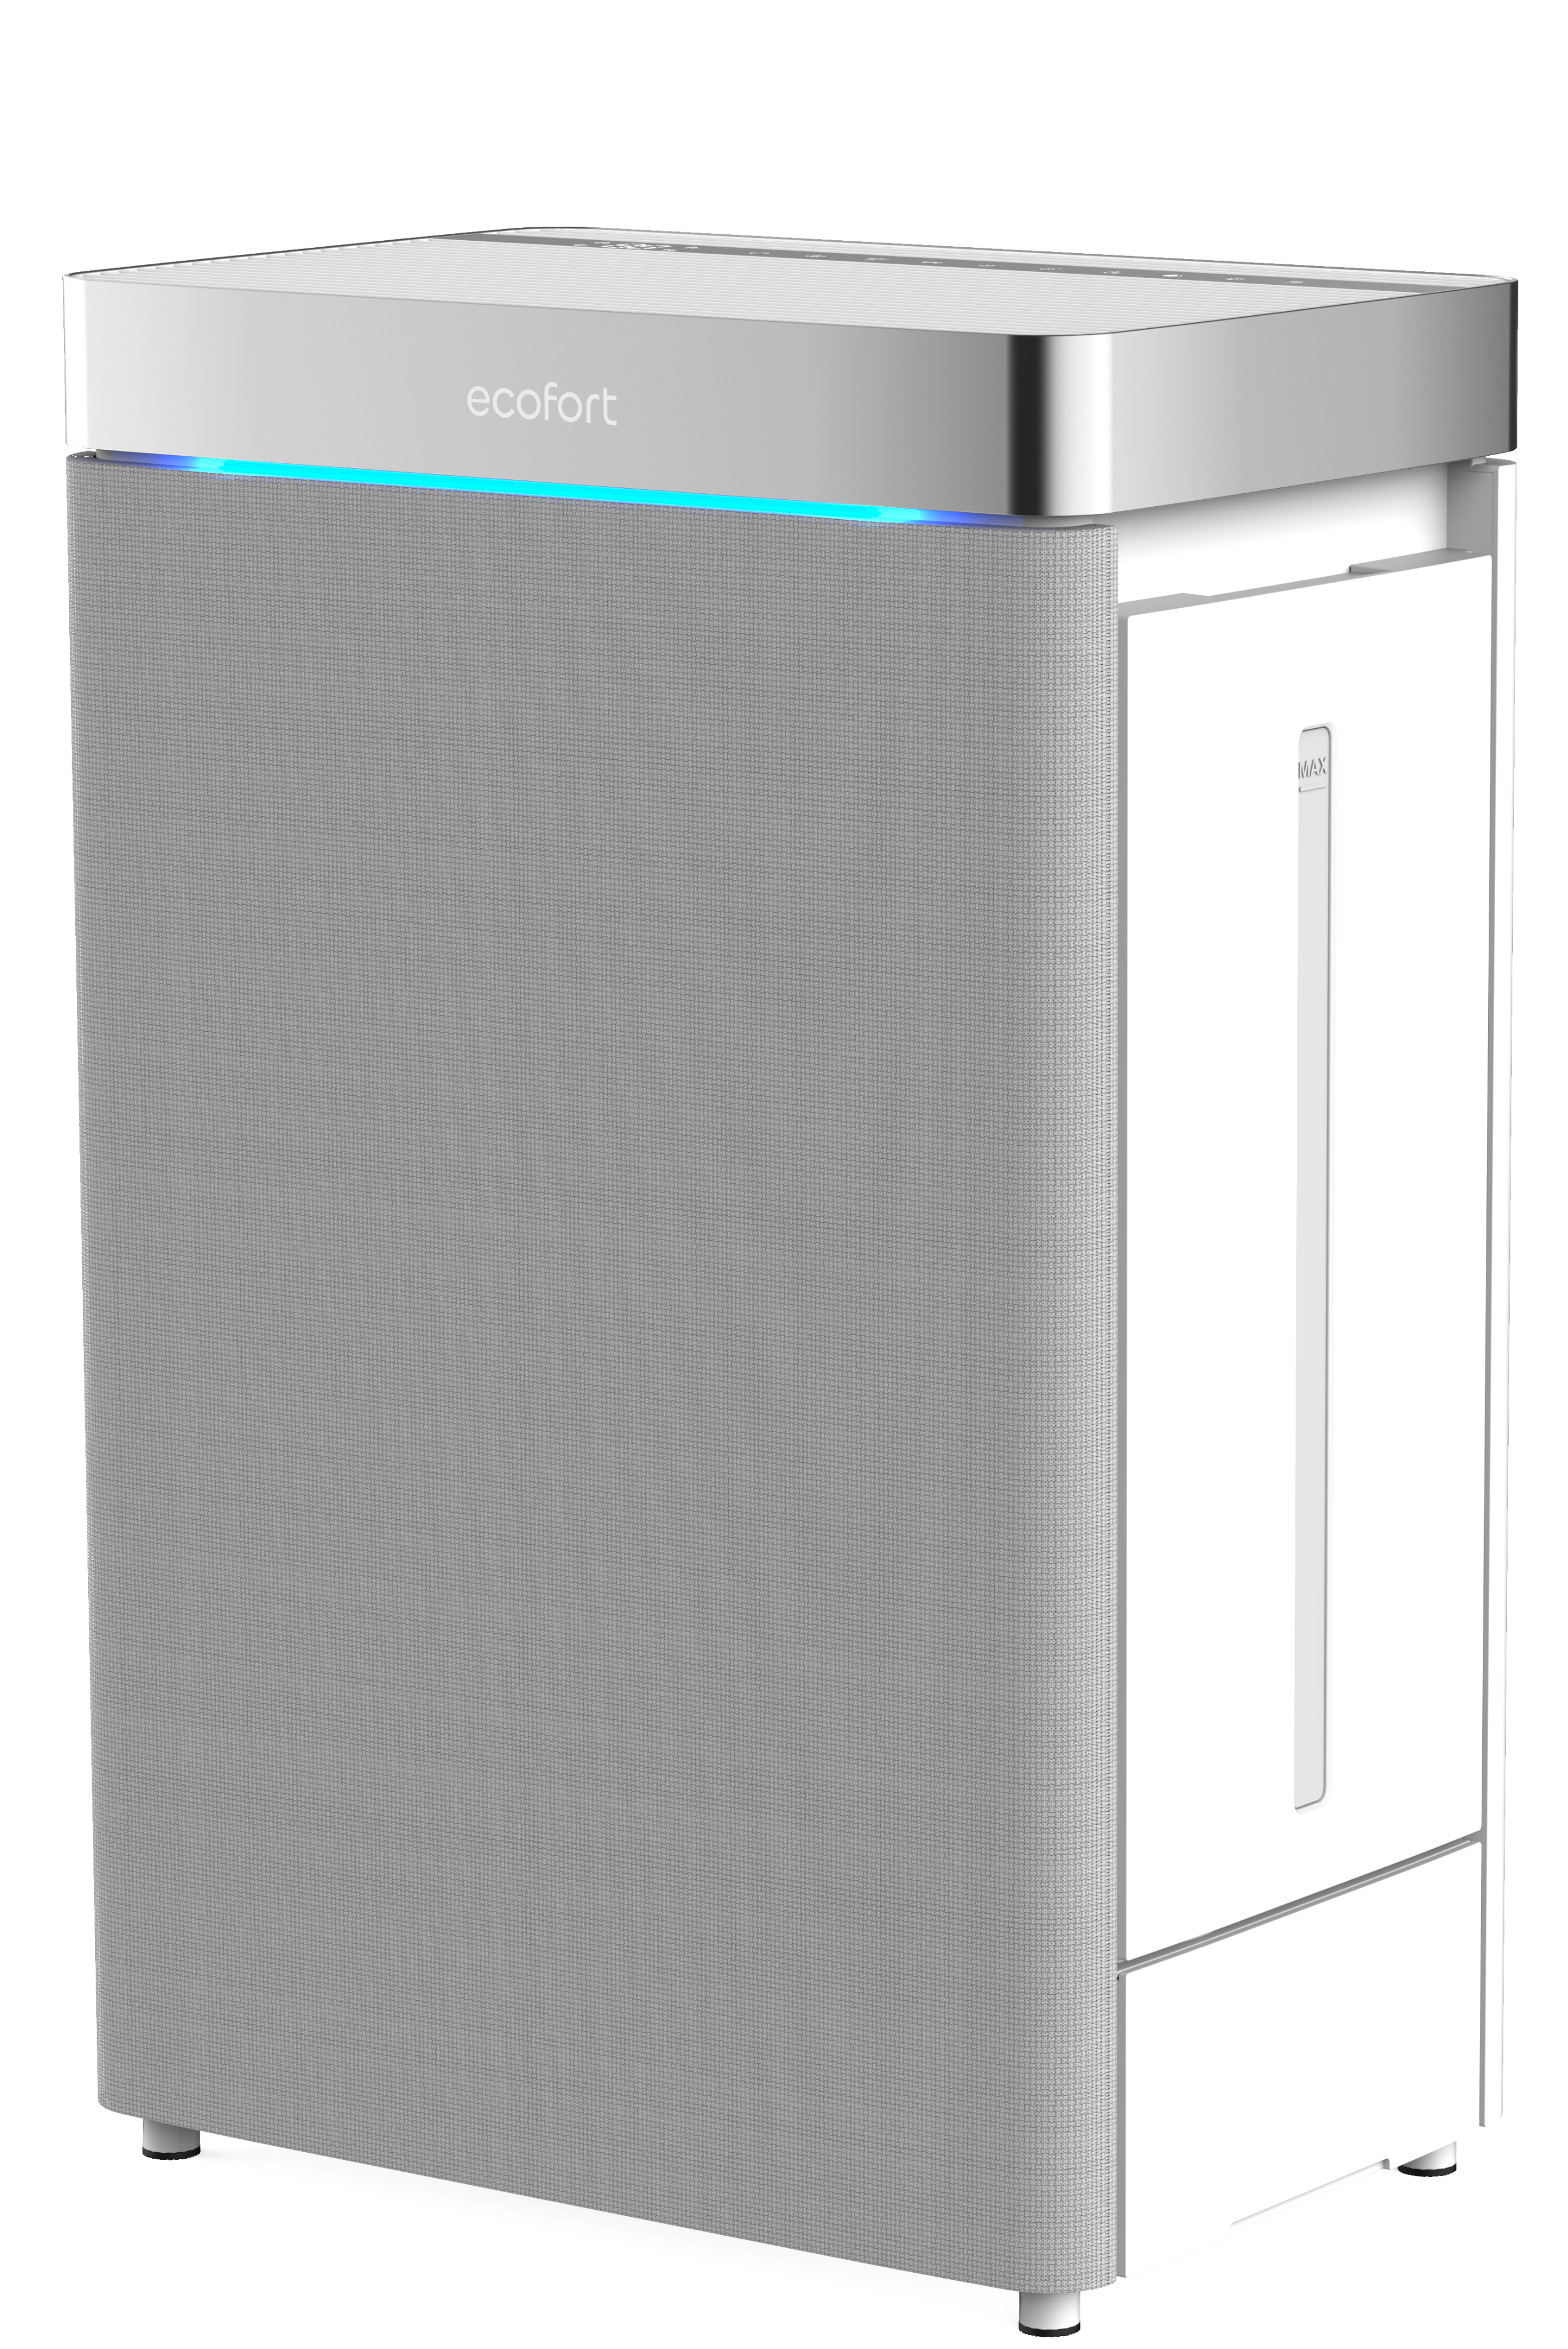
ecoQ HumidAir H1000 Step-by-step user manual for the ecoQ HumidAir H1000: installation, daily operation, and maintenance. Includes Auto and Sleep modes, humidity setpoints, UV safety interlock and plasma function, filter and honeycomb care, tank and basin cleaning, water filling, WiFi and app pairin -
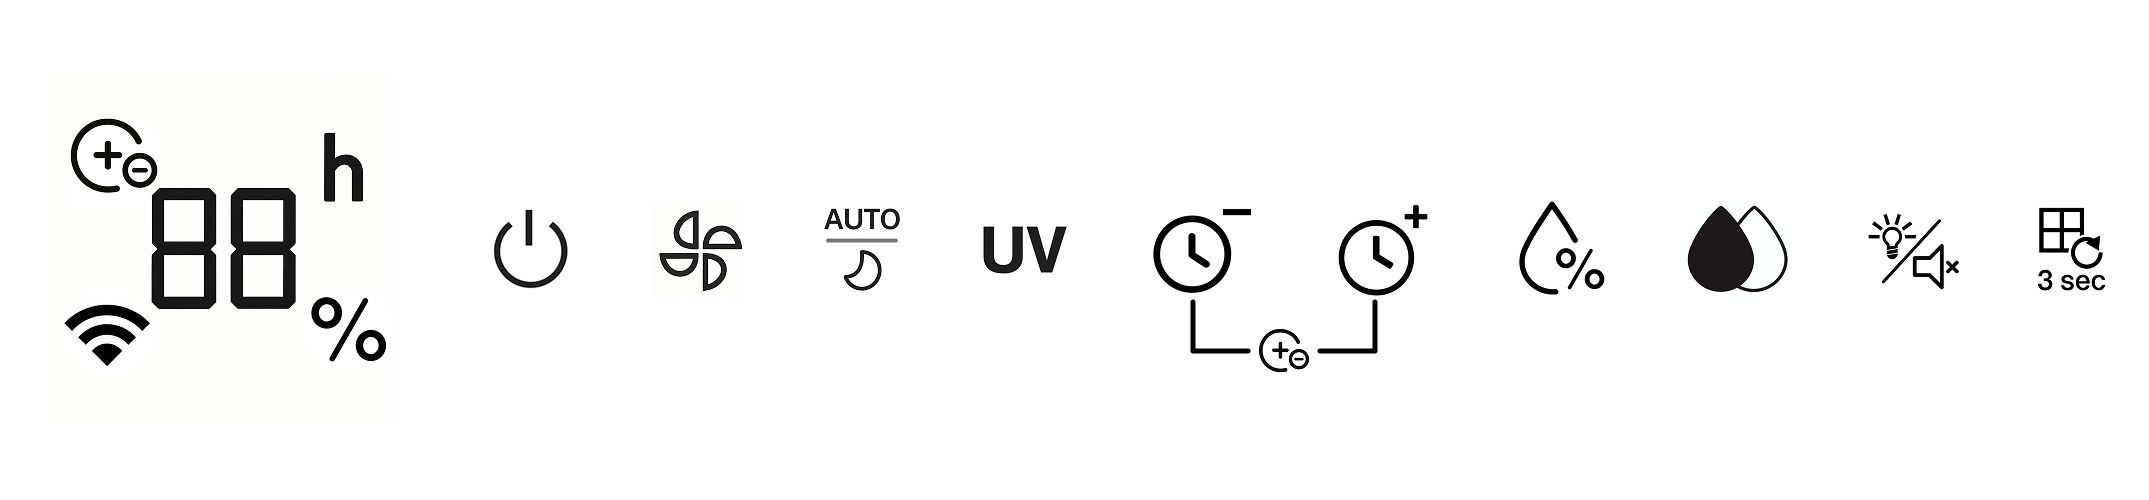
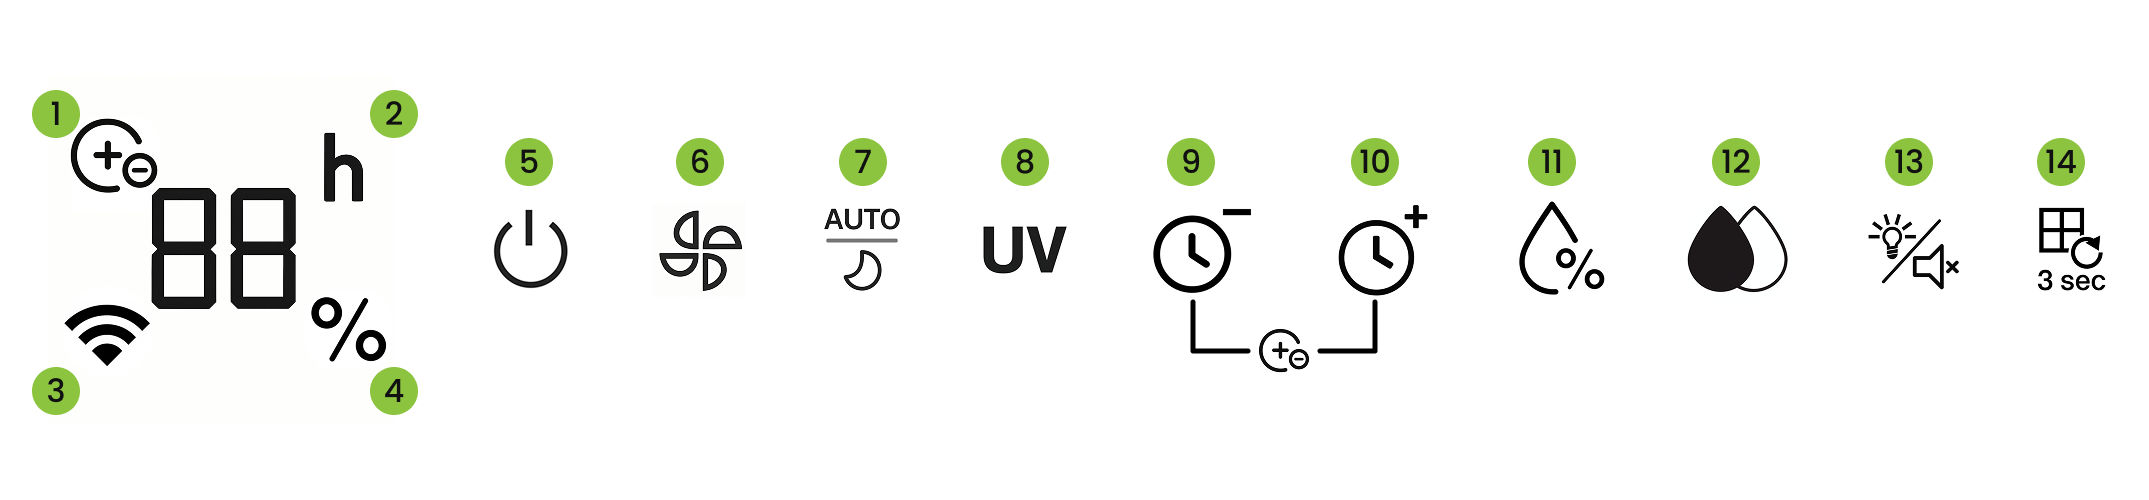
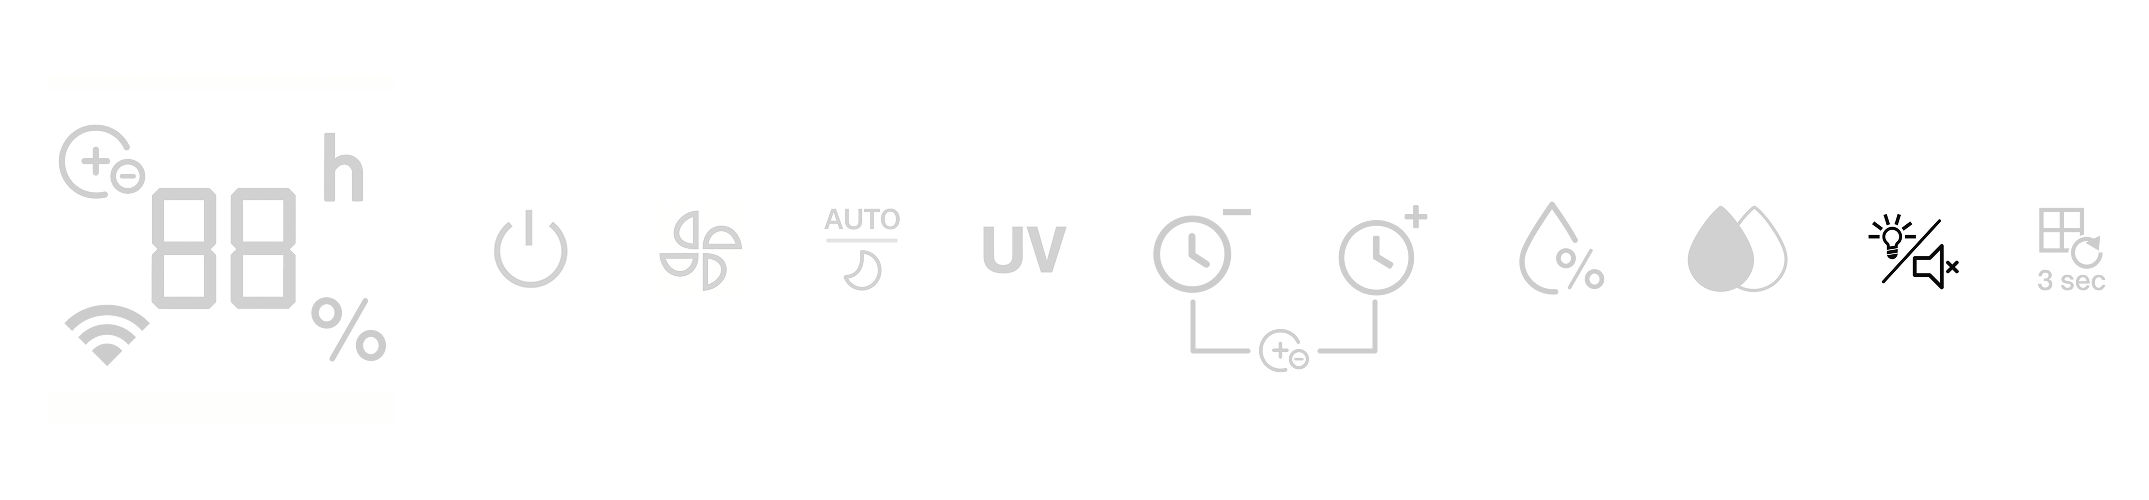
Functions 1. Display -
2. Features
- Plasma Indicator
- Timer Indicator
- WiFi Indicator
- Target/Ambient Humidity Indicator (%)
- Power Button
- Fan Speed Button
- Auto/Sleep Button
- UV Lamp Button
- Timer Decrease (–)
- Timer Increase (+)
- Targer Humidity (%)
- Humidification Function
- Display-off/Silent Button
- Filter Replacement Reminder (HEPA Filter Reminder)
-
3. Getting Started
- Ready to use out of the box – no installation required; simply remove the protective packaging from the filter before first use.
- Plug in: all indicators flash for 1 s, then turn off.
- Before switching on: only the Power button responds; other buttons have
no effect.
-
4. Power Button
-
Default state after power-on
- A. Startup: Plug in → all indicators flash for 1 s, then turn off.
Press Power to
start.
Default Fan speed = 1 (fan-speed indicator on).
Display shows current
humidity: “Lo” if <30%, “Hi” if >80%.
- B. Auto: Off (indicator off).
- C. UV: Off (indicator off).
- D. Timer: Not set.
- E. Target humidity (%): Off (indicator off).
- F. Humidification: Off (indicator off).
- G. PM2.5: On.
-
In working state, pressing the On/Off Button will turn off all functions and
the machine will enter standby state.
-
5. PM 2.5 Function Turned On
-
Warm-up (Auto): After you turn on Auto, the PM2.5 sensor warms up for
~60s.
During this time it cycles red → blue → green and no reading is
shown.
-
After 60s: The light strip shows air quality:
Green = excellent
Blue =
medium
Red = poor
-
Ongoing: The light strip keeps updating color as air quality changes.
-
6. Fan Speed Button
-
When the unit is on, press Fan speed to change the airflow.
-
Cycle: Silent → Low → Mid → High → Silent (repeats).
-
Display shows levels 1 → 2 → 3 → 4 → 1 as you press.
-
7. Honeycomb Filter Drying
-
With the unit on, press and hold Fan speed for 3s to start Filter drying.
- The fan runs on High (level 4) for 20 min to dry the filter.
- During drying, the display is off, the upper LED flashes, and the Power
indicator stays on.
- After 20 min, drying ends and the unit turns off automatically.
-
To stop early, press and hold Fan speed for 3 s.
- While drying, only Fan speed and Power work; all other buttons are
disabled.
-
8. Auto Mode
-
With the unit on, press Auto/Sleep to enter Auto Mode.
-
In Auto, Fan speed adjusts to air quality (PM2.5):
Cleaner air → lower
speed; poorer air → higher speed.
- Air quality: Good → light strip green; Fan speed 2.
- Air quality: Moderate → light strip blue; Fan speed 3.
- Air quality: Poor → light strip red; Fan speed 4.
-
Switch to Manual Mode: Press Fan speed to adjust airflow. This turns the
Auto Mode off.
-
Sleep Mode (from Auto Mode): Press Auto/Sleep again. All indicators turn
off; fan runs at level 1.
-
Exit Sleep Mode: Press any button. The first press only exits Sleep Mode
(no setting changes); the fan remains at level 1.
-
9. UV Light Button
- With the unit on, press UV to turn the UV light on/off. (The UV light is
enclosed and not visible during operation)
- Press and hold UV for 5 s to enter Wi-Fi pairing mode; the Wi-Fi indicator
flashes.
-
10. Timer - / Timer +
-
With the unit on, set a shutdown time 1–24 h; 00 = off.
-
With the unit on, set a shutdown time 1–24 h; 00 = off.
-
Press Timer + to increase, Timer – to decrease.
-
While setting, the display shows the selected hours.
-
11. Plasma Function
-
Press and hold Timer + and Timer – together for 3s to turn Plasma On/Off.
-
The Plasma indicator turns On/Off accordingly.
-
You can also control Plasma in the mobile app.
-
When active, the unit emits positive and negative ions to purify the air.
-
12. Target Humidity (%) Button
-
With the unit on, press Target humidity (%) to enter the setting; the indicator turns
on.
-
Humidification is on by default; default target = 85%.
-
Each press changes the target in 5% steps: 30% → 35% → … →
85% → 00 (off) → 30%.
-
Operation: When ambient humidity reaches the target,
humidification stops; it restarts when ambient is 5%RH below
the target.
-
Display: shows the selected value while setting; afterwards it
shows the ambient humidity.
-
13. Humification Button
- With the unit on, press Humidification to turn humidifying On/Off.
- The Humidification Indicator shows the status: On = lit, Off = off.
- If a humidification mode was active, turning Humidification Off exits that mode.
Water tank shortage protection
- The Humidification Indicator flashes during the water-shortage warning.
-
14. Display-off/Silent Button
-
With the unit on, press Display/Light to turn all indicators off.
-
Press any button to wake the display.
-
Press and hold Display/Light for 3s to activate or deactivate Silent Mode.
-
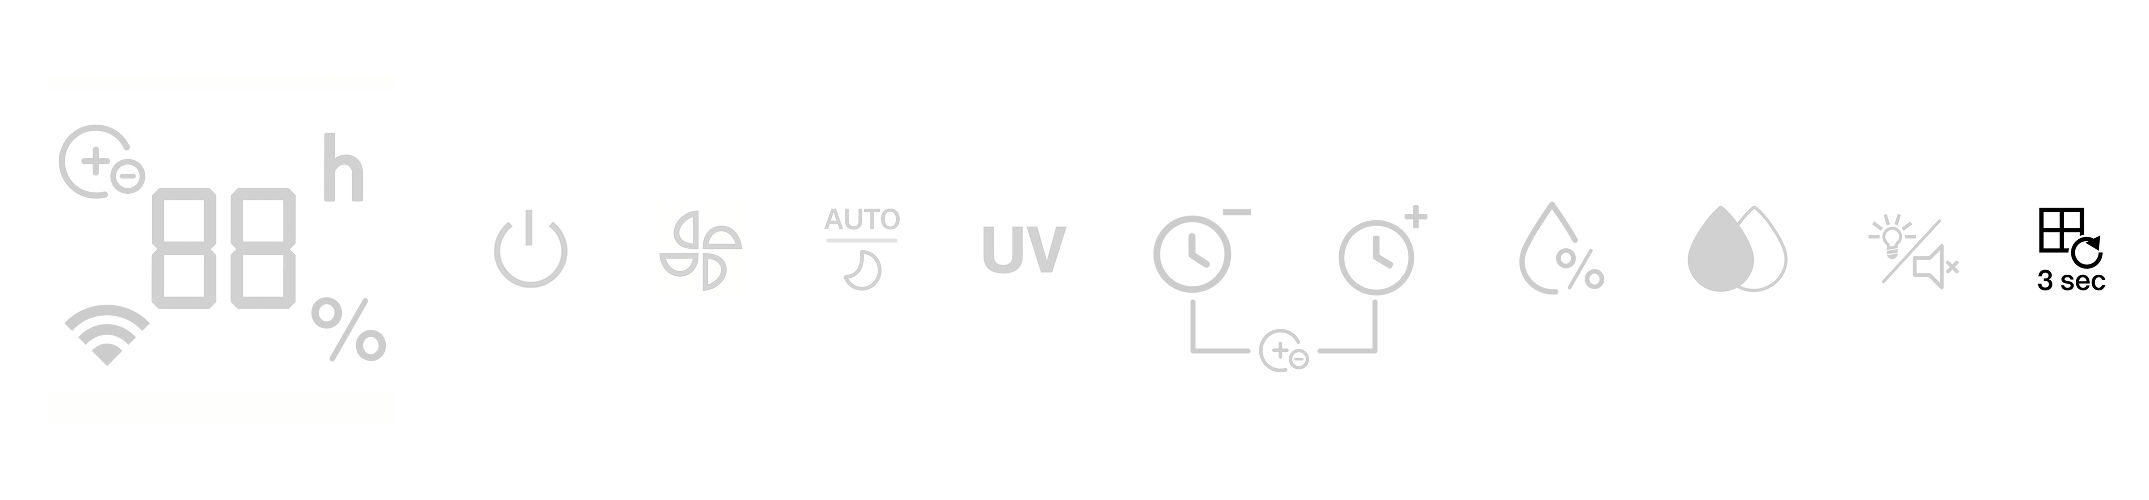
15. Combined Filter Replacement Reminder / Reset
-
After approximately 600 h of use, the unit reminds you to replace
the Combined Filter (indicator lights up).
-
After replacing the Combined Filter, press and hold Filter Reset (3s) to clear the reminder and restart the timer.
-
16. First Touch Check / Second Touch Adjust
-
This applies to settings like Fan speed.
-
First press: The display flashes and shows the current setting.
If there is no second press within 5s, the display returns to ambient
humidity.
-
Second press (within 5s): The setting changes to the next level and the
display keeps flashing.
-
If there is no further action after 5s, the display returns to ambient
humidity.
-
Additional Functions and Water Tank Maintenance 17. Other Functions
-
After 1 min with no button press, the indicators dim to 1/3 brightness.
- Press any button to restore normal brightness.
-
From standby, press Power to start. If it’s not the first start, the unit
restores the previous state (all settings), except Timer and Sleep Mode.
-
18. Water Tank Water Shortage Protection
-
With Humidification on, the pump runs normally.
-
If the tank stays empty for ~50 s, the pump stops and
Humidification turns off.
-
The Water shortage indicator flashes (0.5 s on / 0.5 s off) and the
unit emits 10 beeps.
-
Press Humidification again to turn off the indicator.
-
19. Add Water to Water Tank
-
Remove the empty water tank (A) from the
unit and lay it flat.
-
Open the water stopper (B) and fill under a
faucet (C)(outlet Ø < 25 mm).
- Alternatively, keep the tank upright and fill
through the screw-cap opening.
-
After filling, close the water stopper or screw
the cap (B) on tightly. Check for leaks, wipe
off any water, and insert the tank back into
the unit.
-
Ensure the tank is properly locked in place.
-
20. Notes on Adding Water
- After filling, tighten the cap/stopper firmly, check the tank for leaks, and
wipe off any water on the surface.
- Please be sure to use clean tap water.
- First use: a slight smell or slight water discoloration from the wet
curtain is normal, non-toxic, and will not affect health.
-
Cleaning and Maintenance 21. Cleaning the Device
- Turn off and unplug the unit.
- For dust on the exterior, wipe with a soft cloth. If heavily soiled, use water
< 50 °C then air-dry.
- Use clean water only - Do not use chemicals
-
22. Honeycomb Filter Cleaning
-
Cleaning: Rinse the Honeycomb Filter with clean water only, using very
light water pressure. Avoid detergents or scrubbing with brushes.
-
Drying: Allow the filter to dry completely before reinstallation.
-
Recommendation: To ensure the most efficient and hygienic operation, we
recommend replacing the Honeycomb Filter at the end of every season.
-
23. Combined Filter Maintenance and Inspection
- DO NOT WASH or rinse the Combined Filter (A) with water or any liquid. This will
severely damage the filter medium.
- To extend lifetime, gently clean the outer pre-filter mesh with a vacuum cleaner or a
dry cloth.
- Always visually inspect the filter and replace immediately if heavy discoloration is
visible.
-
24. General Unit and Inner Surface Cleaning
-
Wipe the outer casing and inner air surfaces
with a damp cloth.
-
Do not use corrosive cleaners or solvents.
-
Do not rinse the inner surface with water.
-
Allow to dry completely before reinstalling
filters or operating the unit.
-
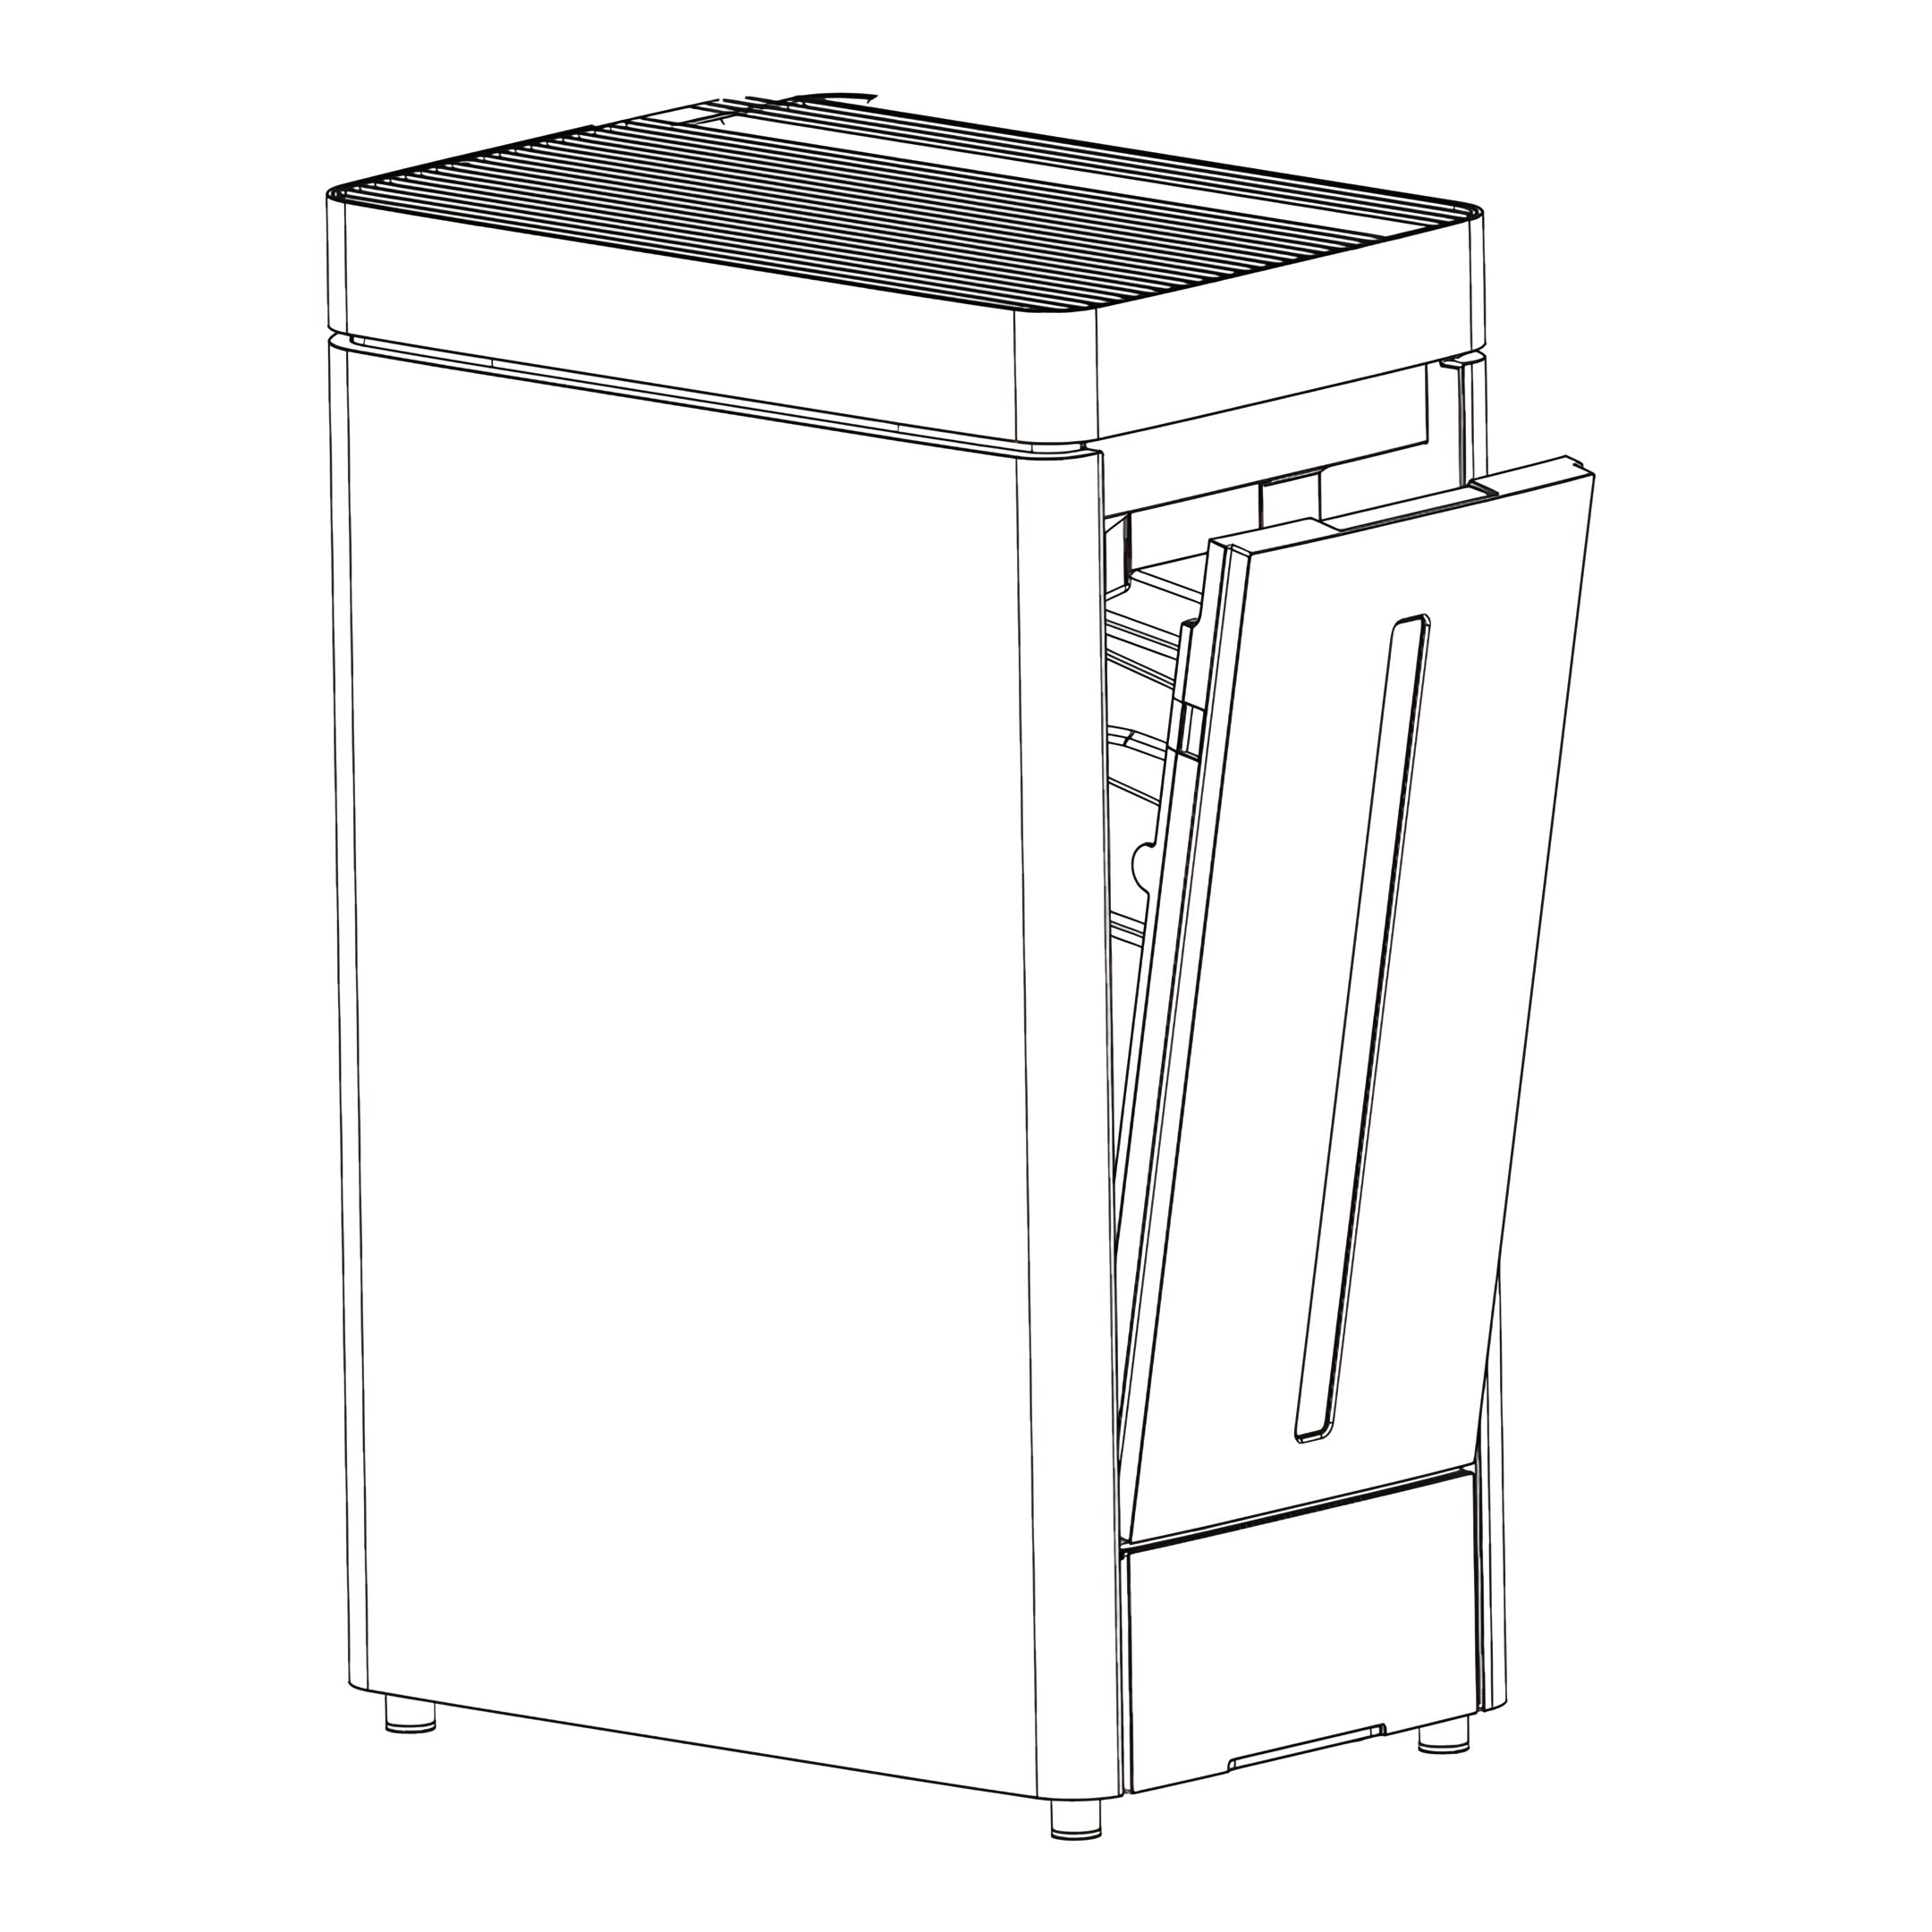
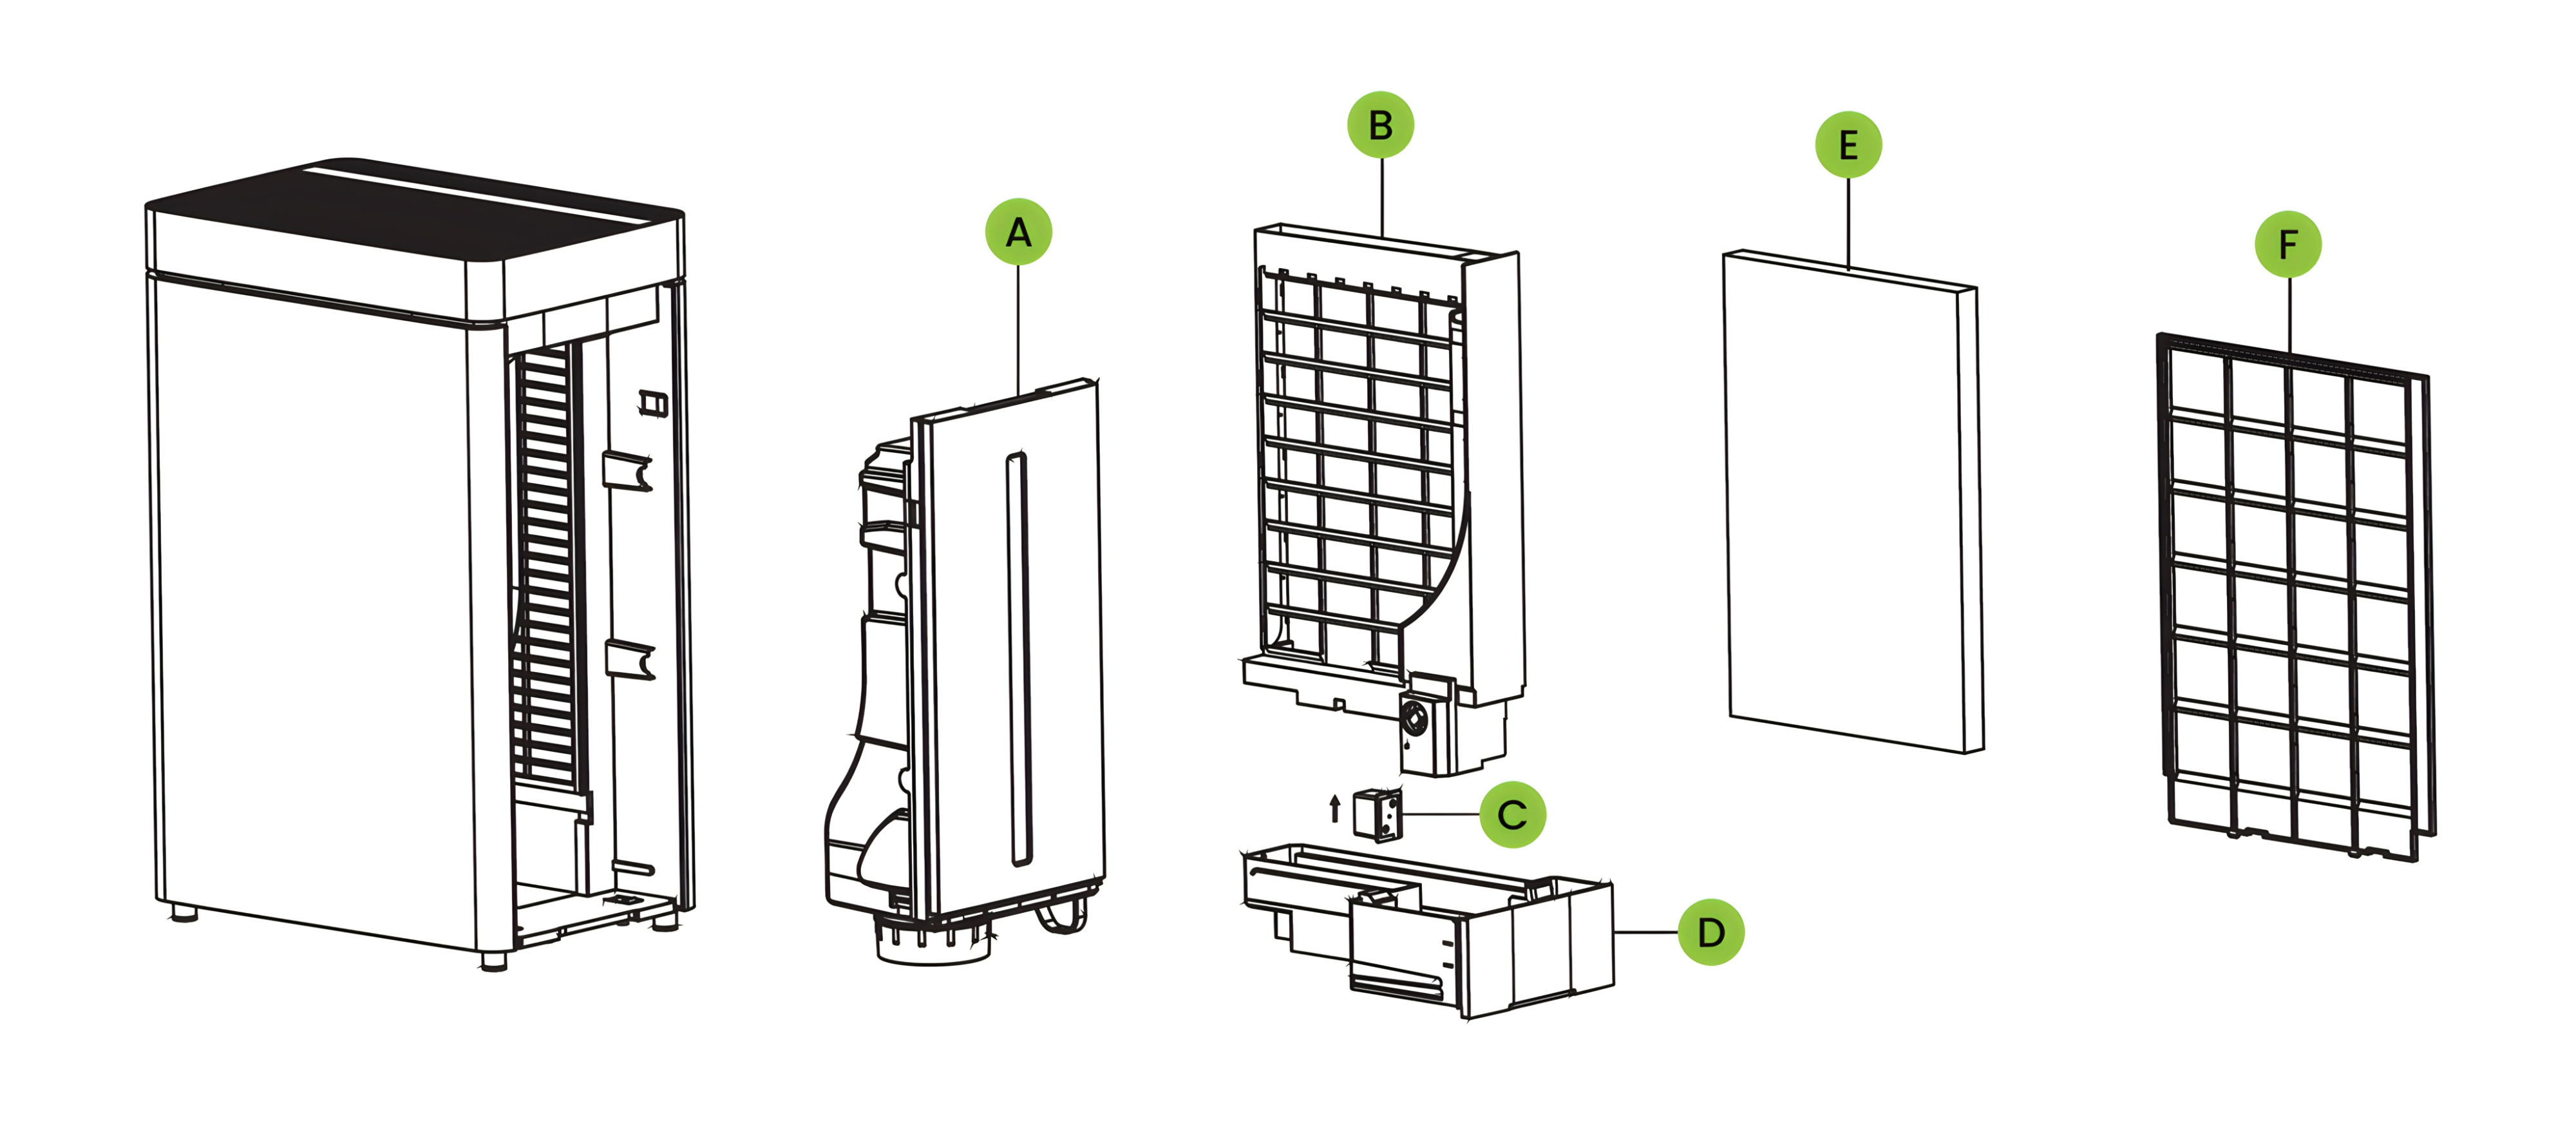
25. Disassembly and Reassembly for Cleaning Disassembly: Quick Steps
- Power off and unplug the unit.
- Remove the Water Tank (A), then lift out the Sink (D).
- Unclip the On/Off Assembly (C) from the tank side and keep it dry.
- Release the buckles and lift out the Honeycomb Filter Assembly (B).
- Open the plastic retainer (F) in (B) and take out the Honeycomb Filter(E).
- Clean/dry all parts
Reassembly check
- Place the Honeycomb Filter (E) back into (B) and lock it with the plastic
retainer (F).
- Refit the Honeycomb Filter Assembly (B) and fasten the buckles.
- Clip the On/Off Assembly (C) back to the tank side
- Insert the Sink (D) fully until it seats flush to press the safety cut-off switch.
- Reinstall the Water Tank (A).
- Plug in and start the unit.
Storage (Maintenance)
-
For long periods of non-use, unplug and protect the unit from dust.
-
Before packing, ensure the Honeycomb and the combined Filter are dry and
wipe any water from the Water Tank and Sink.
-
26. Body Surface Cleaning
- To clean the surface of the machine, just wipe it clean with a wet rag. It is strictly forbidden to rinse it directly with water.
- Do not use corrosive detergents or solvents for cleaning.
- When cleaning the machine body, be sure to turn off the power switch and unplug the power cord, otherwise there may be a risk of electric shock.
-
27. Install and Use After Cleaning
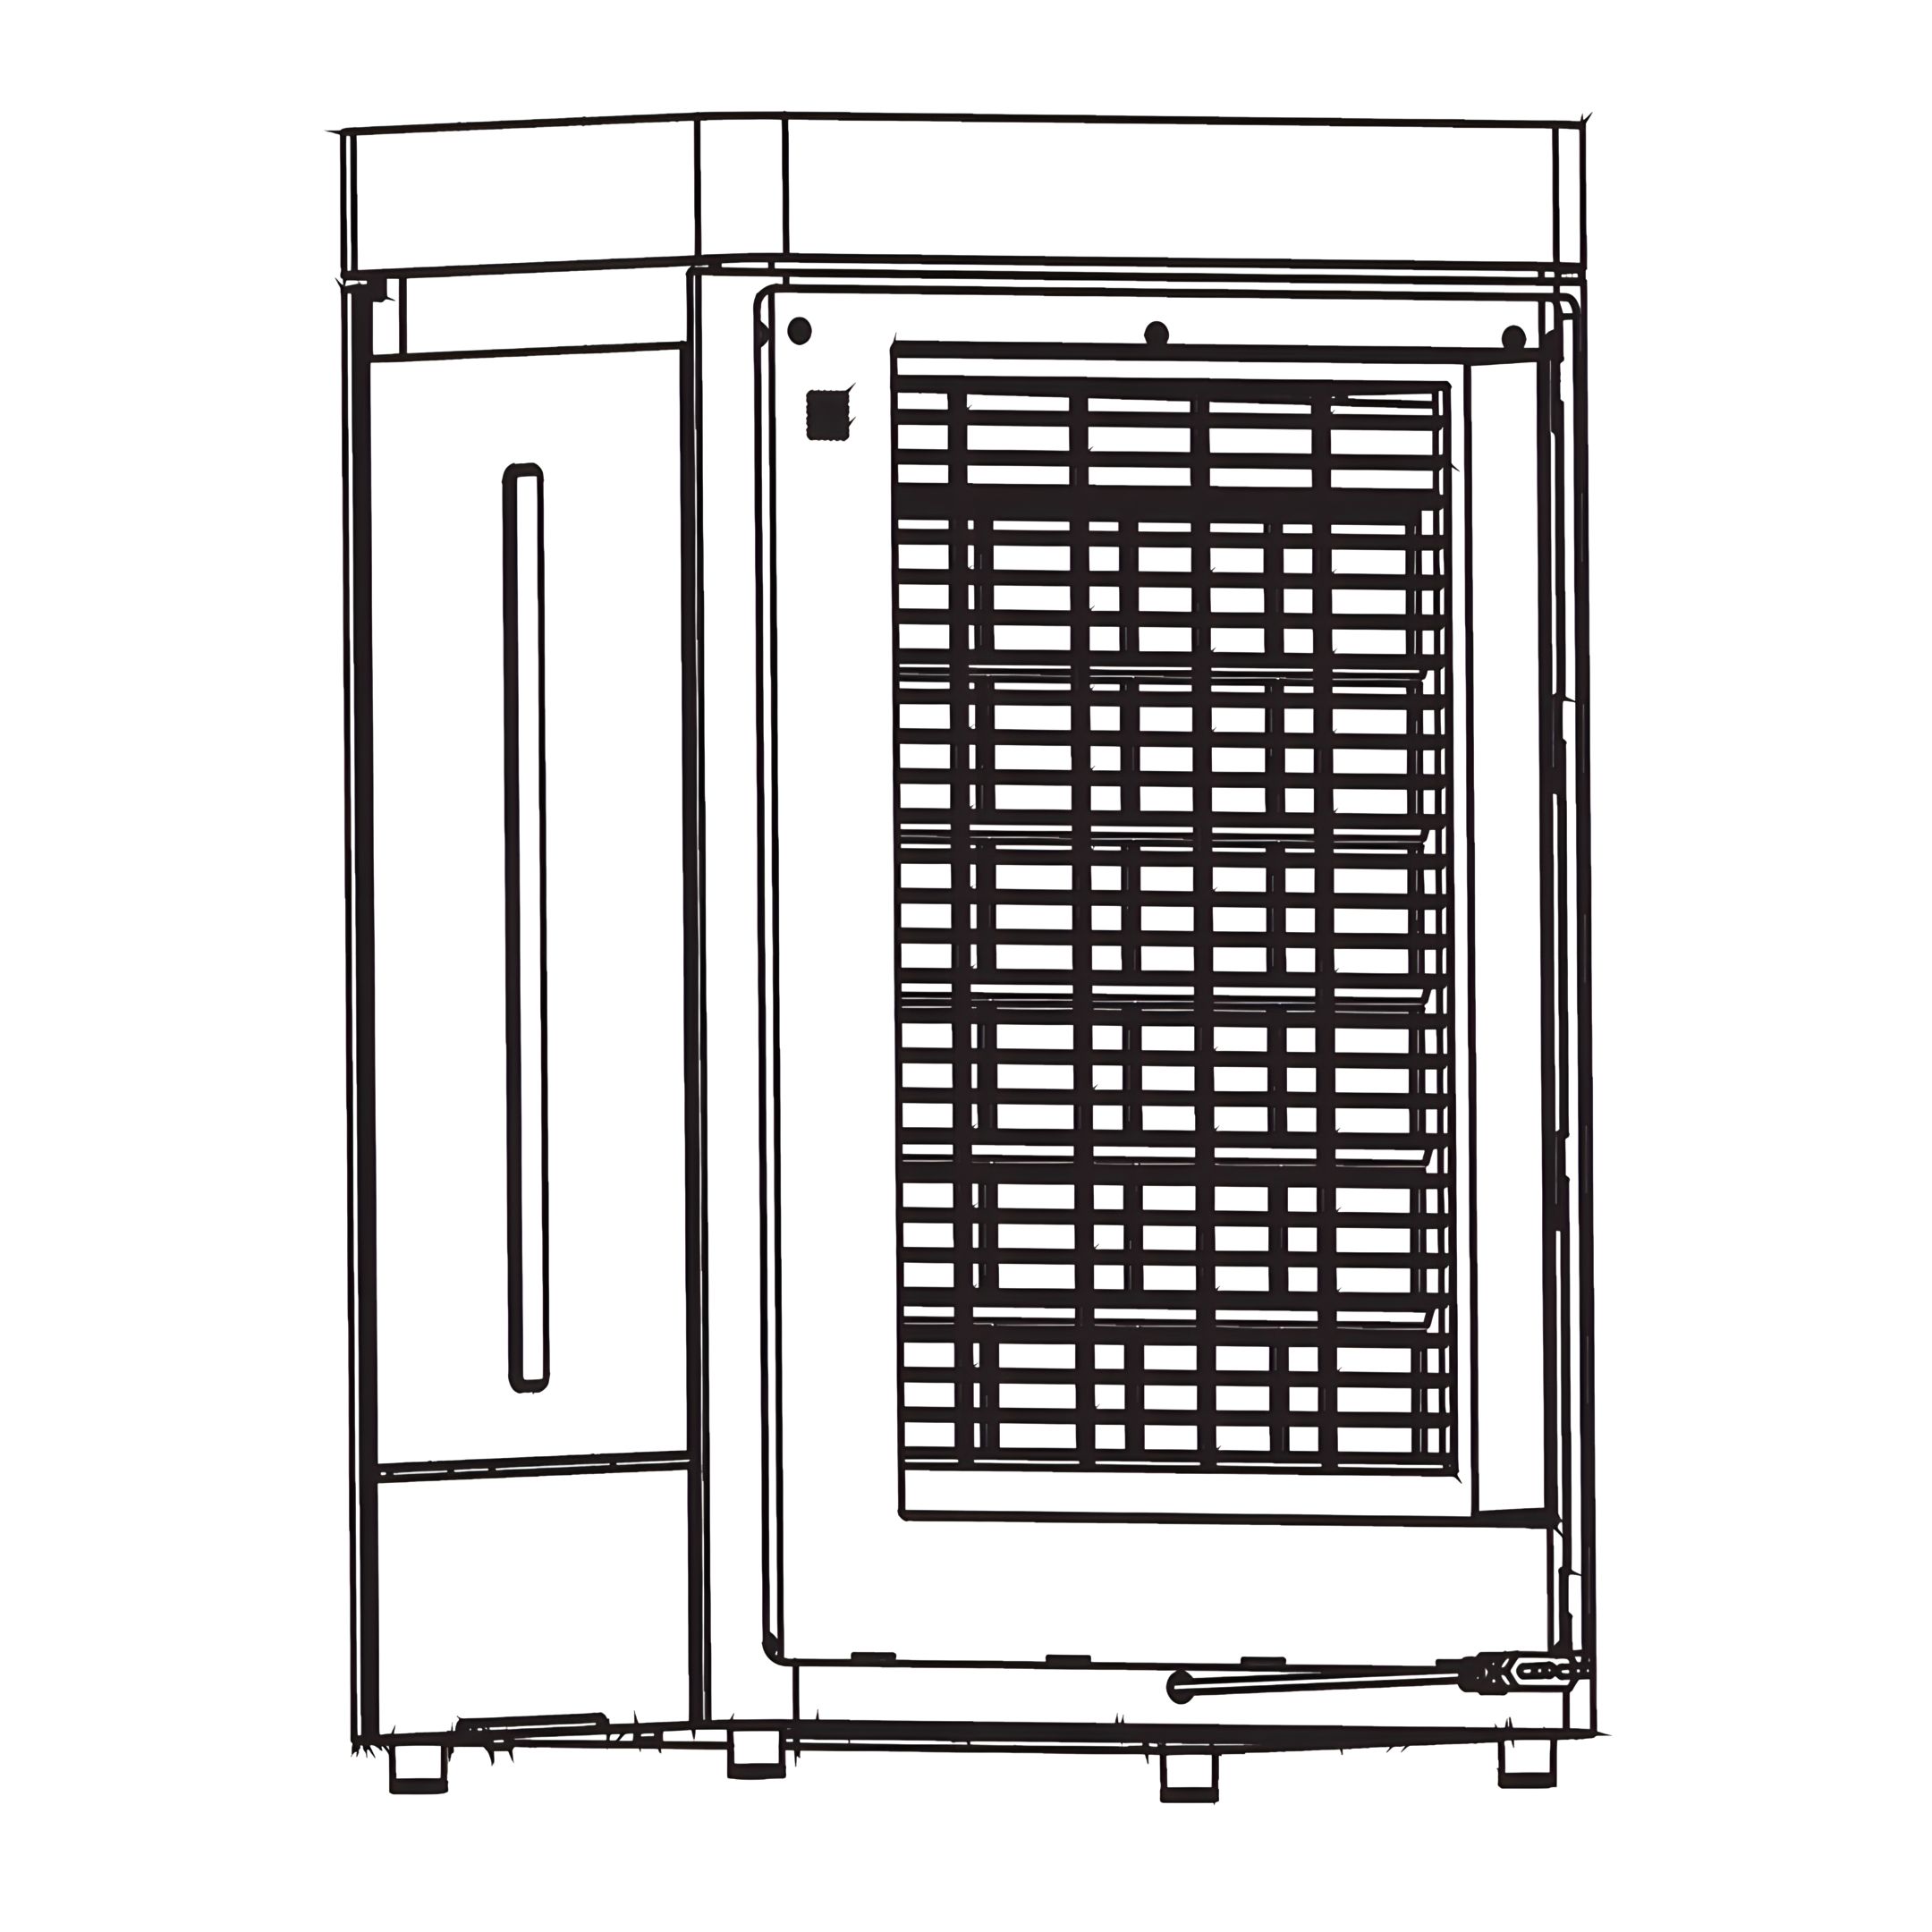
- Install in the correct order: Honeycomb Filter assembly, Water Sink, Water Tank, HEPA filter, etc. Ensure each part is fully seated to prevent leaks and startup issues.
- Connect to power and confirm normal operation.
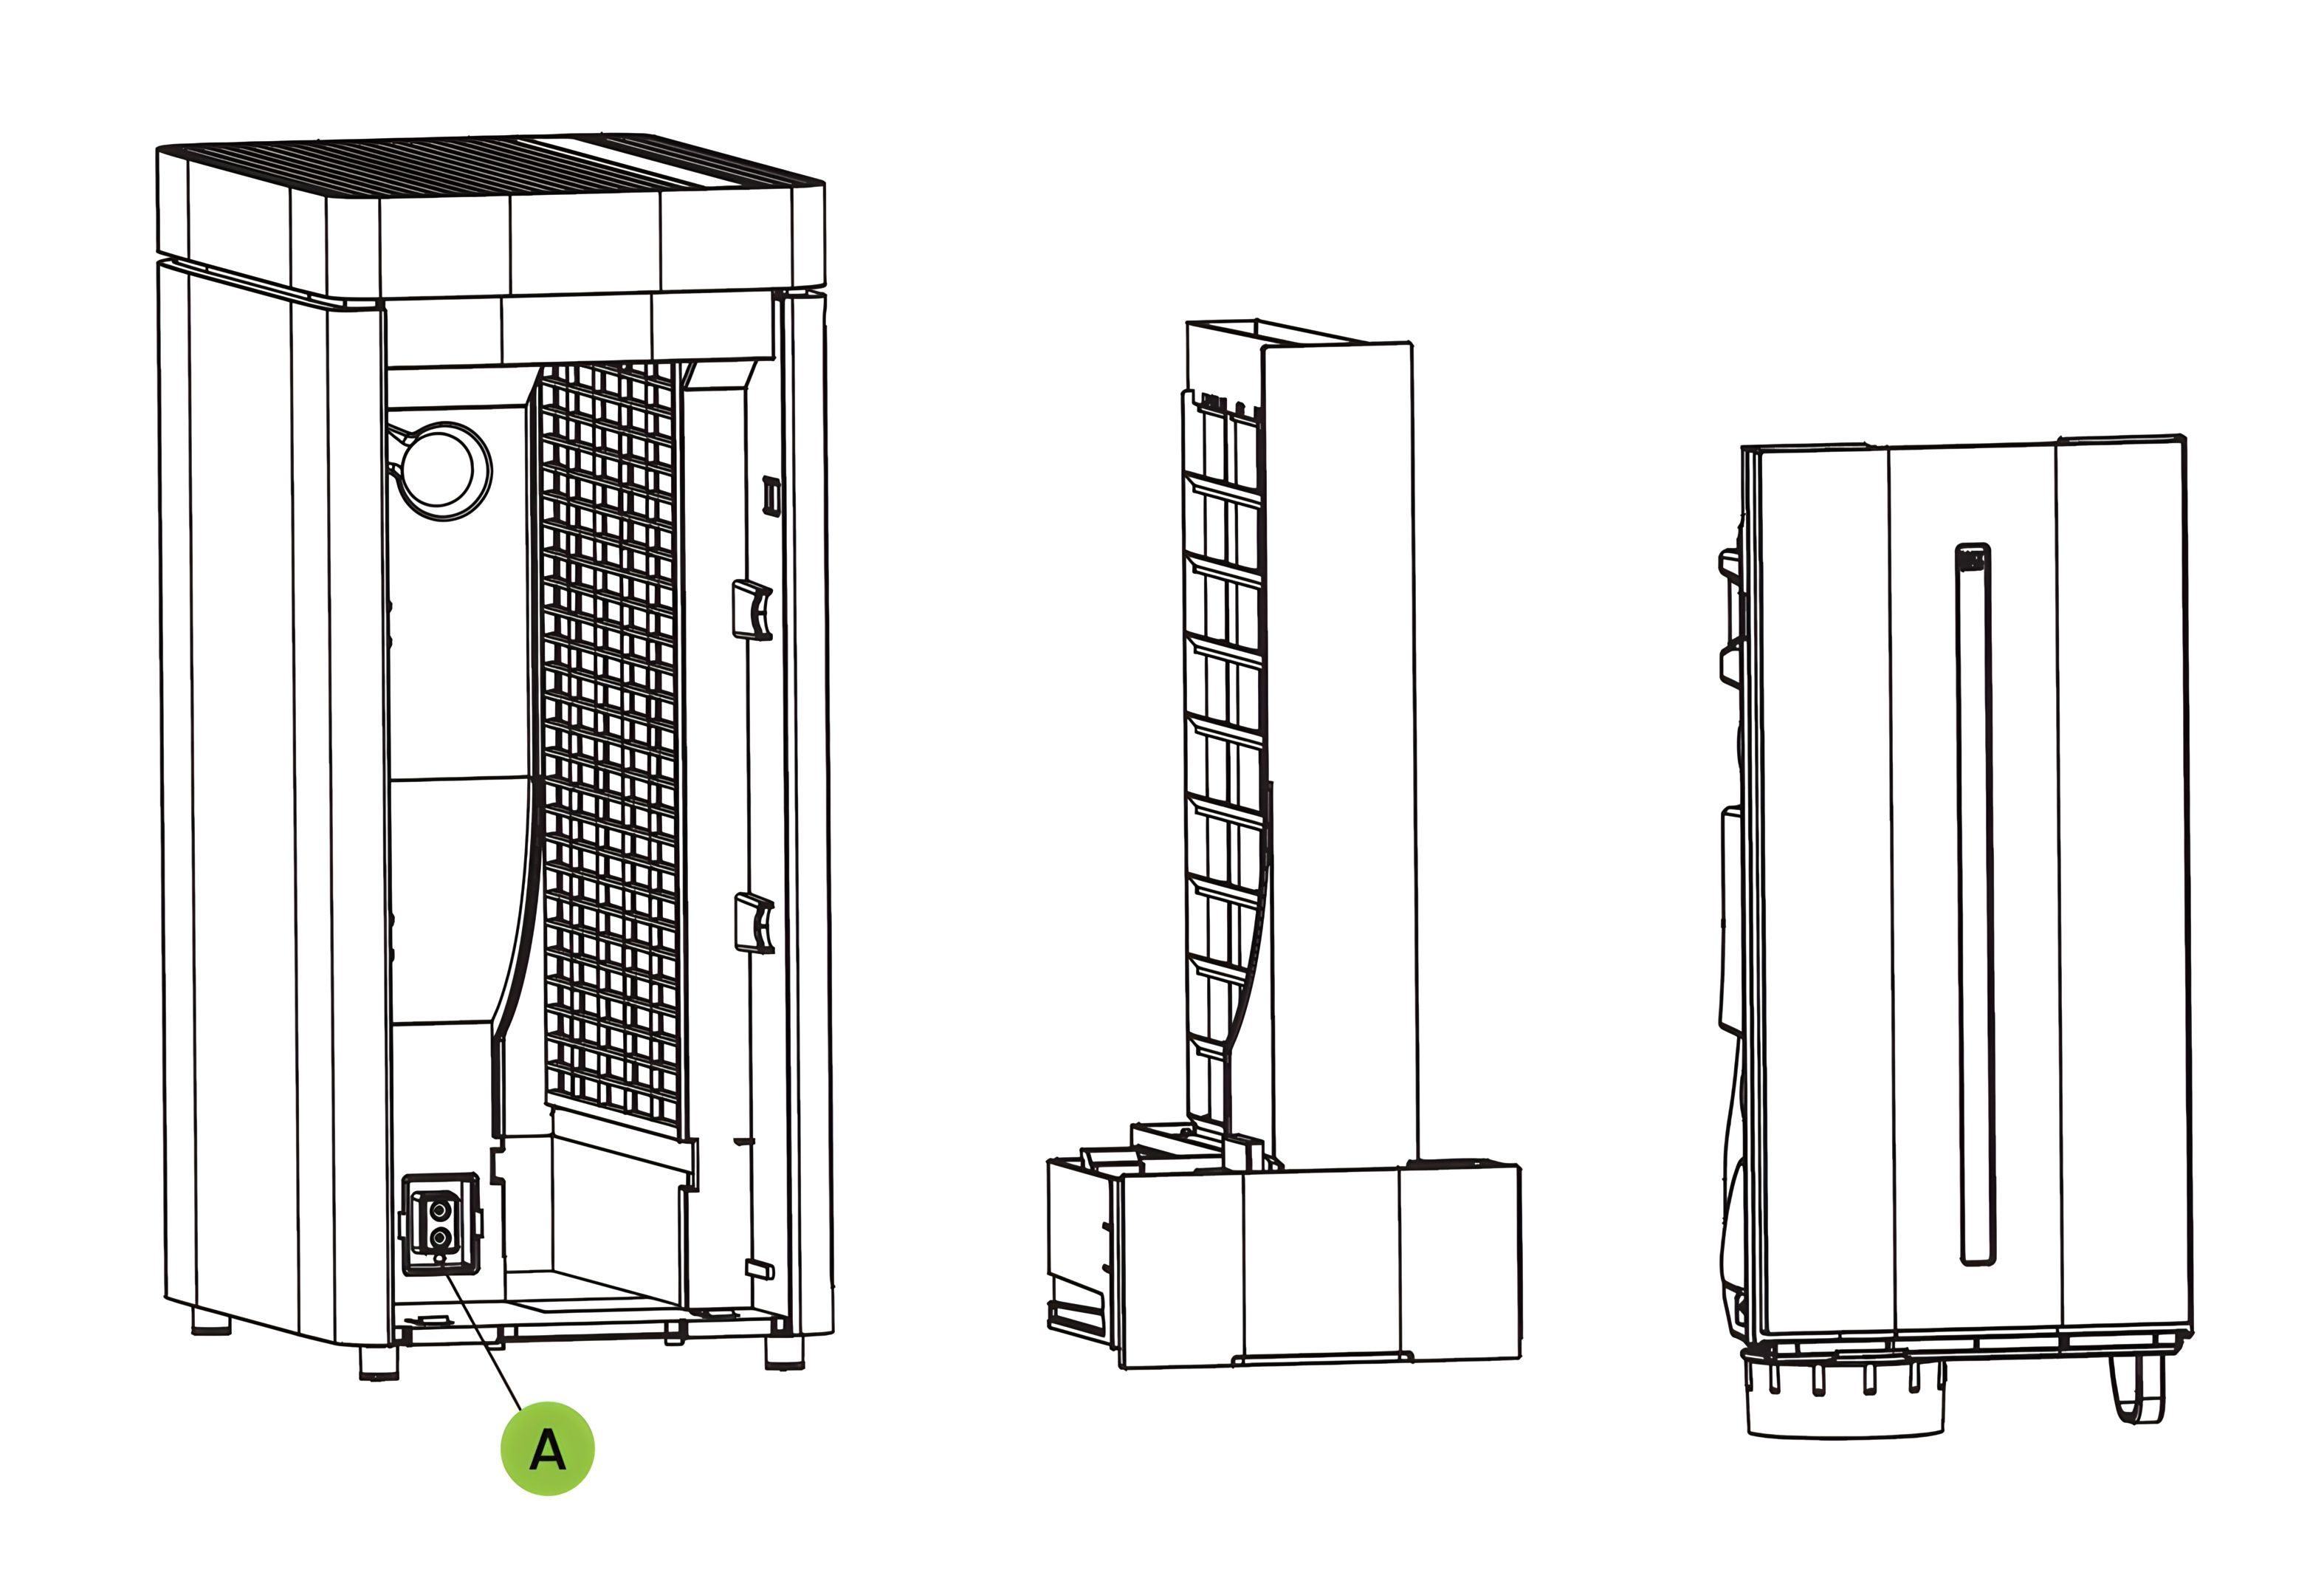
- UV safety: The UV lamp operates only when the Sink assembly is fully installed and presses the UV safety micro-switch (A). If the Sink is missing or not properly seated, pressing the UV button has no effect.
-
28. Maintenance
- When the product is not used for a long time, unplug the power plug, package the product and prevent dust from entering the body.
- Before packaging, ensure all filters (honeycomb filter, pre-filter, etc.) are dry, and wipe any water from the Water Tank and Sink.
-
Wi-Fi Connection 29. Preparation for Connection The app "ecofort SMART" is available for free for Android and iOS.
With this app, you can operate the device via your home network. A permanent Wi-Fi connection to your router and the "ecofort SMART" app are required for this.
- Install the "ecofort SMART" app and create a user account.
- Activate the Wi-Fi function by pressing and holding the UV button on the device.
- Place the device within range of your router.
- As long as the power supply is on, the Wi-Fi indicator will blink. After 3 minutes, the status will be cancelled if there is no network configuration, and the indicator light will go out. If you need to reconnect the Wi-Fi, press and hold the UV button for 5 seconds to restart the network configuration; the Wi-Fi indicator will blink again.
-
30. Method 1: Connection via Bluetooth
-
Activate Bluetooth on your mobile phone or tablet.
-
If the Wi-Fi indicator on the device is flashing, open the “ecofort SMART” app and select “Add new device”, the device will automatically connect via Bluetooth.
-
31. Method 2: Connection via Wi-Fi
-
If the Wi-Fi indicator on the device is flashing, select “Add Device” and “Humidifier” on your smartphone or tablet and follow the on-screen instructions.
-
Check the status of the Wi-Fi indicator on the device; if the Wi-Fi indicator is flashing, please confirm and press “Next”.
-
Enter your Wi-Fi network name and password, confirm and wait 1-2 minutes for the connection, then press “Finish”.
Note:
-
Once the device is successfully connected, the Wi-Fi light will illuminate. You can now operate the device via the app.
-
Press and hold the UV button for about 5 seconds to disconnect the device; the Wi-Fi indicator light will turn off.
-
32. App Control Interface After the matching is completed, you can enter the main interface to control the machine through the App.
|