Installation and configuration guide for professional installers. Covers wiring, RF pairing, installer parameter settings, and integration with central systems to ensure a safe and accurate thermostat setup.
Product Information
ecoheat Sensus Wireless Thermostat
The ecoheat Sensus is a wireless, programmable thermostat designed for residential, office, or light commercial spaces. It supports heating and cooling systems, features auto and manual modes, and offers advanced scheduling, safety functions, and wireless pairing.
Caution: Risk of explosion if battery is replaced by an incorrect type dispose of used batteries according to the instructions.
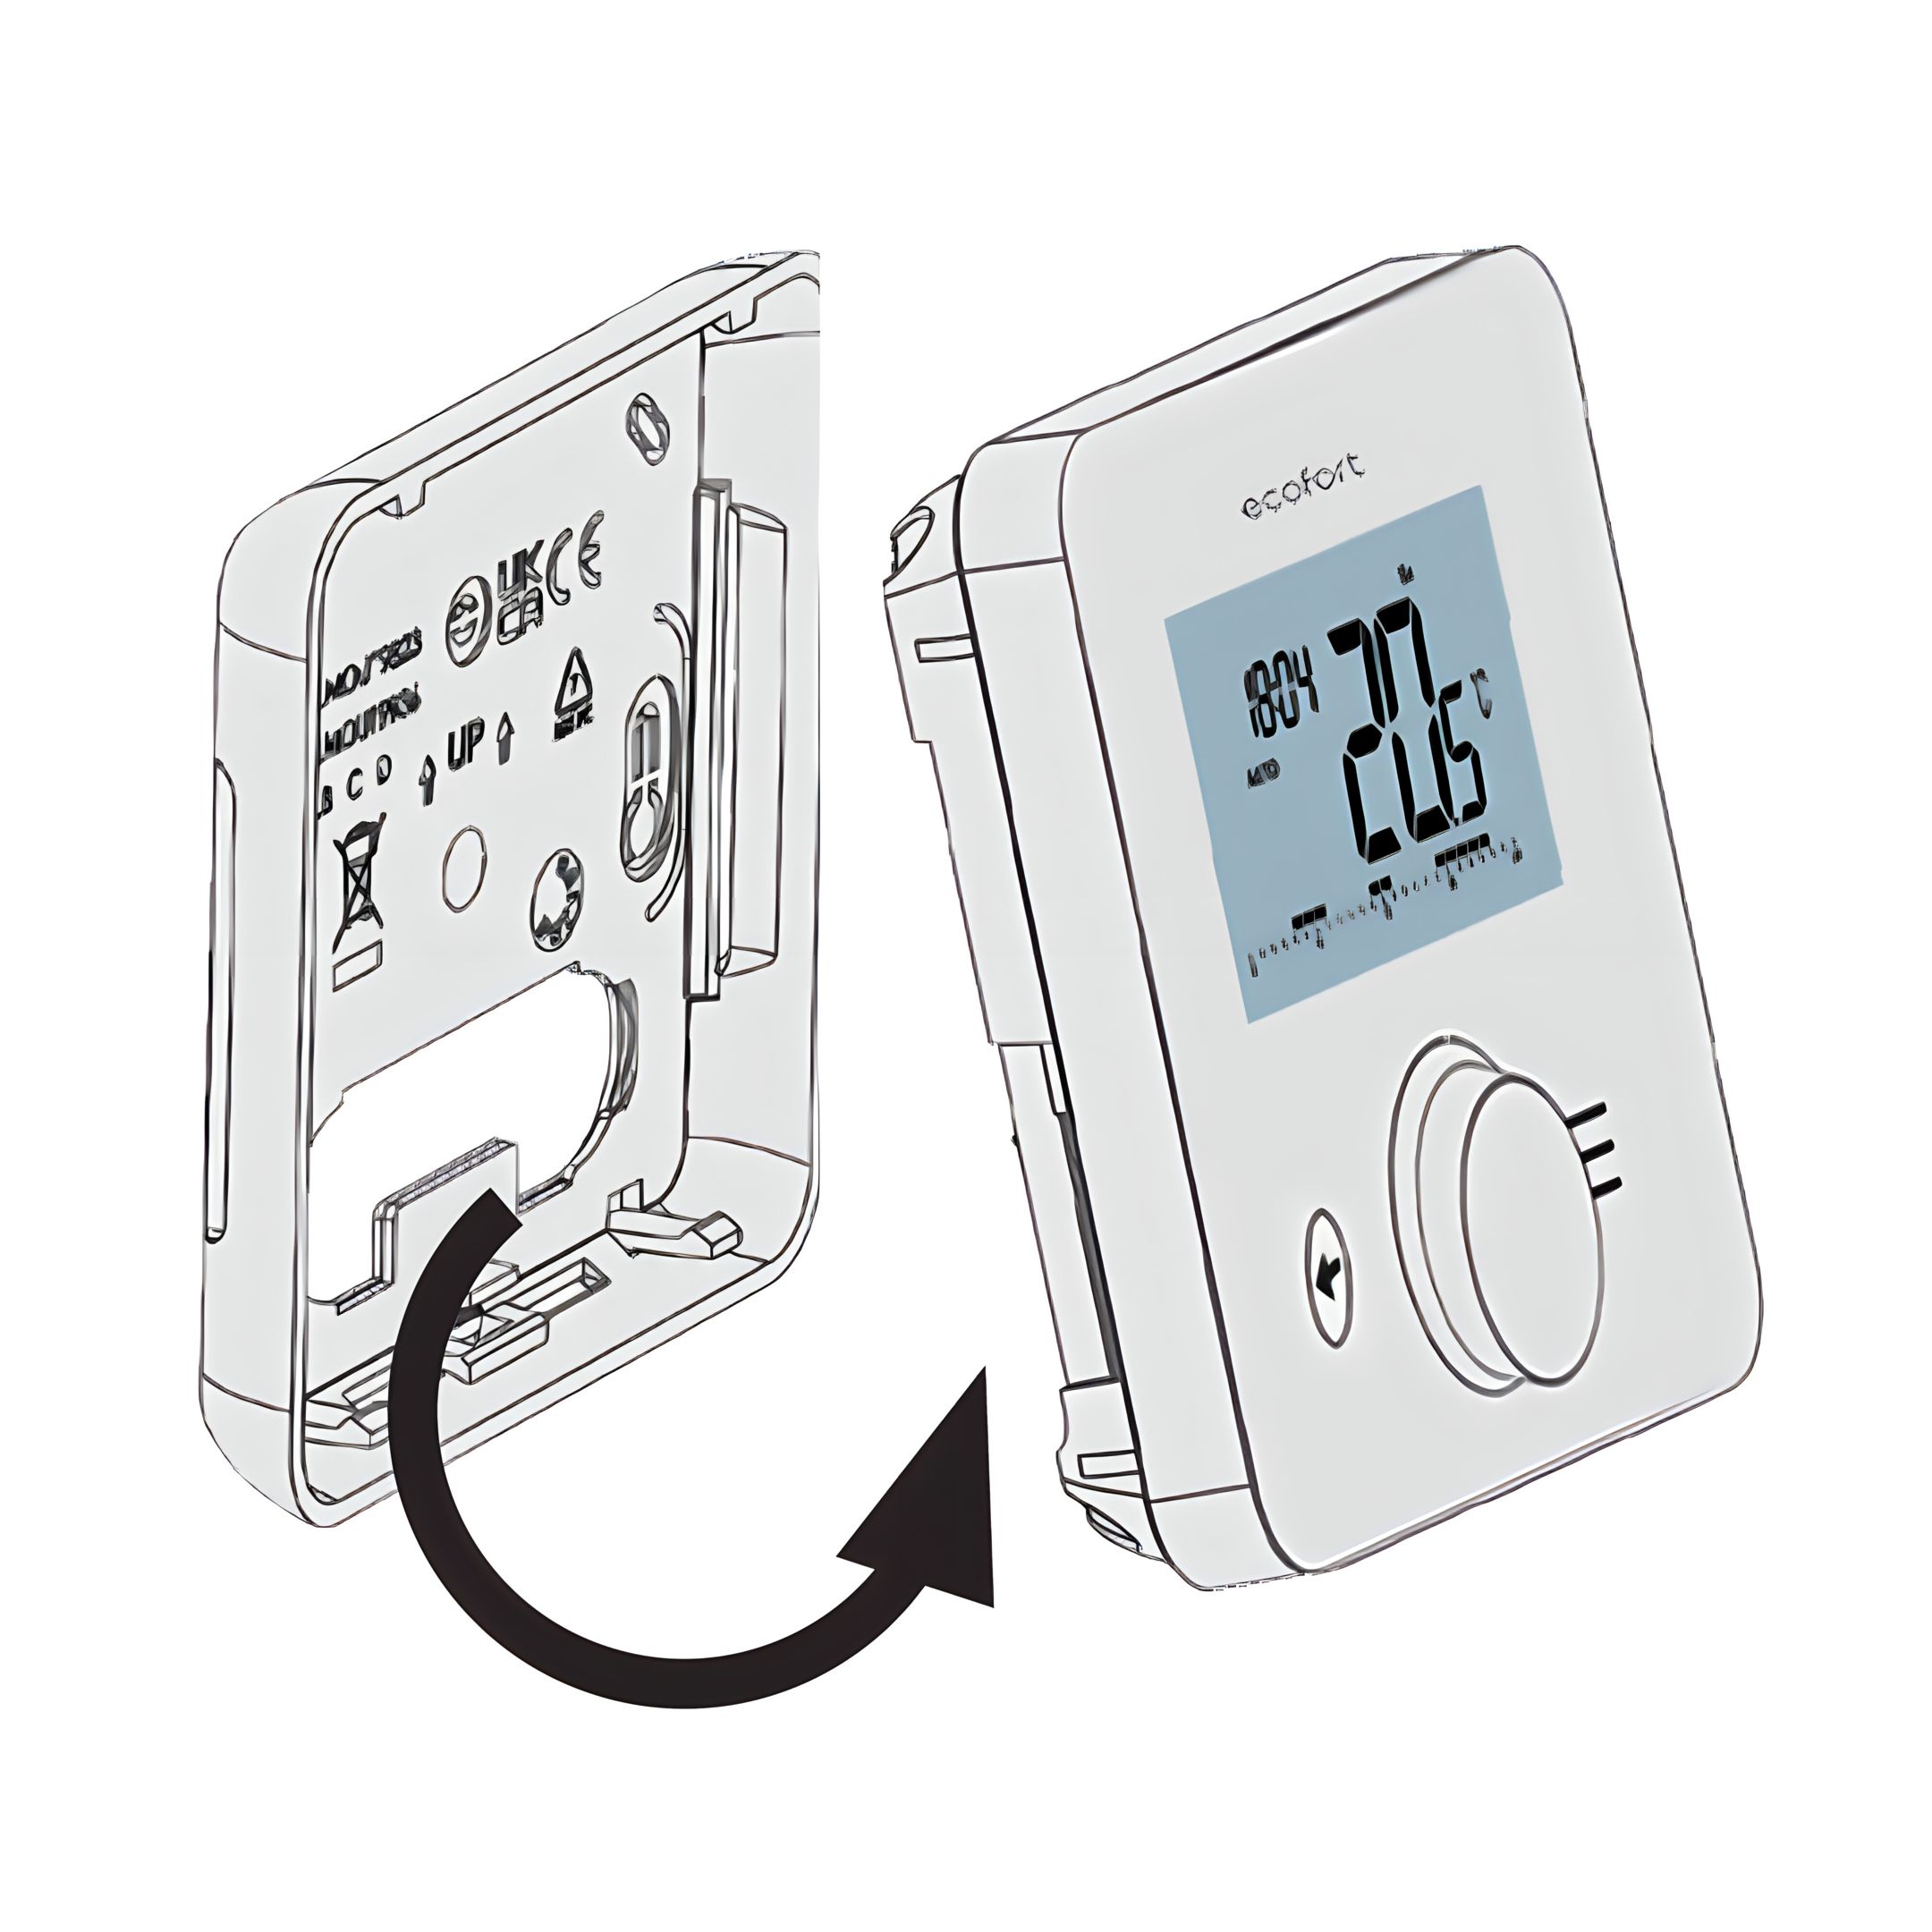
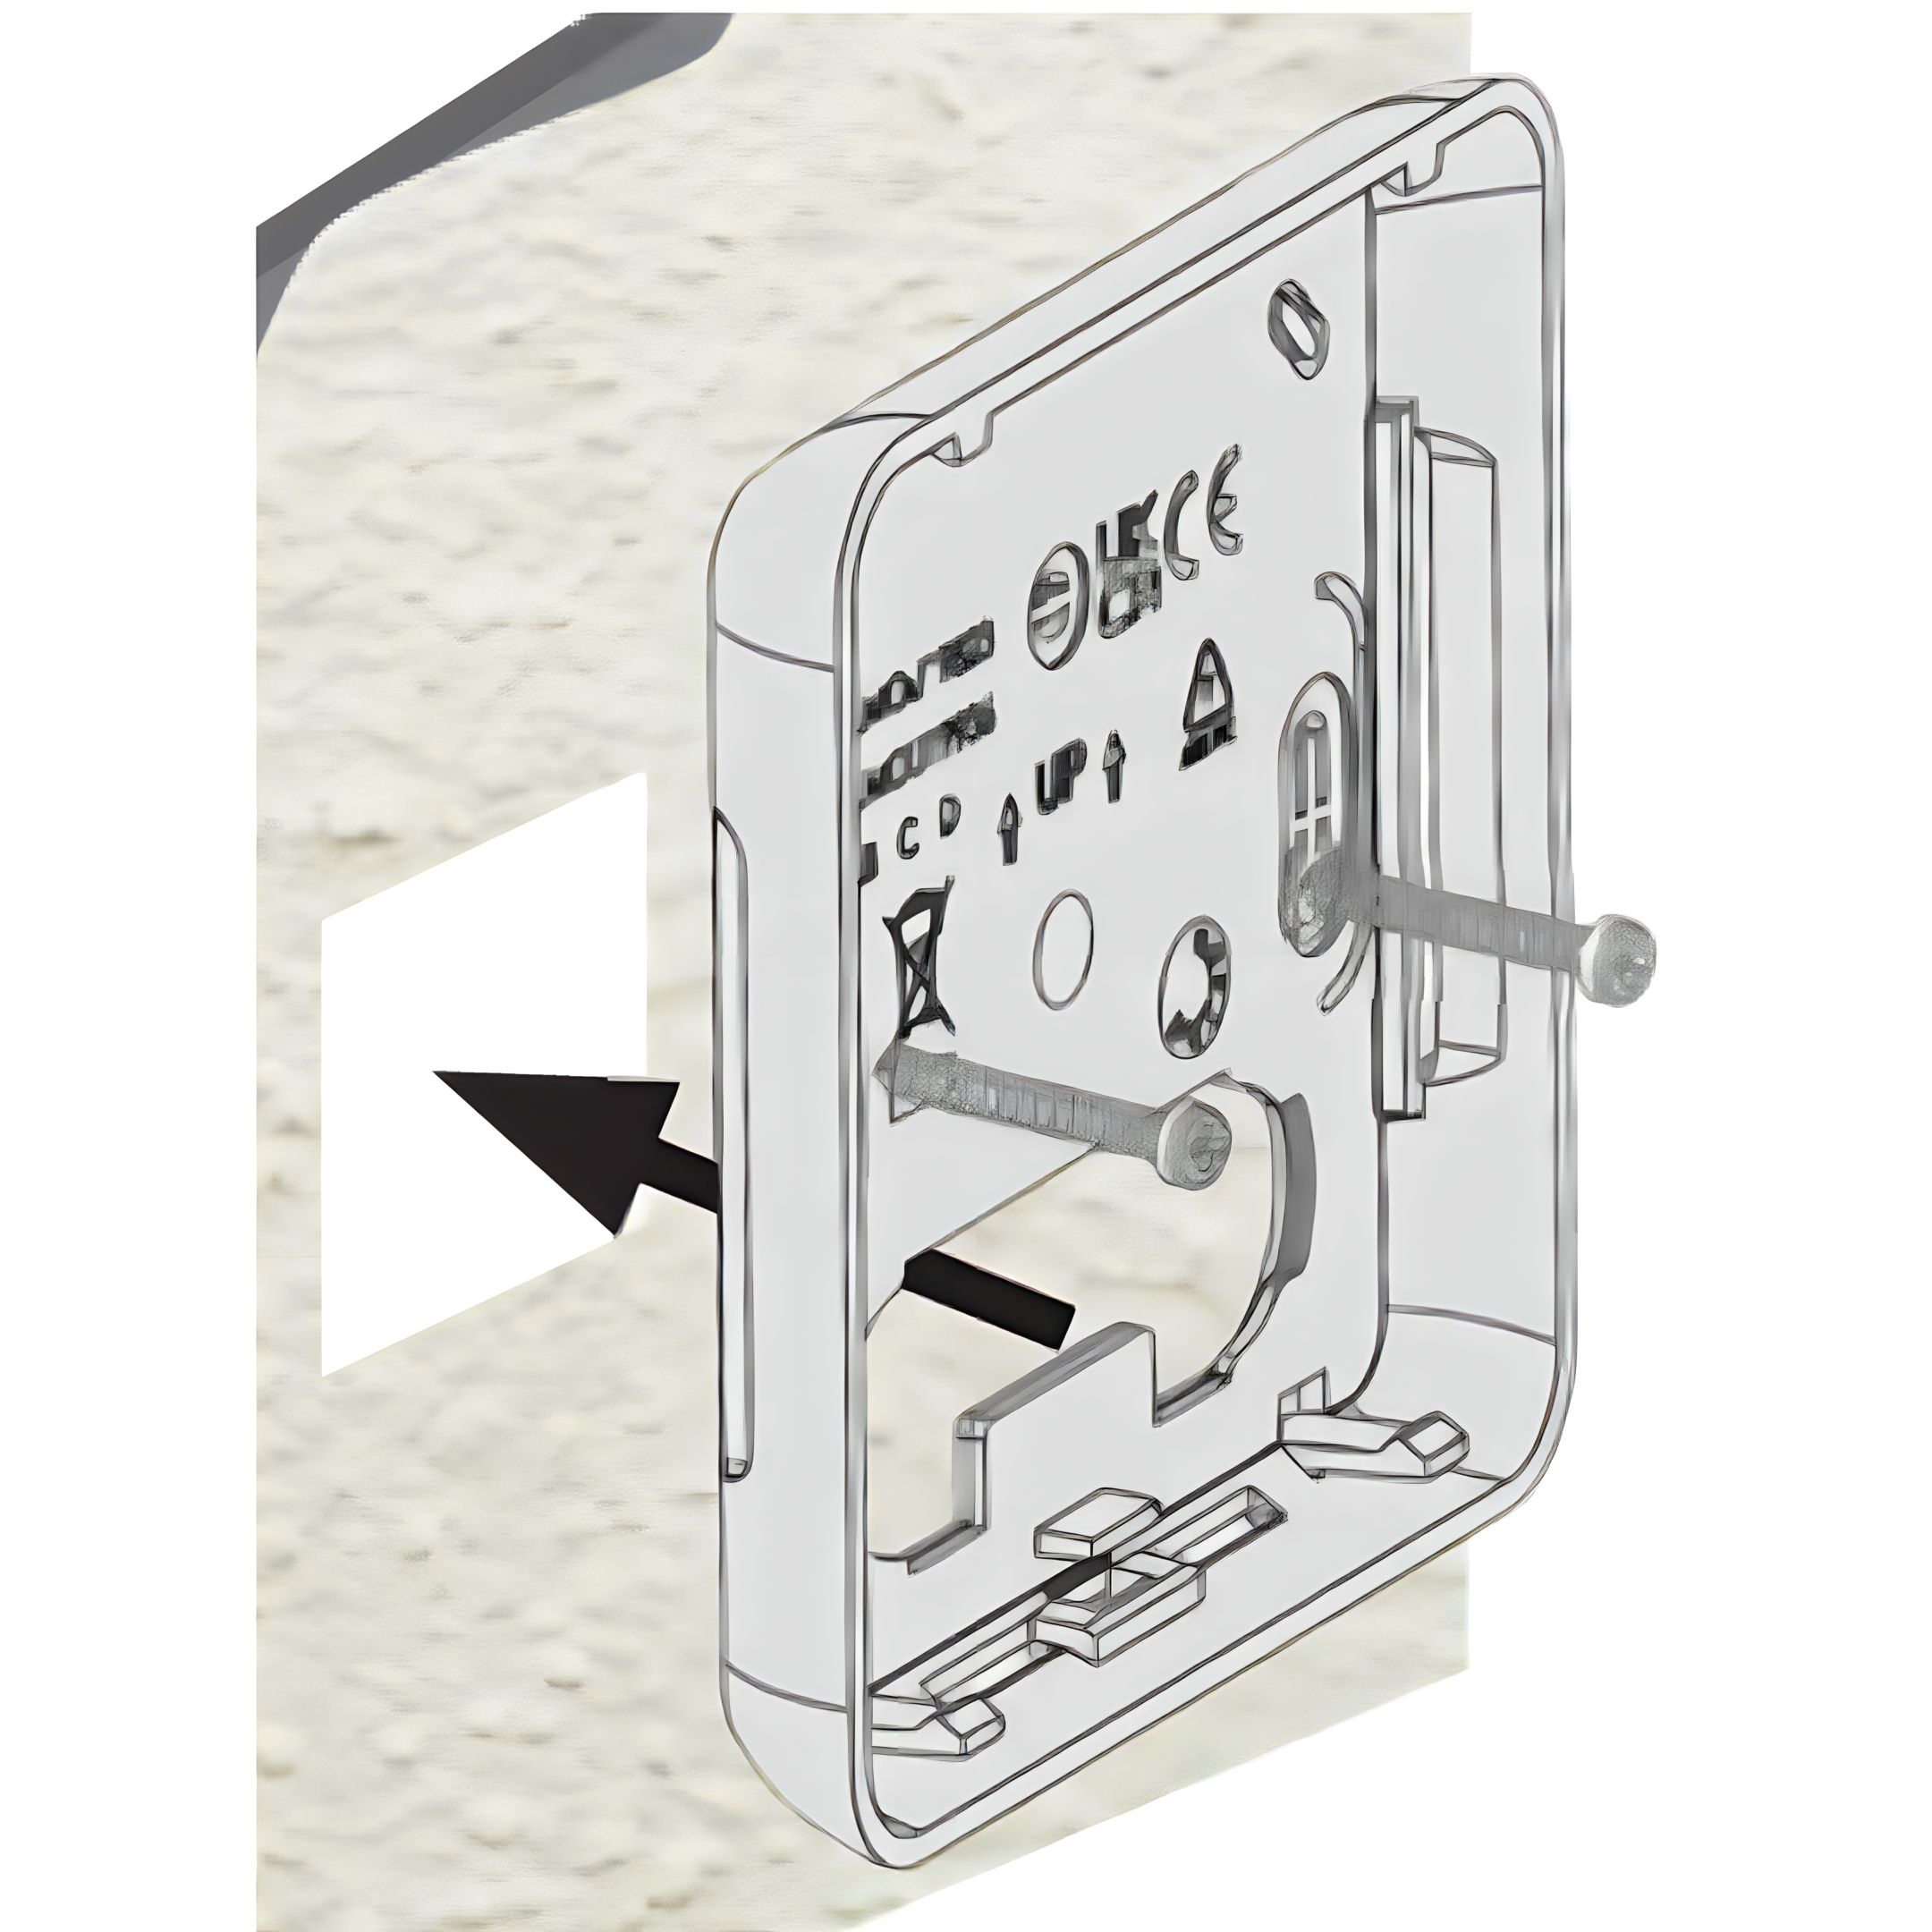
2. Wall Mounting
Choose a flat, well-ventilated area — avoid radiators, direct sunlight, or enclosed spaces.
Apply the double-sided adhesive to the mounting plate.
Use the included screws to secure it to the wall if needed.
Align the thermostat with the plate and press it until it clicks into place.
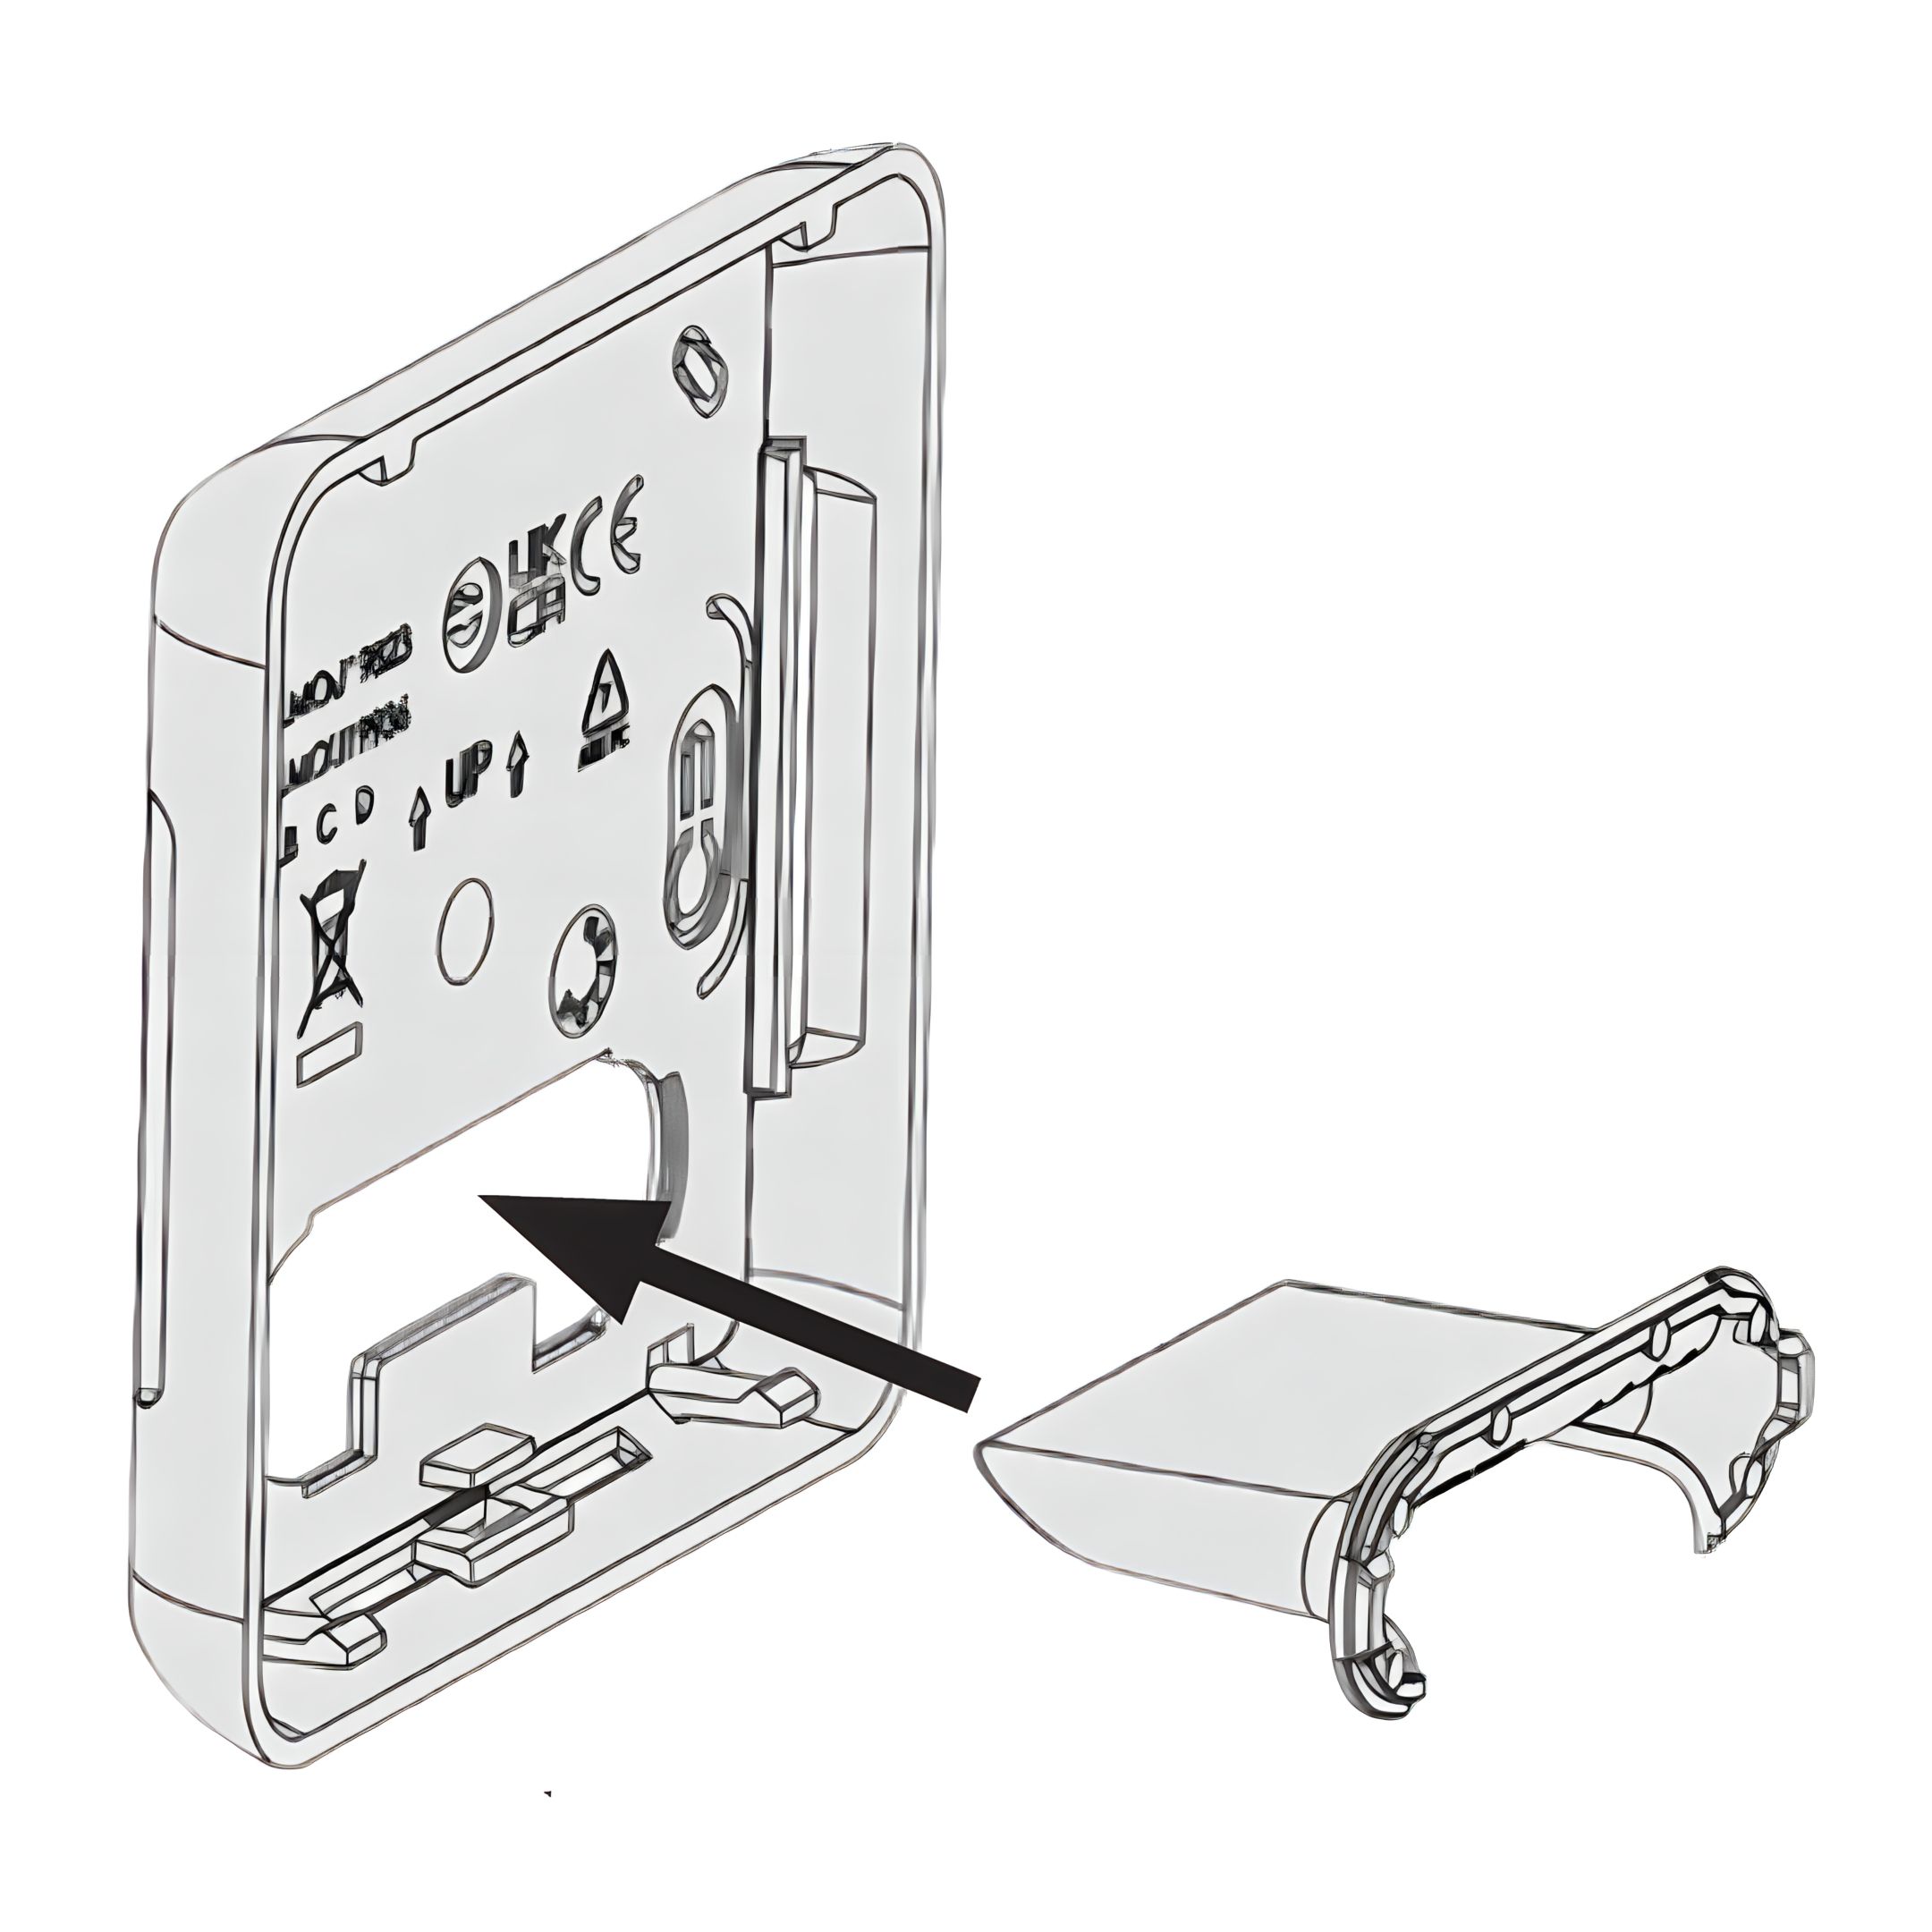
3. Table Use
Snap the provided stand into the back of the thermostat.
Place it on a flat, stable surface such as a table or shelf.
Ensure it is upright, uncovered, and away from heat or drafts.
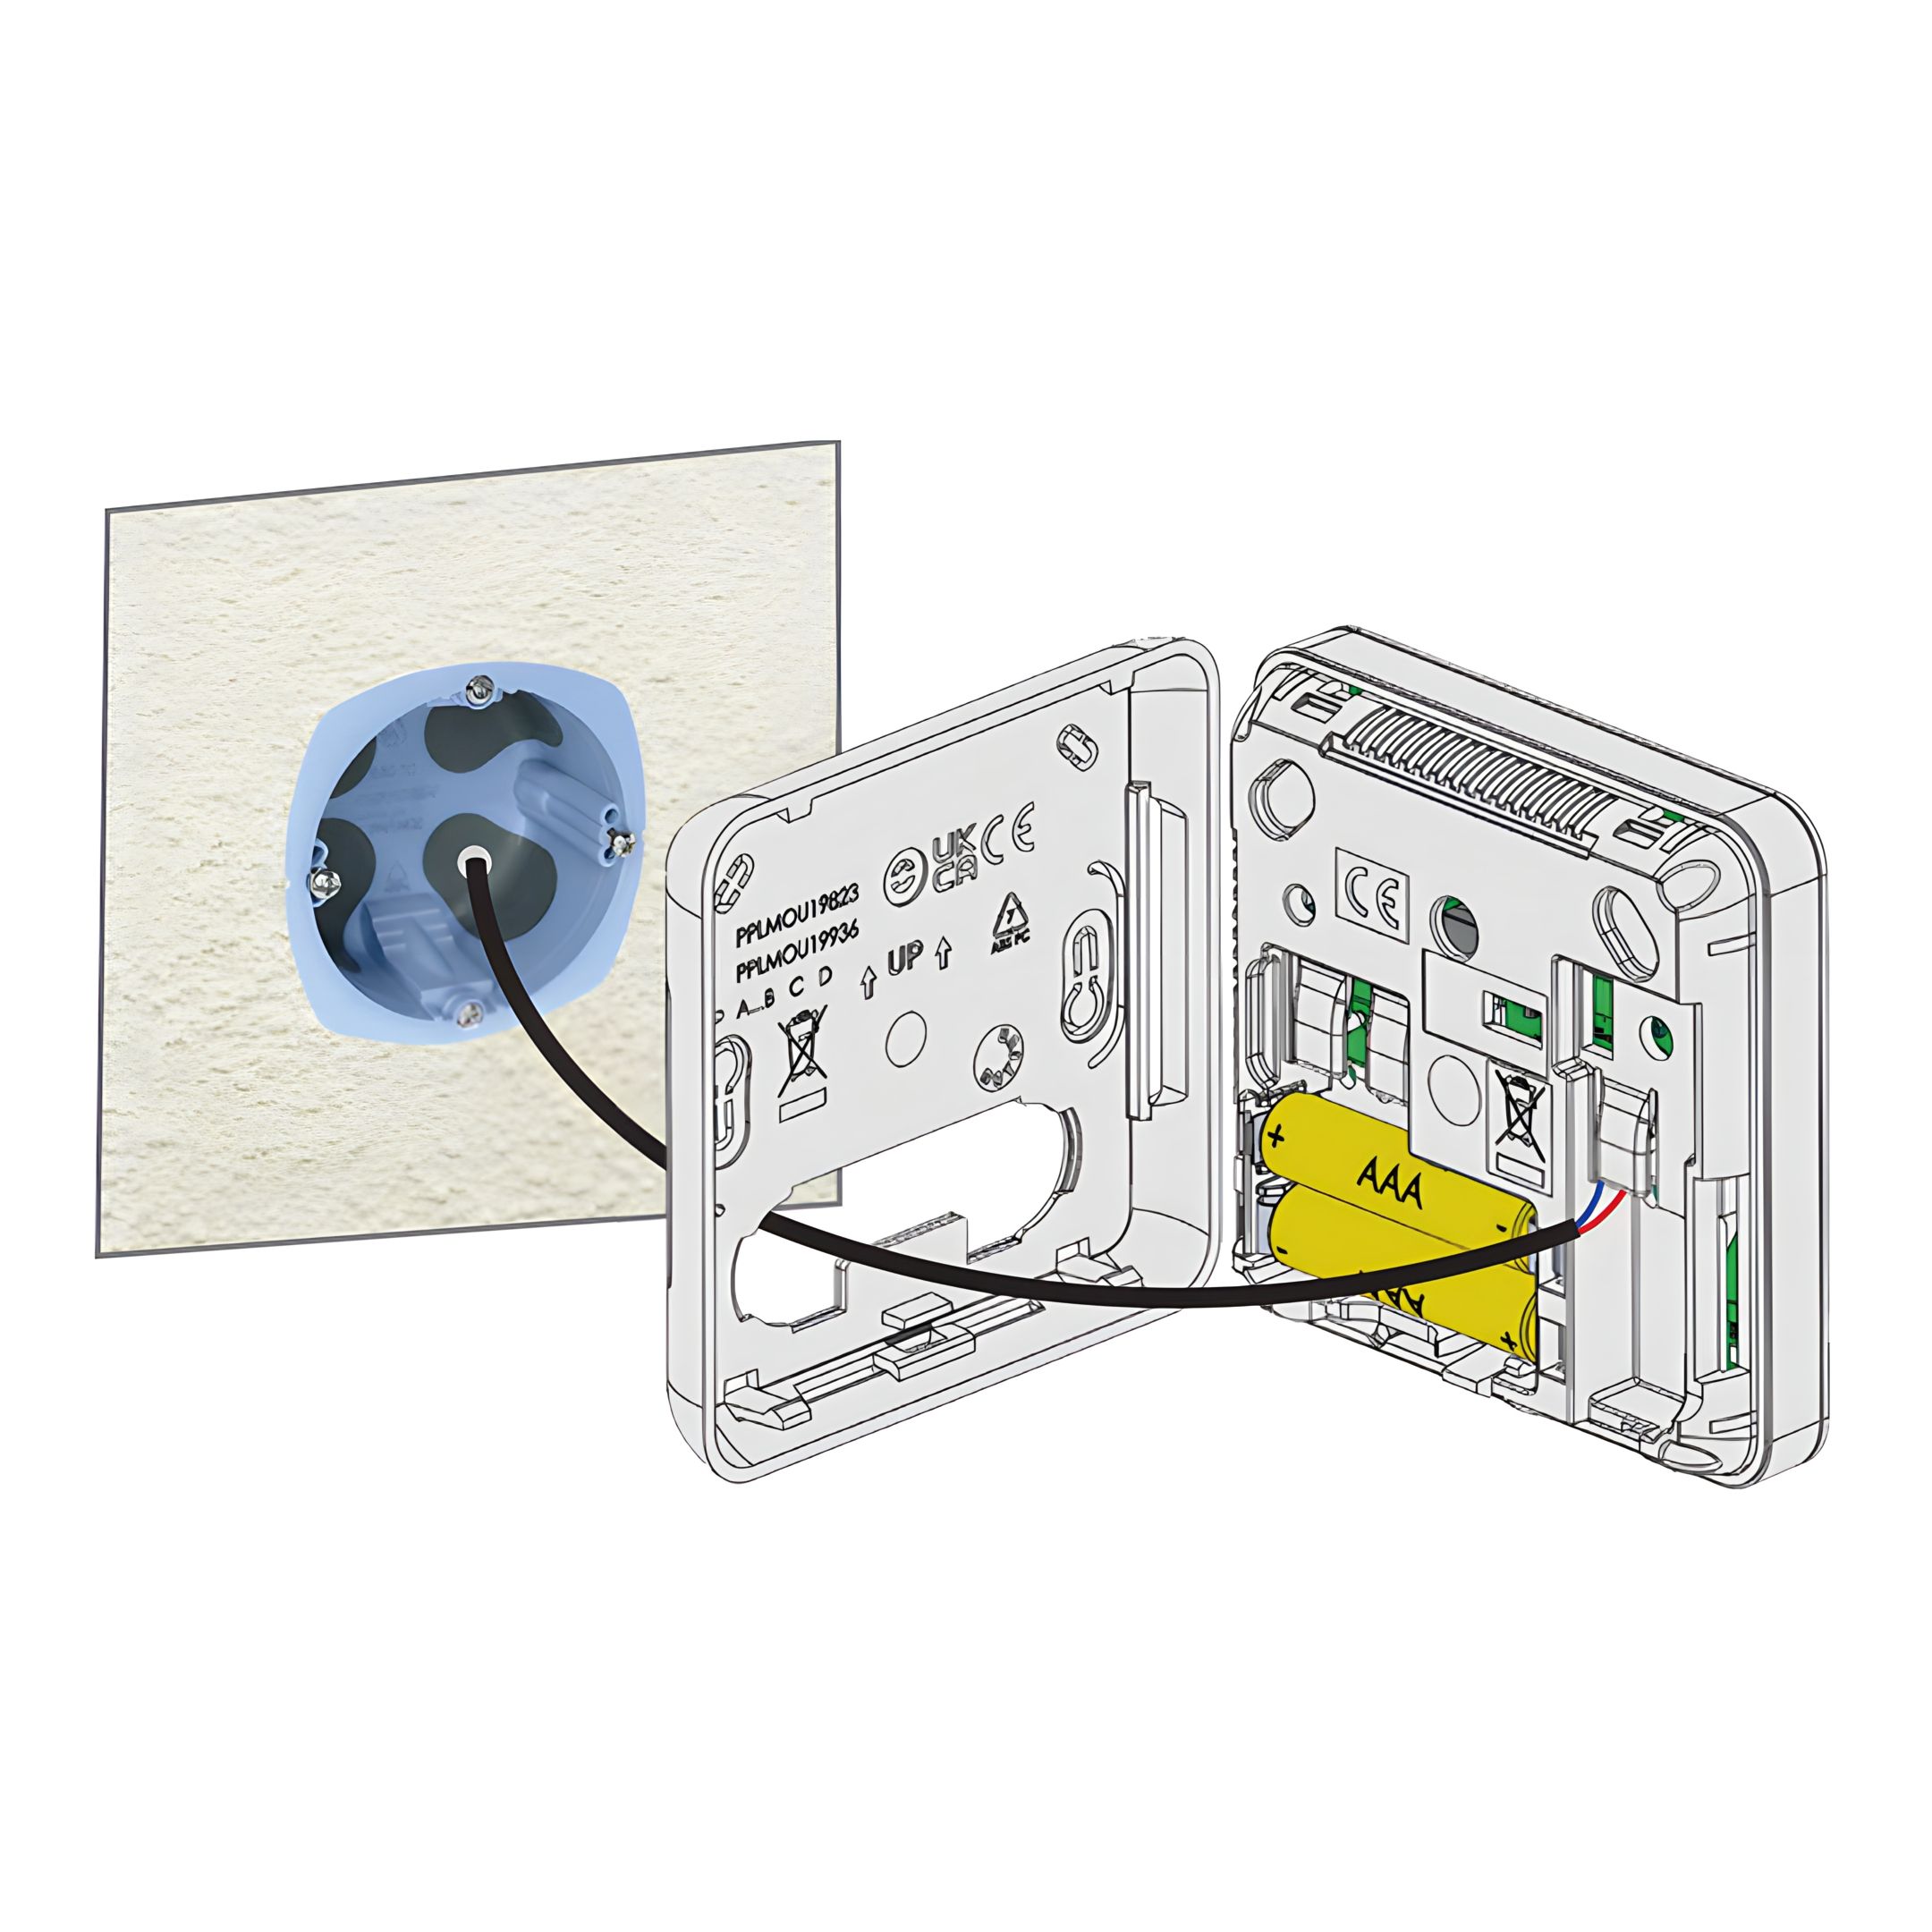
4. Connect a Floor Sensor (Optional)
If using a floor temperature sensor: Pull the sensor wire through the wall box.
Connect the two wires to the sensor terminals inside the thermostat.
Route cables neatly to avoid blocking the batteries or mounting.
Product Description
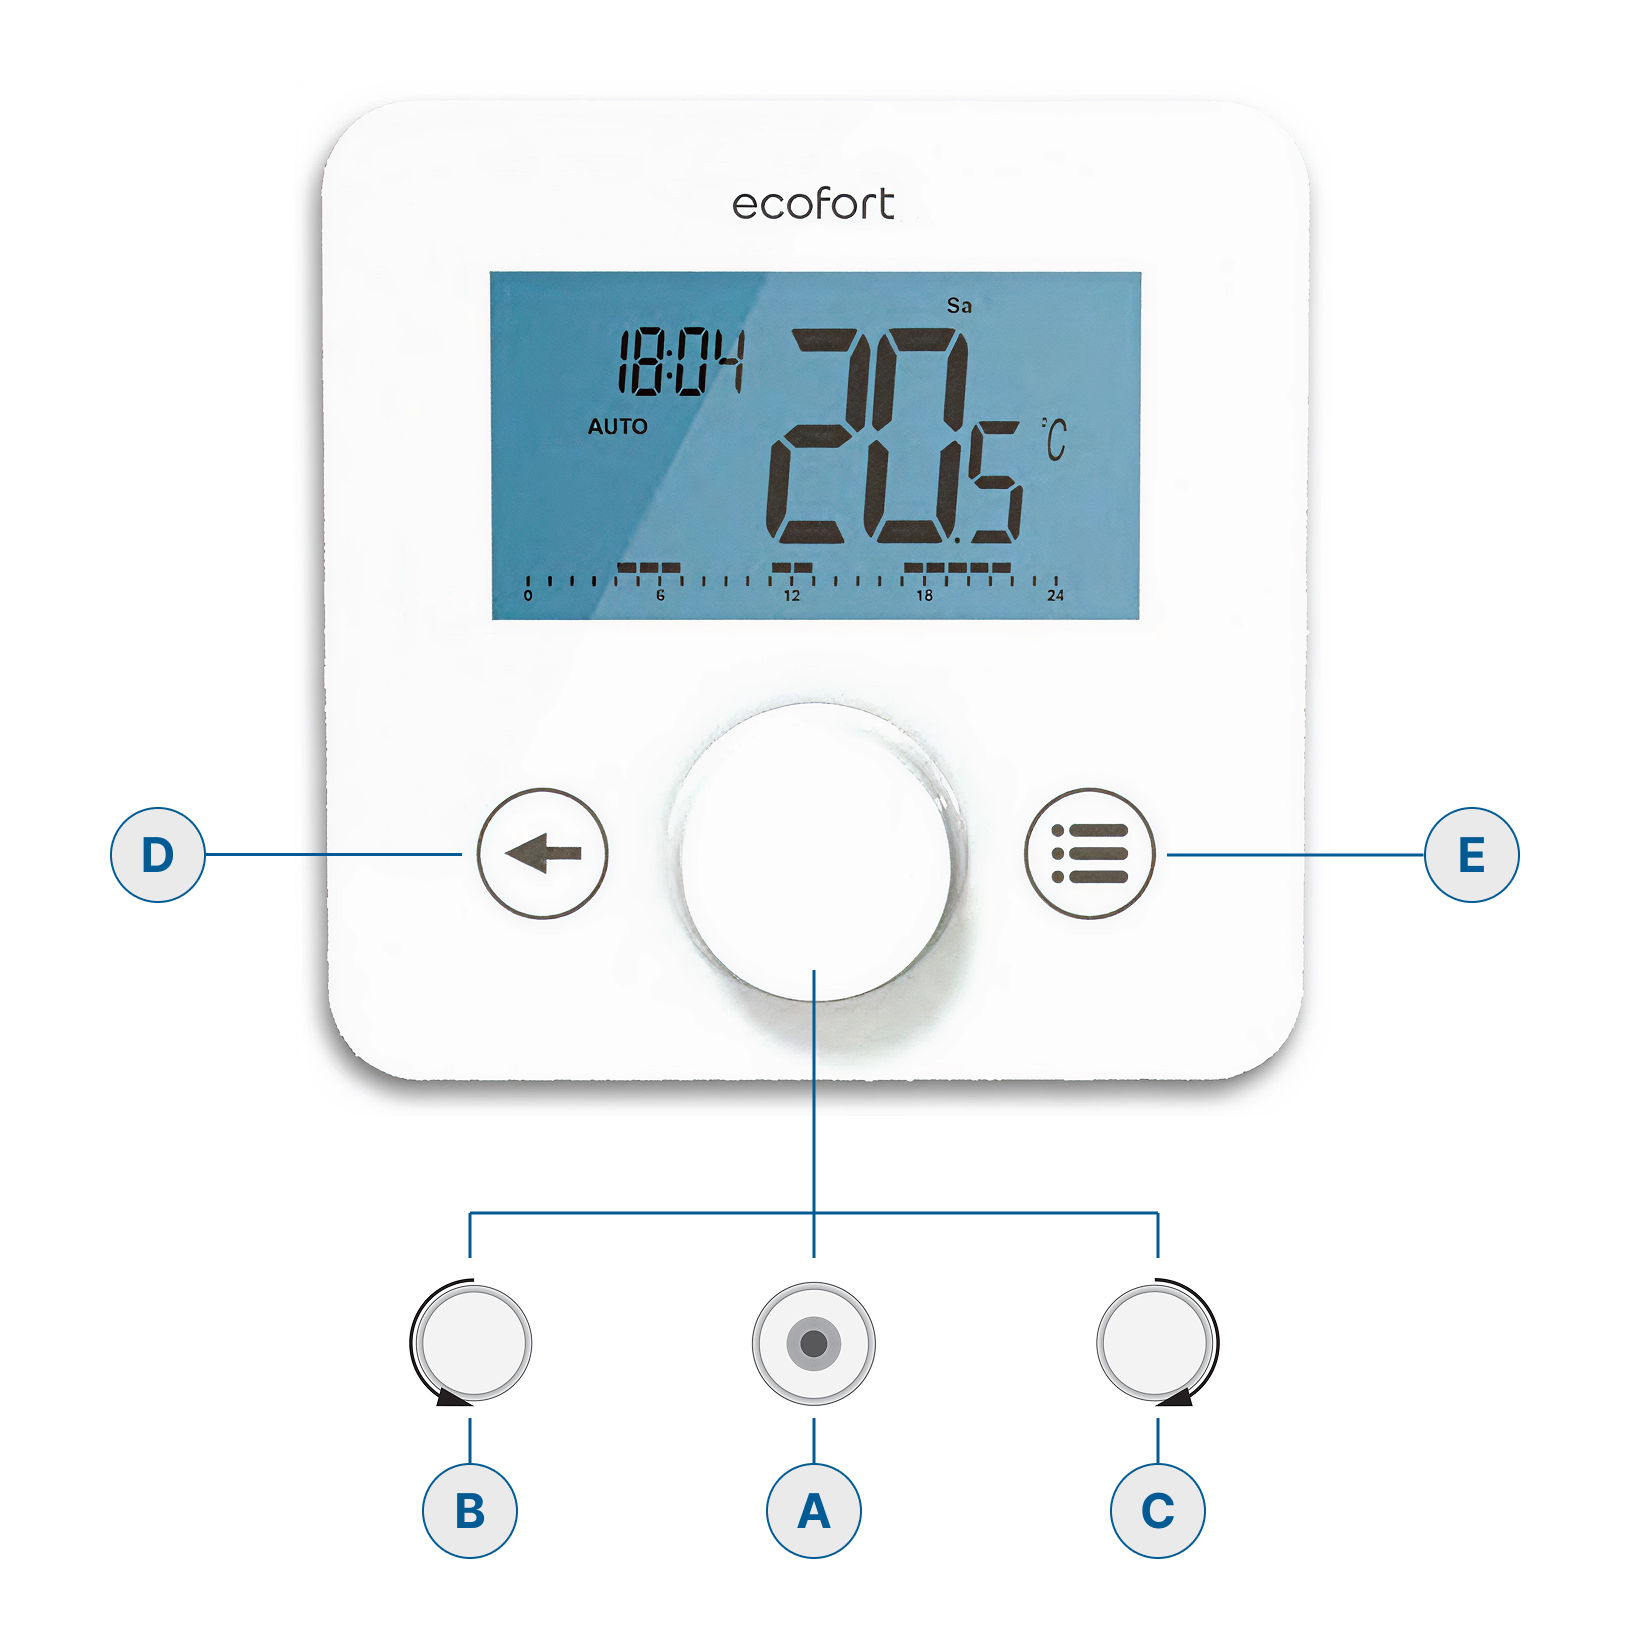
5. Keyboard on Front Face and Symbols Used
Rotary/Push Button:
A - Push Button: Product wake-up / validation of parameter setting / displaying measured temperature or temperature set point / saving of auto derogation setpoint.
B - Minus Rotation: down/left navigation.
C - Plus Rotation: up/right button for menu navigation.
Keys:
D - Home Button: To return to main screen
E - Menu Button: To access the mode selection menu, parameter menu, or edit time menu.
6. Wake-Up, Communication, and Reset Functions
When the backlight is off for several seconds, press any key to transmit an RF communication frame. This updates the thermostat based on changes made on the central unit (see “Wireless Communication and Pairing Product Description”).
If the thermostat is in standby mode, press or turn the rotator button to activate it.
Locate the Reset button on the back of the device. Hold it to access the following functions:
Unlock the device
Pair the device
Reset user parameters to factory values
Refer to the “Reset” section for detailed instructions.
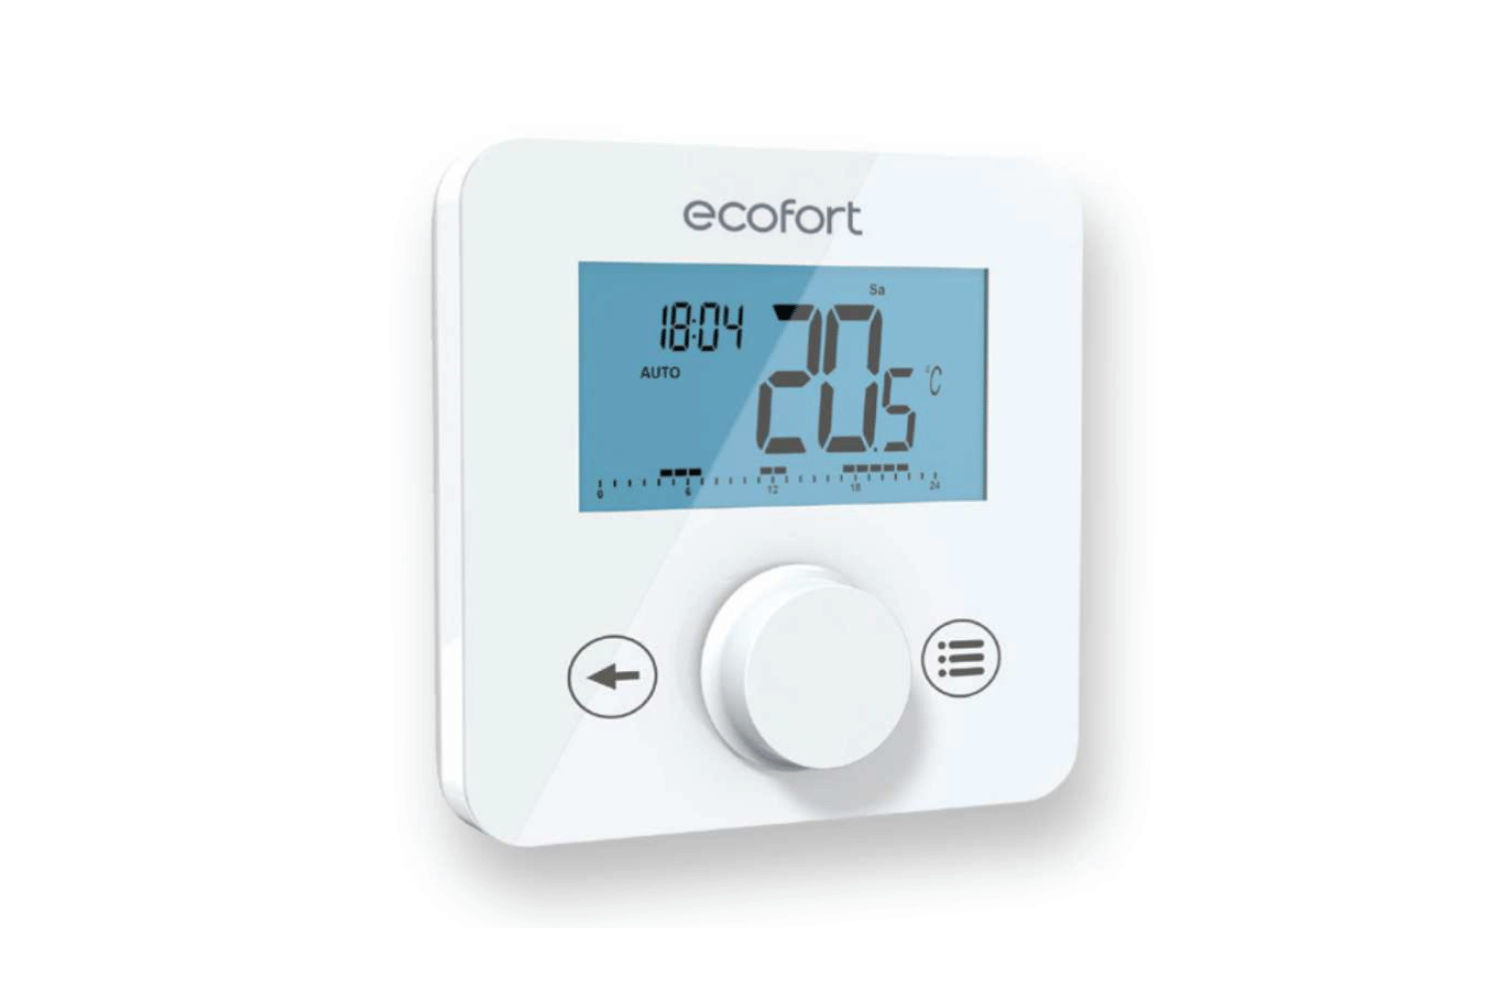
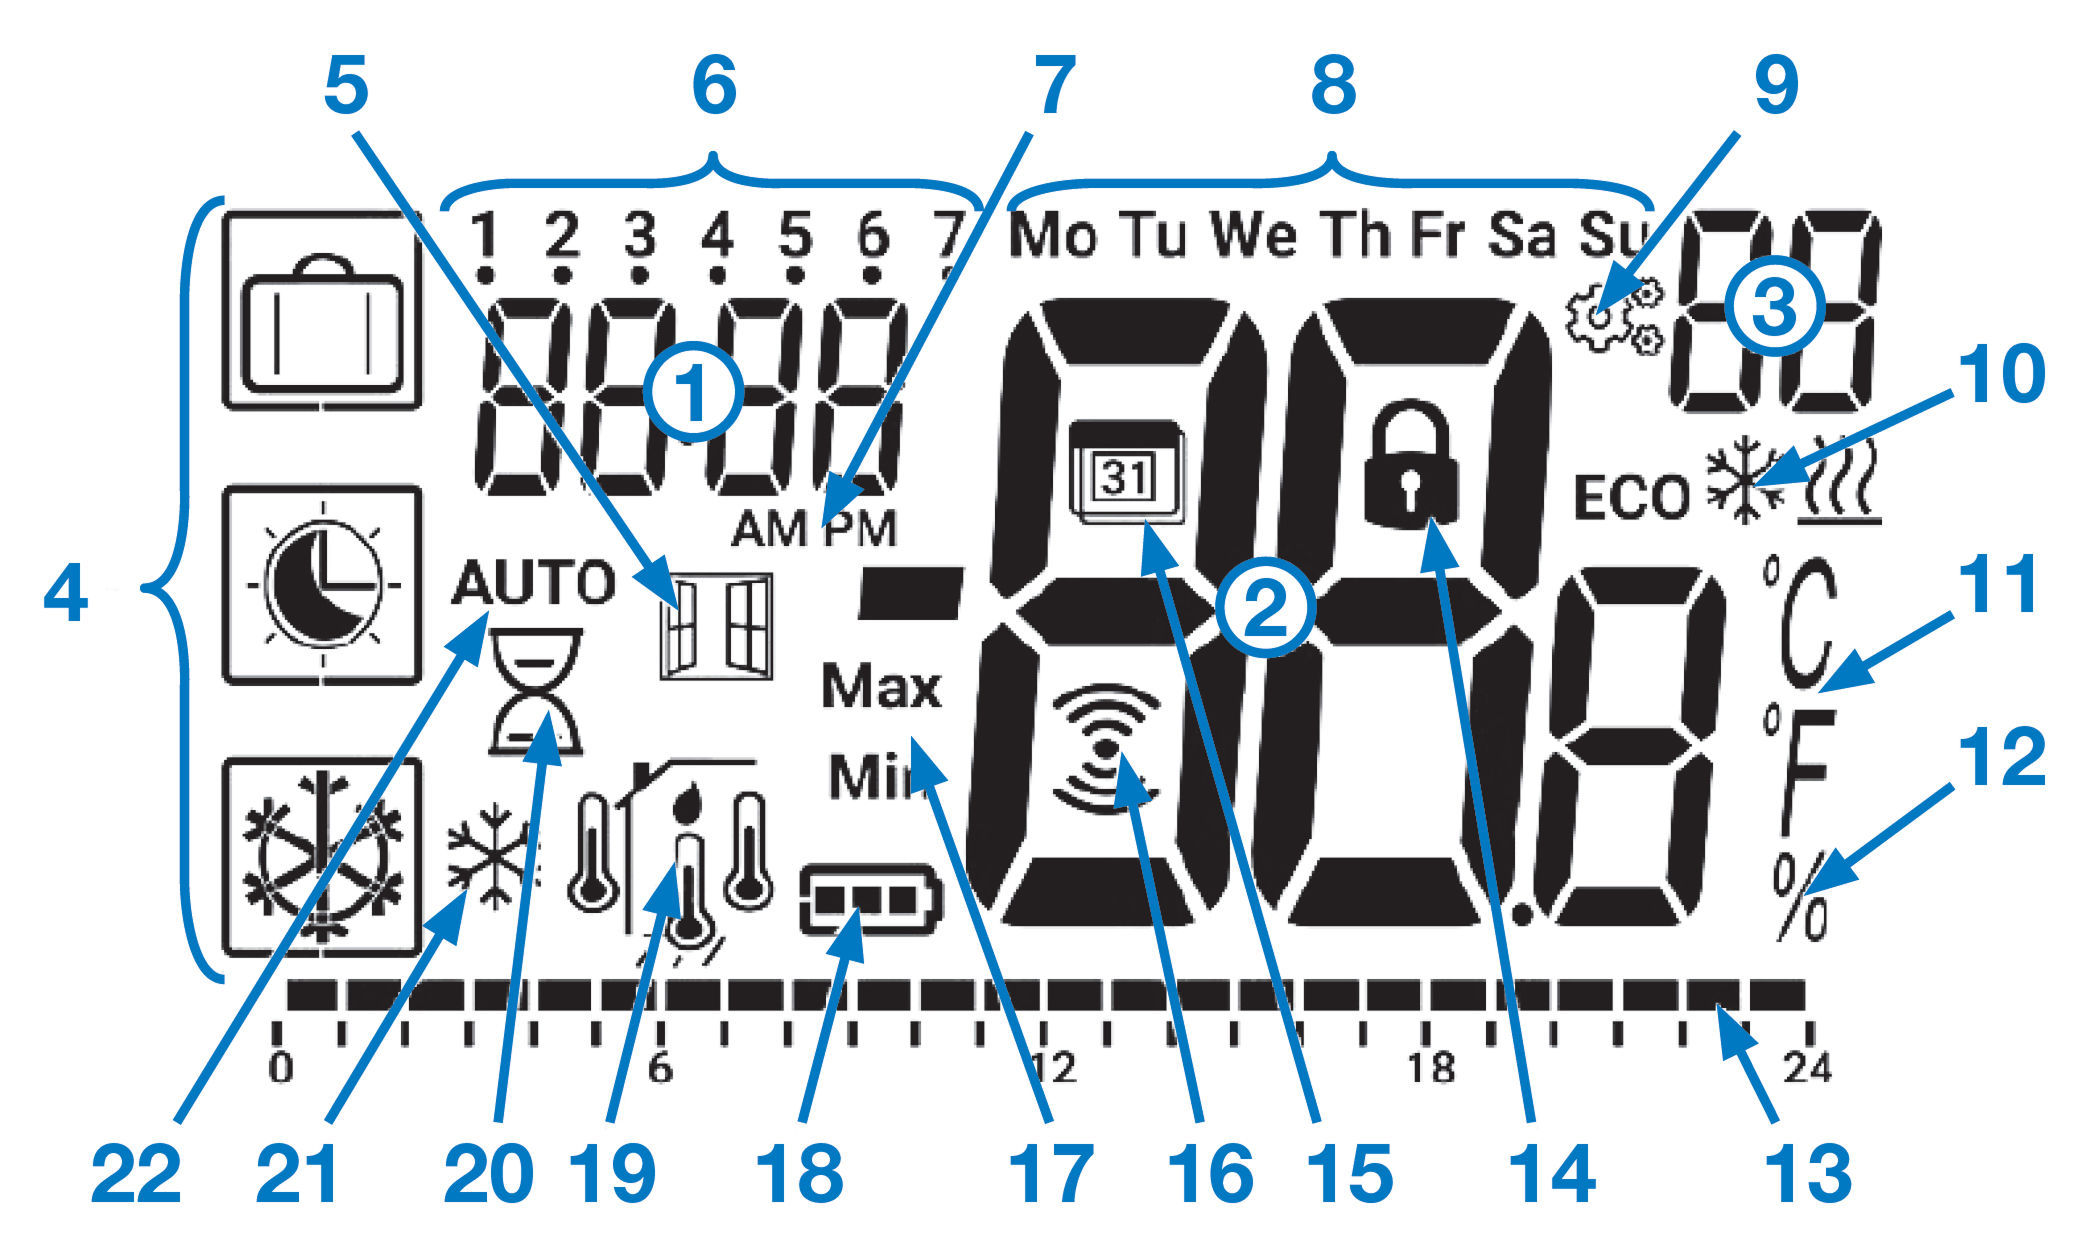
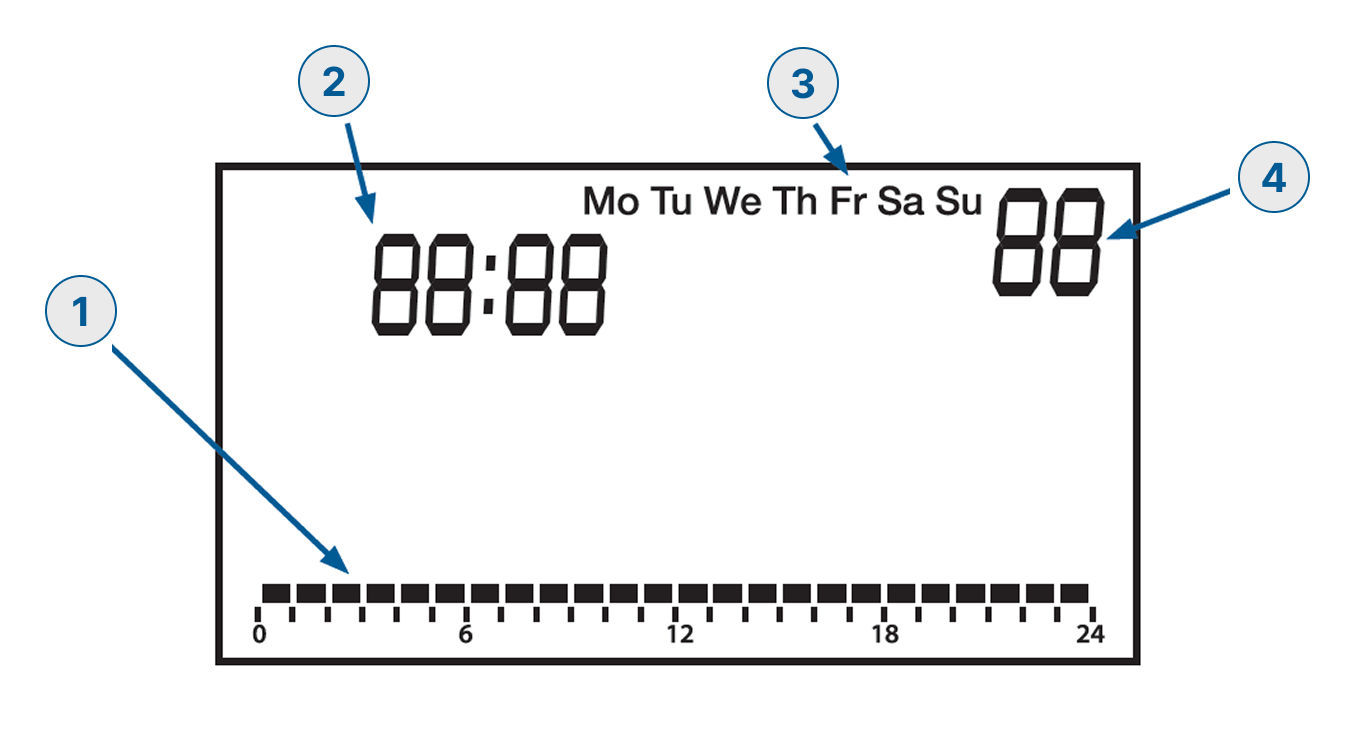
7. LCD Symbols and Descriptions
Clock icon – Clock or remaining time for boost mode
Temperature digits – Measured temperature / temperature set point
Numbers 1–7 – Day of the week (1 = Monday, 7 = Sunday)
AM / PM – 12-hour time format indicator
Day letters – Day name in English (Mo, Tu, We, etc.)
MENU icon – Parameter menu access indicator
ECO / Heating / Cooling symbols – System is in eco/reduced mode (10a), Heating is running (10b), Cooling is running (10c)
°C / °F – Temperature units (Celsius or Fahrenheit)
% symbol – Humidity rate measurement
Bar graph – Visual indicator (e.g., signal strength, humidity, etc.)
Padlock icon – Keyboard is locked
Calendar icon (31) – Edit date indicator
RF icon – RF (radio frequency) communication active
Max / Min – Max or min setpoint display
Battery icon – Battery level indicator
Sensor type icons – Humidity measurement (19a), Internal temperature sensor (19b), Ambient temperature sensor (19c), Floor temperature sensor (19d), External temperature sensor (19e)
Arrow icon – Derogation or boost mode active
Stop icon with snowflake – Antifreeze mode active
AUTO + ECO combo – Auto mode is active with reduced temperature setpoint
Radio Pairing
8. RF Wireless Communication Initialization
To enable wireless communication, the thermostat must be paired with the receiver.
On the back of the thermostat, press and hold the button for about 5 seconds.
The screen will display In it and rF, indicating entry into pairing mode.
Wait for the pairing to complete:
Keep holding the button as the thermostat goes through the initialization sequence.
When pairing is successful, the display will show In it along with the RF Communication icon.
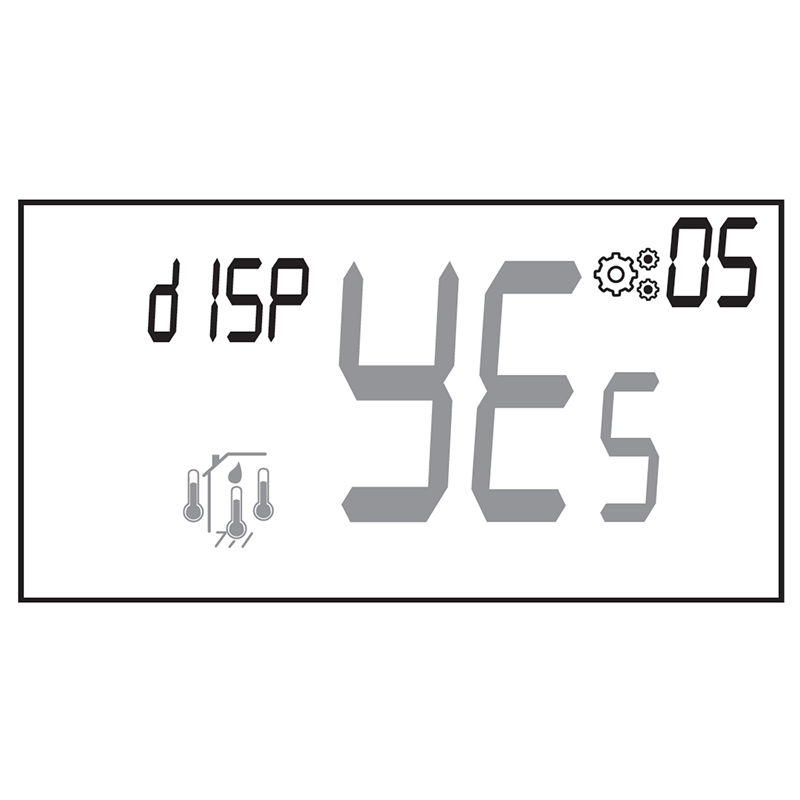
9. Alternative Method: Using the Parameter Menu
To enter radio pairing mode via the configuration interface:
Access the Parameter Menu
Press and hold the Menubutton (E) for 3 seconds to access the configuration screen.
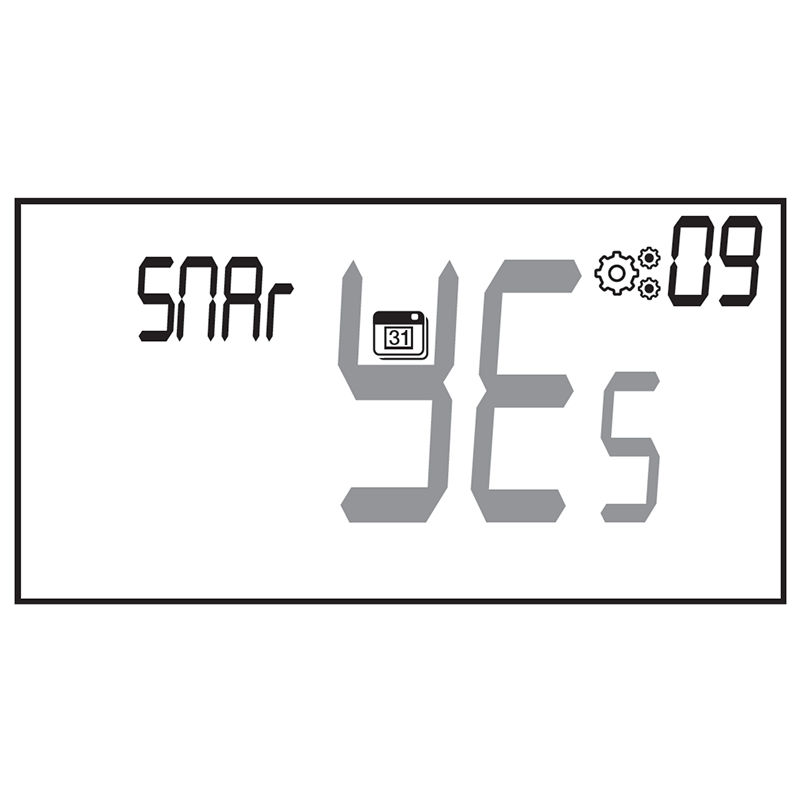
Select the "PArA" (user parameters) menu.
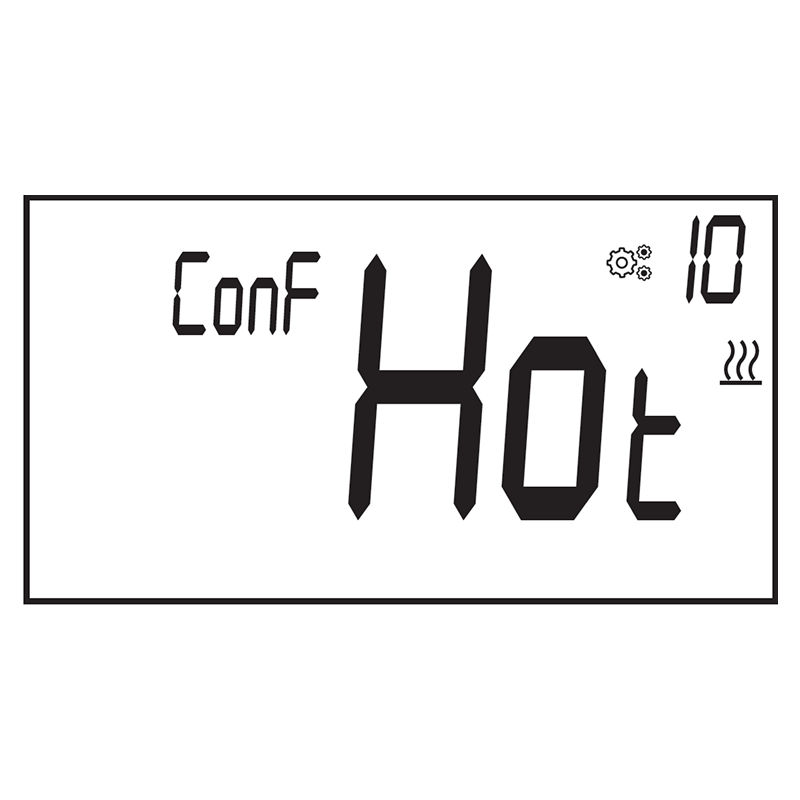
Select the RF Parameter:
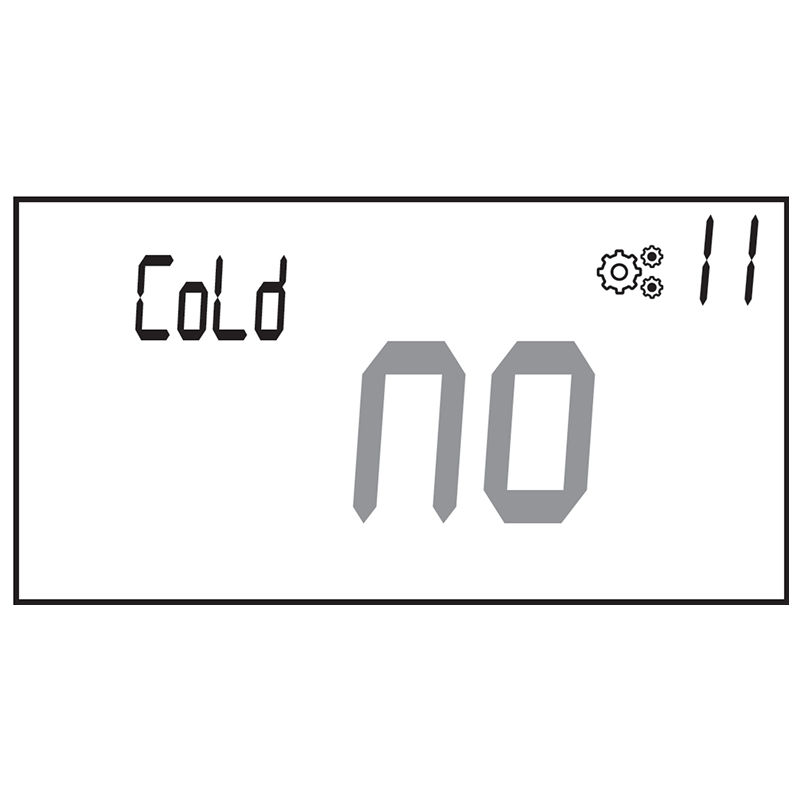
Use the rotator to scroll through parameters until you reach: rF
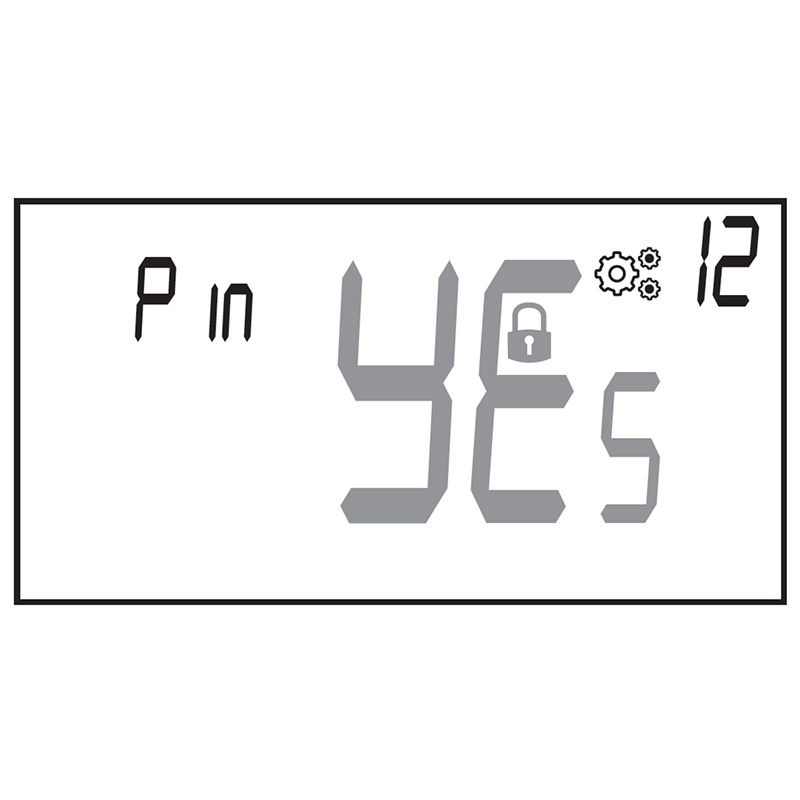
This parameter controls radio pairing.
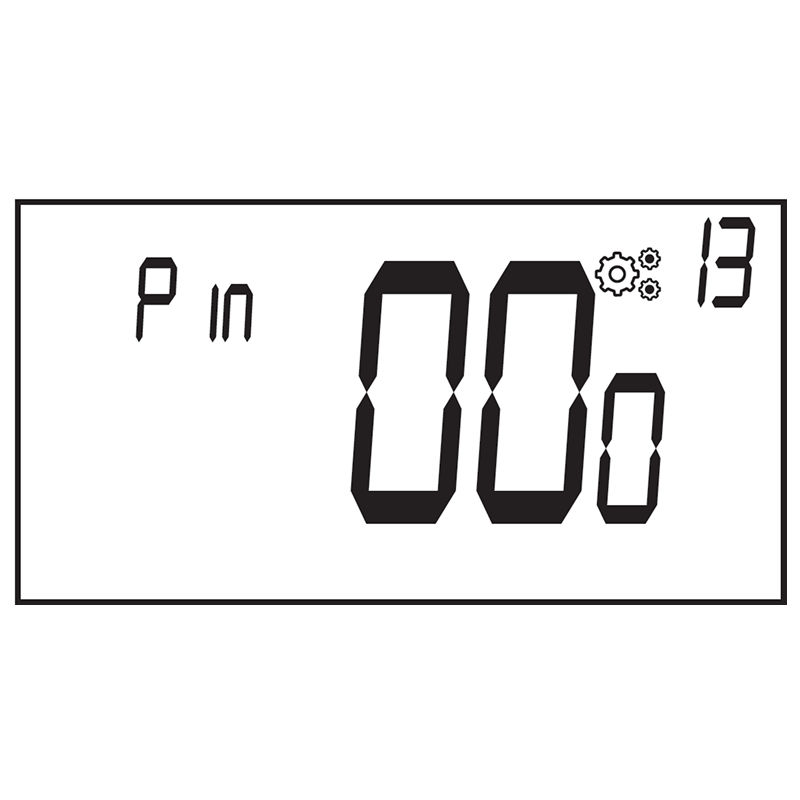
Start Pairing
Press the Home **button (A)**The thermostat will begin sending continuous pairing signals and display In it along with the RFCommunication icon.
10. Pairing Outcomes
Successful Pairing: Once the receiver connects, the thermostat exits the initialization phase automatically.
Unsuccessful Pairing or Timeout: If pairing is not completed (or there is no key activity), the thermostat will remain in pairing mode for 10 seconds, then automatically stop.
11. Important Notes
When radio pairing is completed, most parameters are reset to their factory values based on the receiver type.
If pairing is not completed, the thermostat does not transmit any RF frame.
The installer can check signal strength in the Professional Parameter Menu.
Set Time and Date
12. How to Set Time and Date
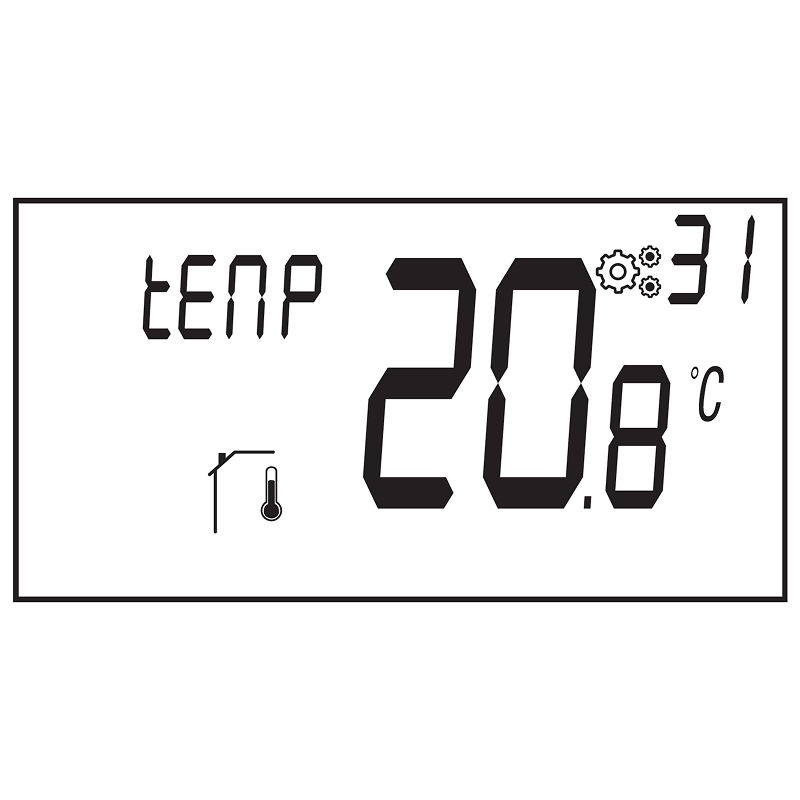
Press and hold the Menu Button (E) until the screen shows the time and date settings.
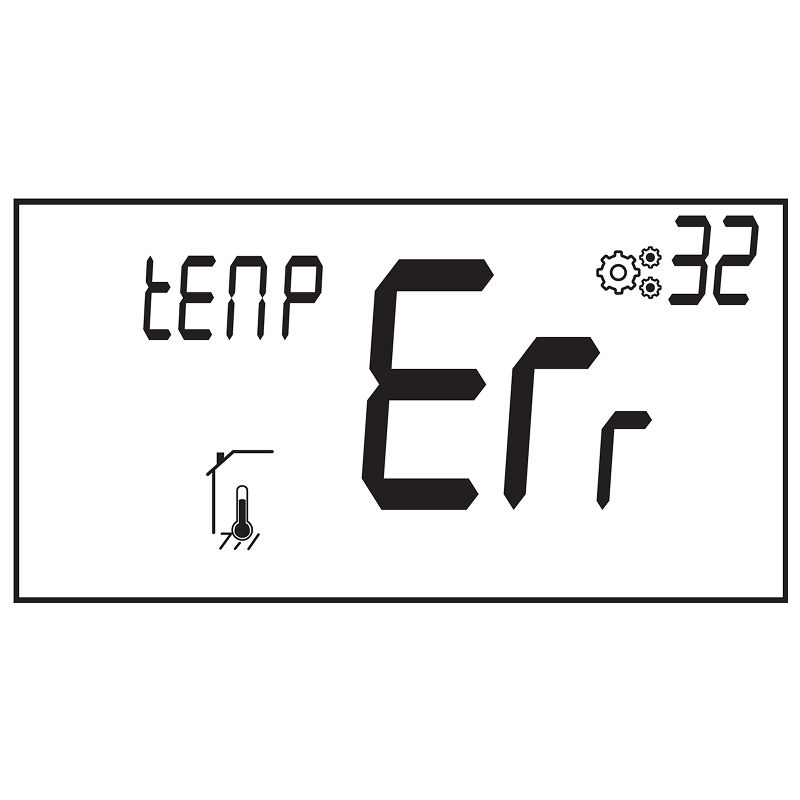
Use the Dial
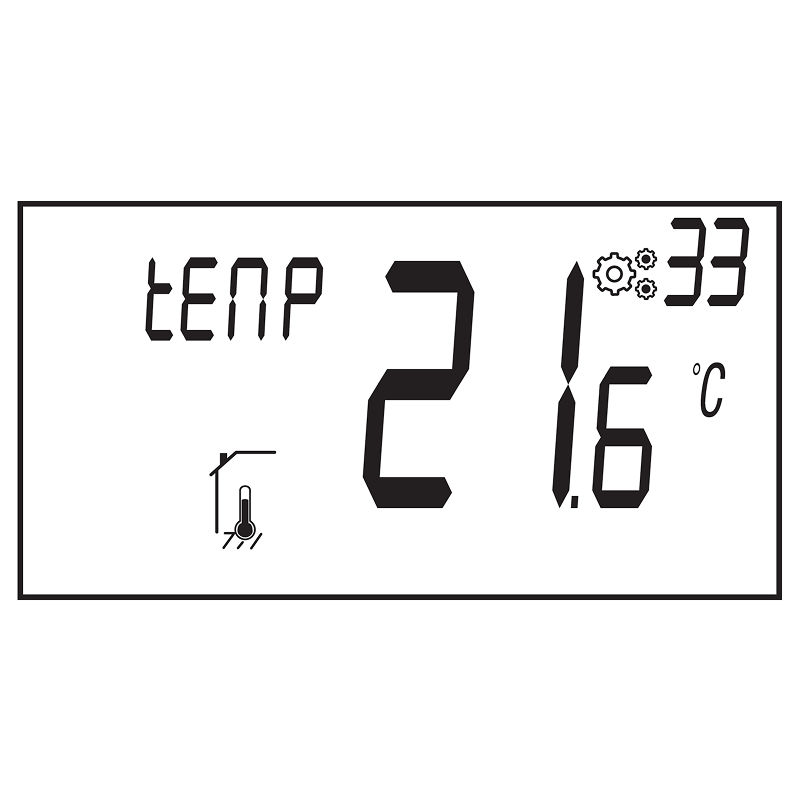
Use the Minus or Plus Rotation (B & C) to choose a value.
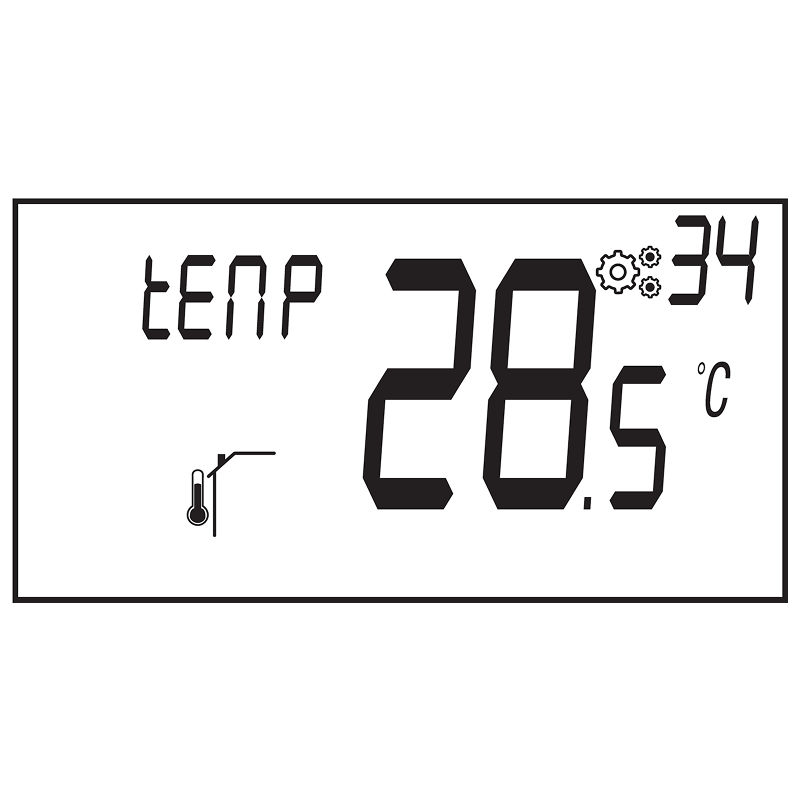
Use the Press Key (A) to confirm and move to the next.
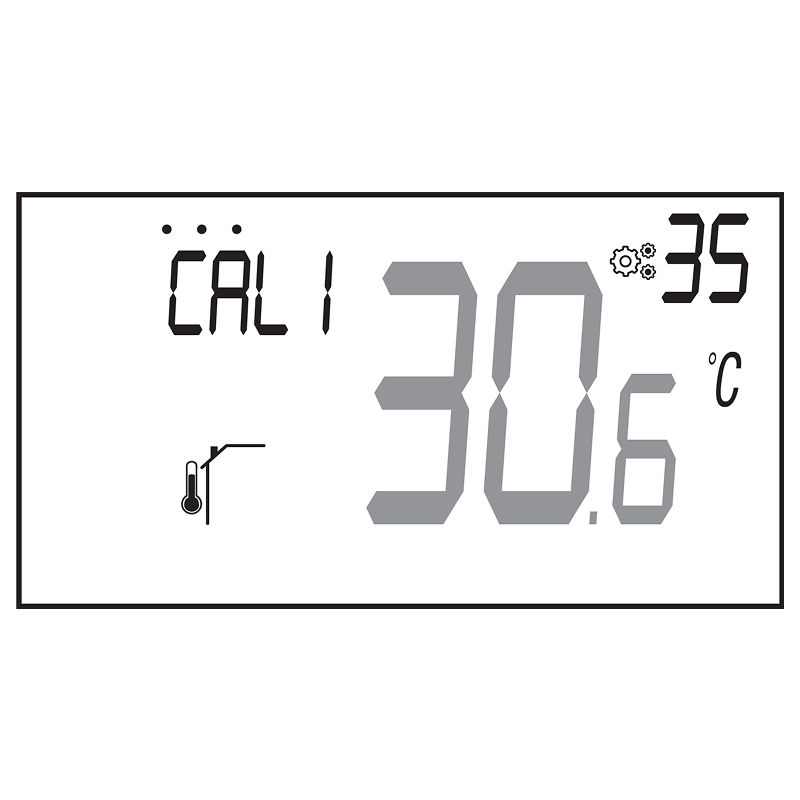
Each confirmation will automatically move you to the next item in the following order:
Year (YEAr) → Month (Nont) → Day Number (dAY) → Day Letters (dAY) → Hour (00:00**)** → **Minutes (**00:00)
After setting the minutes, using the Press Key (A) one last time will save all changes and return you to the main screen.
If you want to cancel and return to the main screen without validation, press the Home Button (D) at any time.
13. Set the Year
Turn the rotation button left or right (B or C) to choose the year (e.g., 23 for 2023).
Press Key (A) to confirm.
14. Set the Month
Turn the rotation button left or right (B or C) to choose the month (e.g., 06 for June).
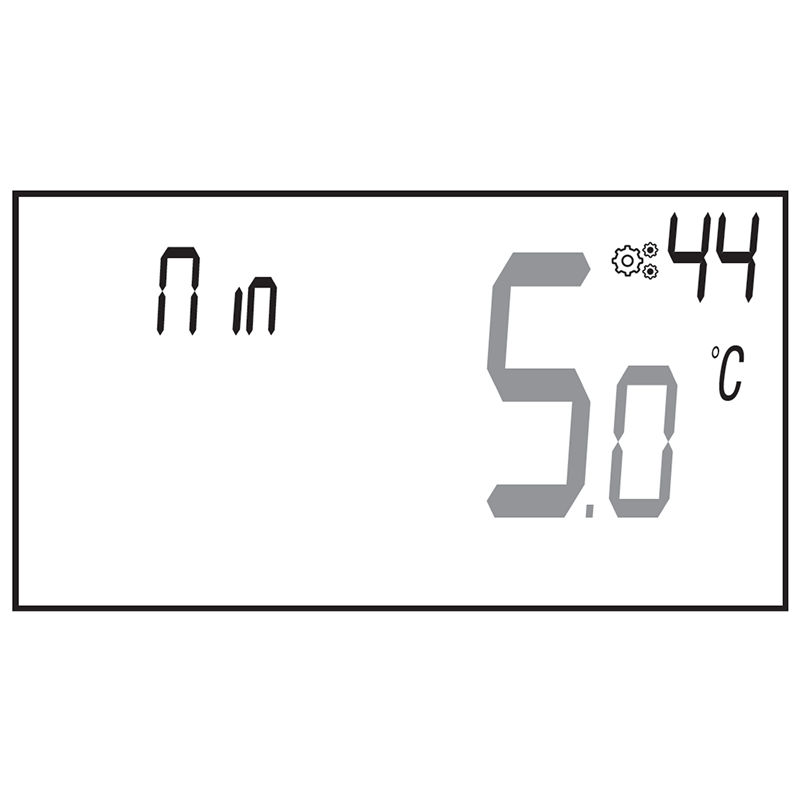
Press Key (A) to confirm.
15. Set the Day Number
Turn the rotation button left or right (B or C) to choose the day of the month (e.g., 10).
Press Key (A) to confirm.
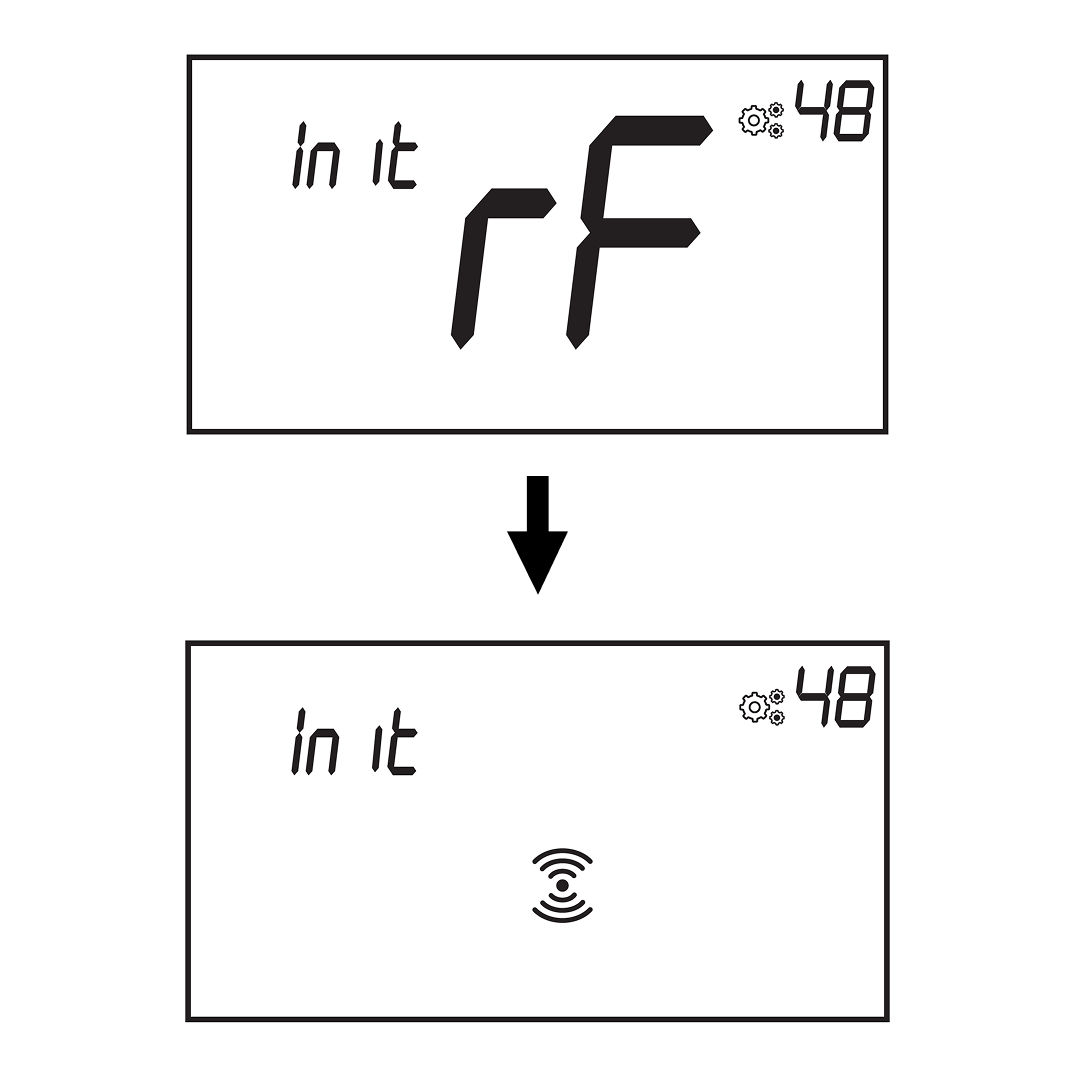
16. Set the Day of the Week
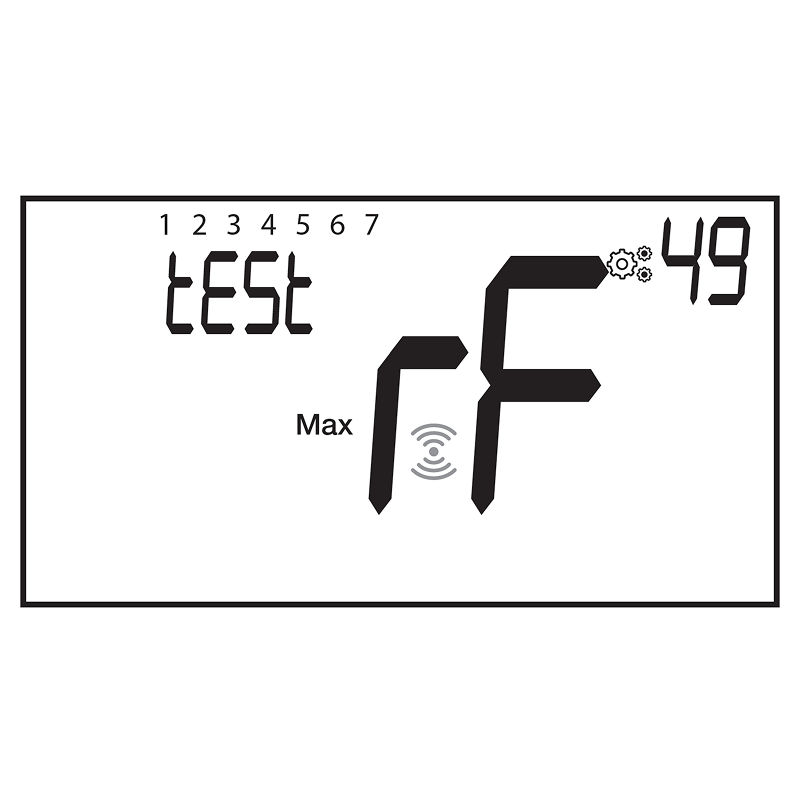
Turn the rotation button left or right (B or C) to choose the day of the week (e.g., Th for Thursday).
Press Key (A) to confirm.
17. Set the Hour
Turn the rotation button left or right (B or C) to choose the hour.
Press Key (A) to confirm.
18. Set the Minutes
Turn the rotation button left or right (B or C) to choose the minutes.
Press Key (A) to finish.
Guide to Menus and Modes
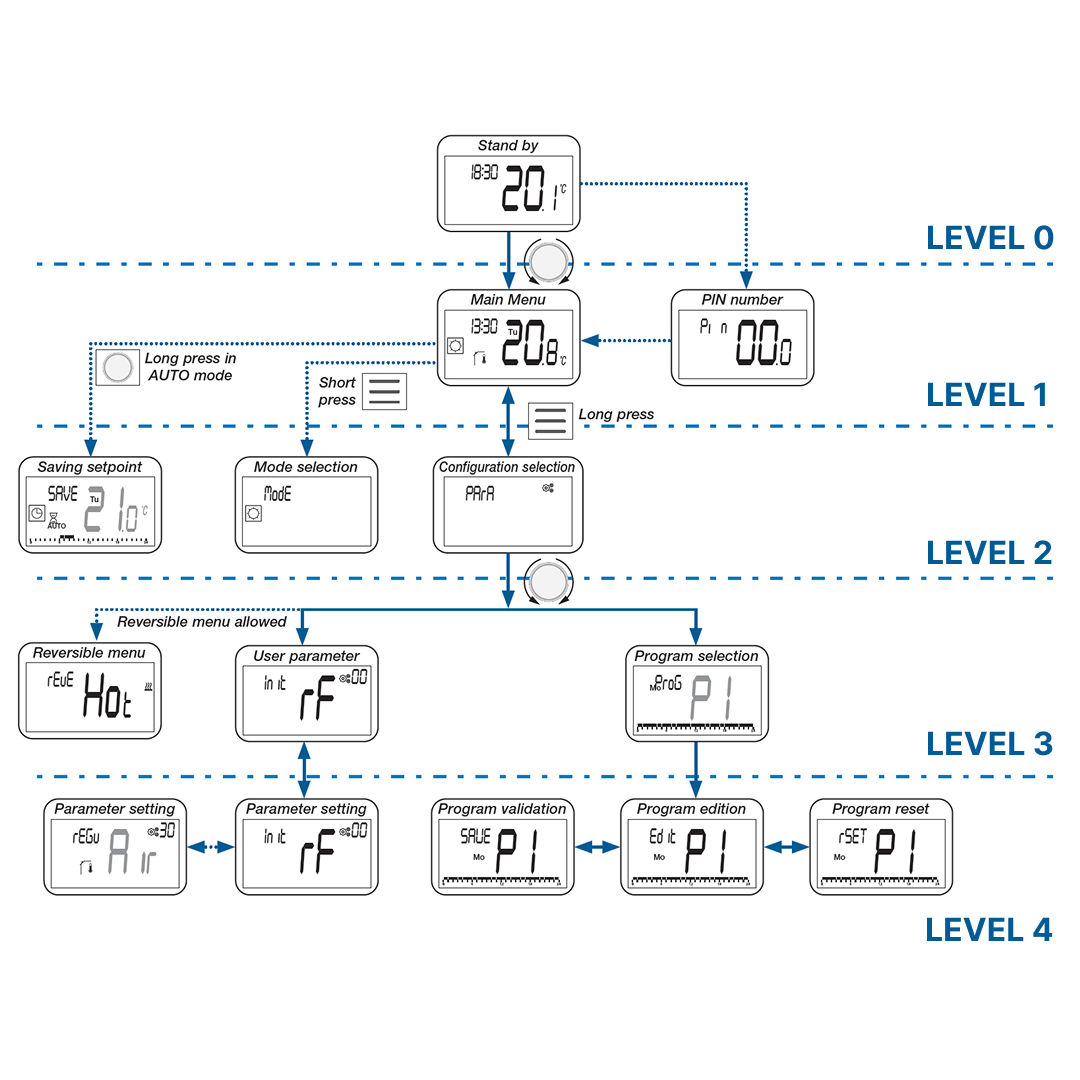
19. Understanding the Menu Structure
The thermostat interface is organized into four main levels, each accessed by specific button actions. Here's how to navigate through them:
Level 0 - Standby Screen
Level 1 - Main Menu
Level 2 - Configuration Menu
Level 3 -Parameter or Program Selection
Level 4 - Parameter Settings or Program Edition
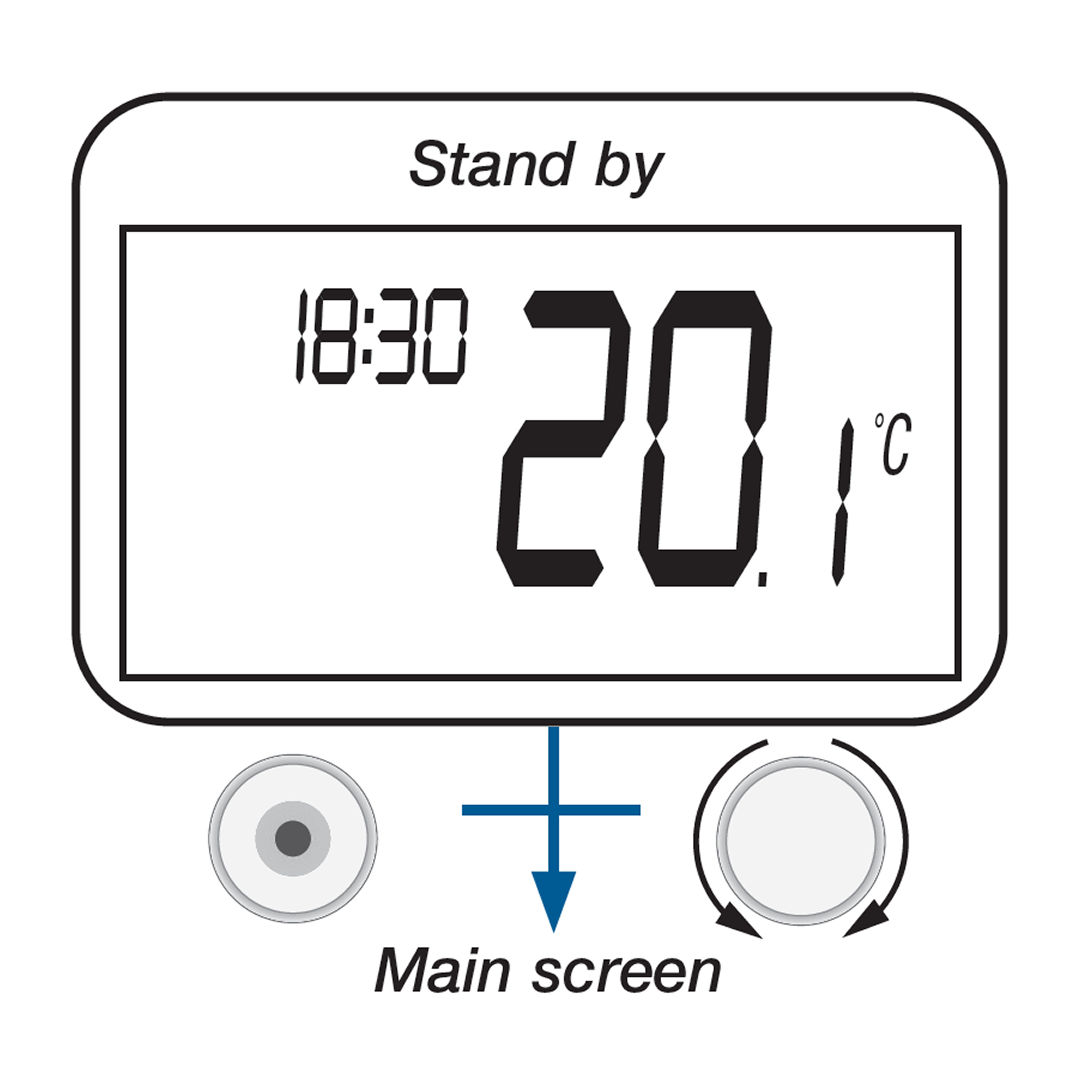
20. Standby Screen
This screen helps you quickly check whether the thermostat is working, what mode it's in, and whether the heating or cooling is active.
Current time – Shown in the top left (e.g., 18:30)
Temperature value – Large number in the center (e.g., 20.1°C)
Temperature unit – °C or °F next to the temperature
Mode indicator – Text like AUTO or ECO above the temperature and below the time, showing the current operating mode
Heating/Cooling demand – Symbols appear when the system is heating or cooling
Other Possible Indicators:
Open window detected
Locked thermostat or locked keyboard
Sensor or battery error
Wireless signal status
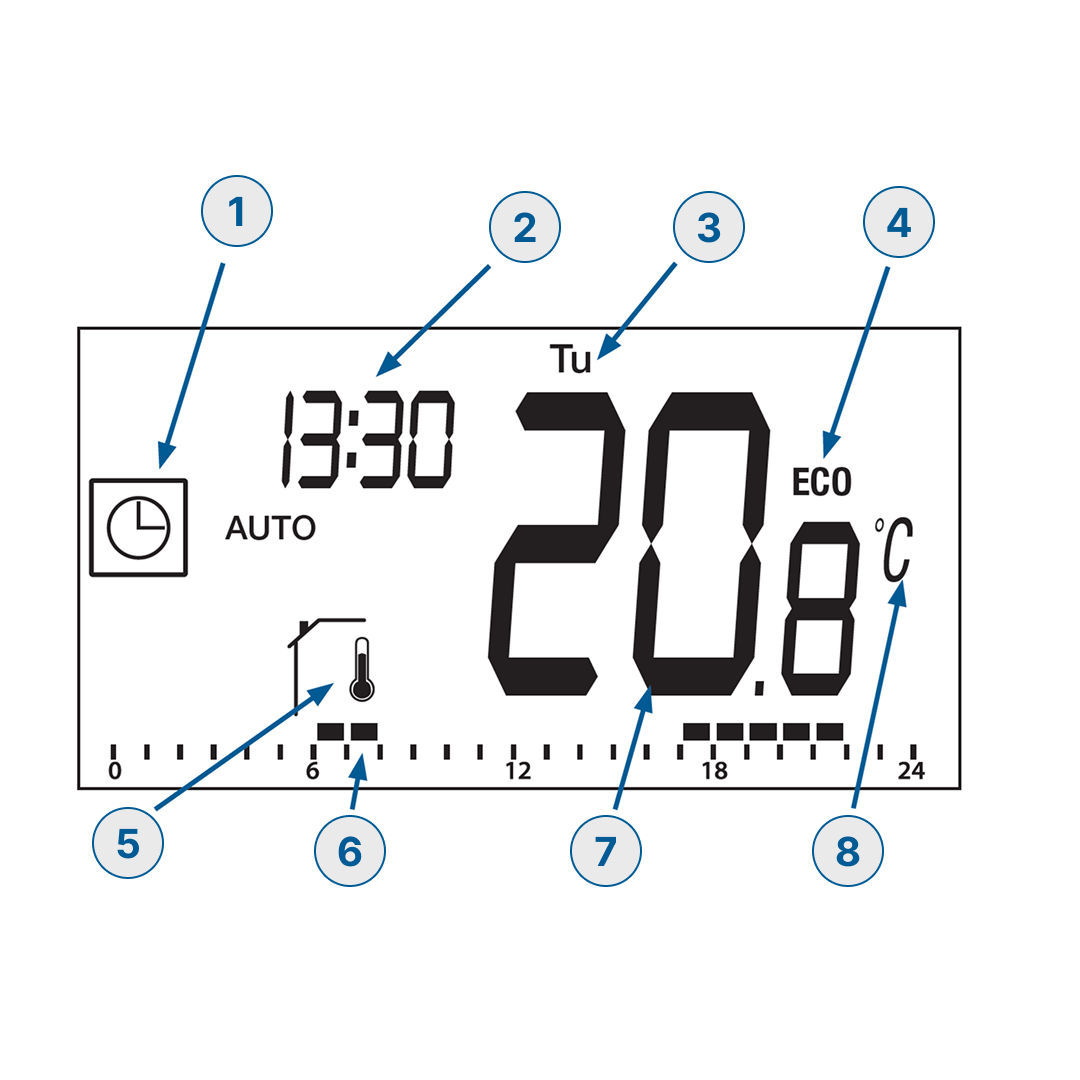
21. Main Menu
The main menu lets you view and adjust the thermostat’s settings depending on the selected operating mode.
The main screen shows these details:
Current working mode – e.g., AUTO, MAN, OFF
Current time – e.g., 13:30
Current day – e.g., Tu for Tuesday
ECO interval (if Auto mode is active) – Time range where reduced temperature is applied
Sensor type icon – Indicates which sensor is being used
Bar graph – Shows heating/cooling periods if in Auto mode
Temperature value – e.g., 20.8
Temperature unit – °C or °F
Other Information That May Appear:
Open window detected icon
Battery level (press the home button to display it)
Heating or cooling active icons
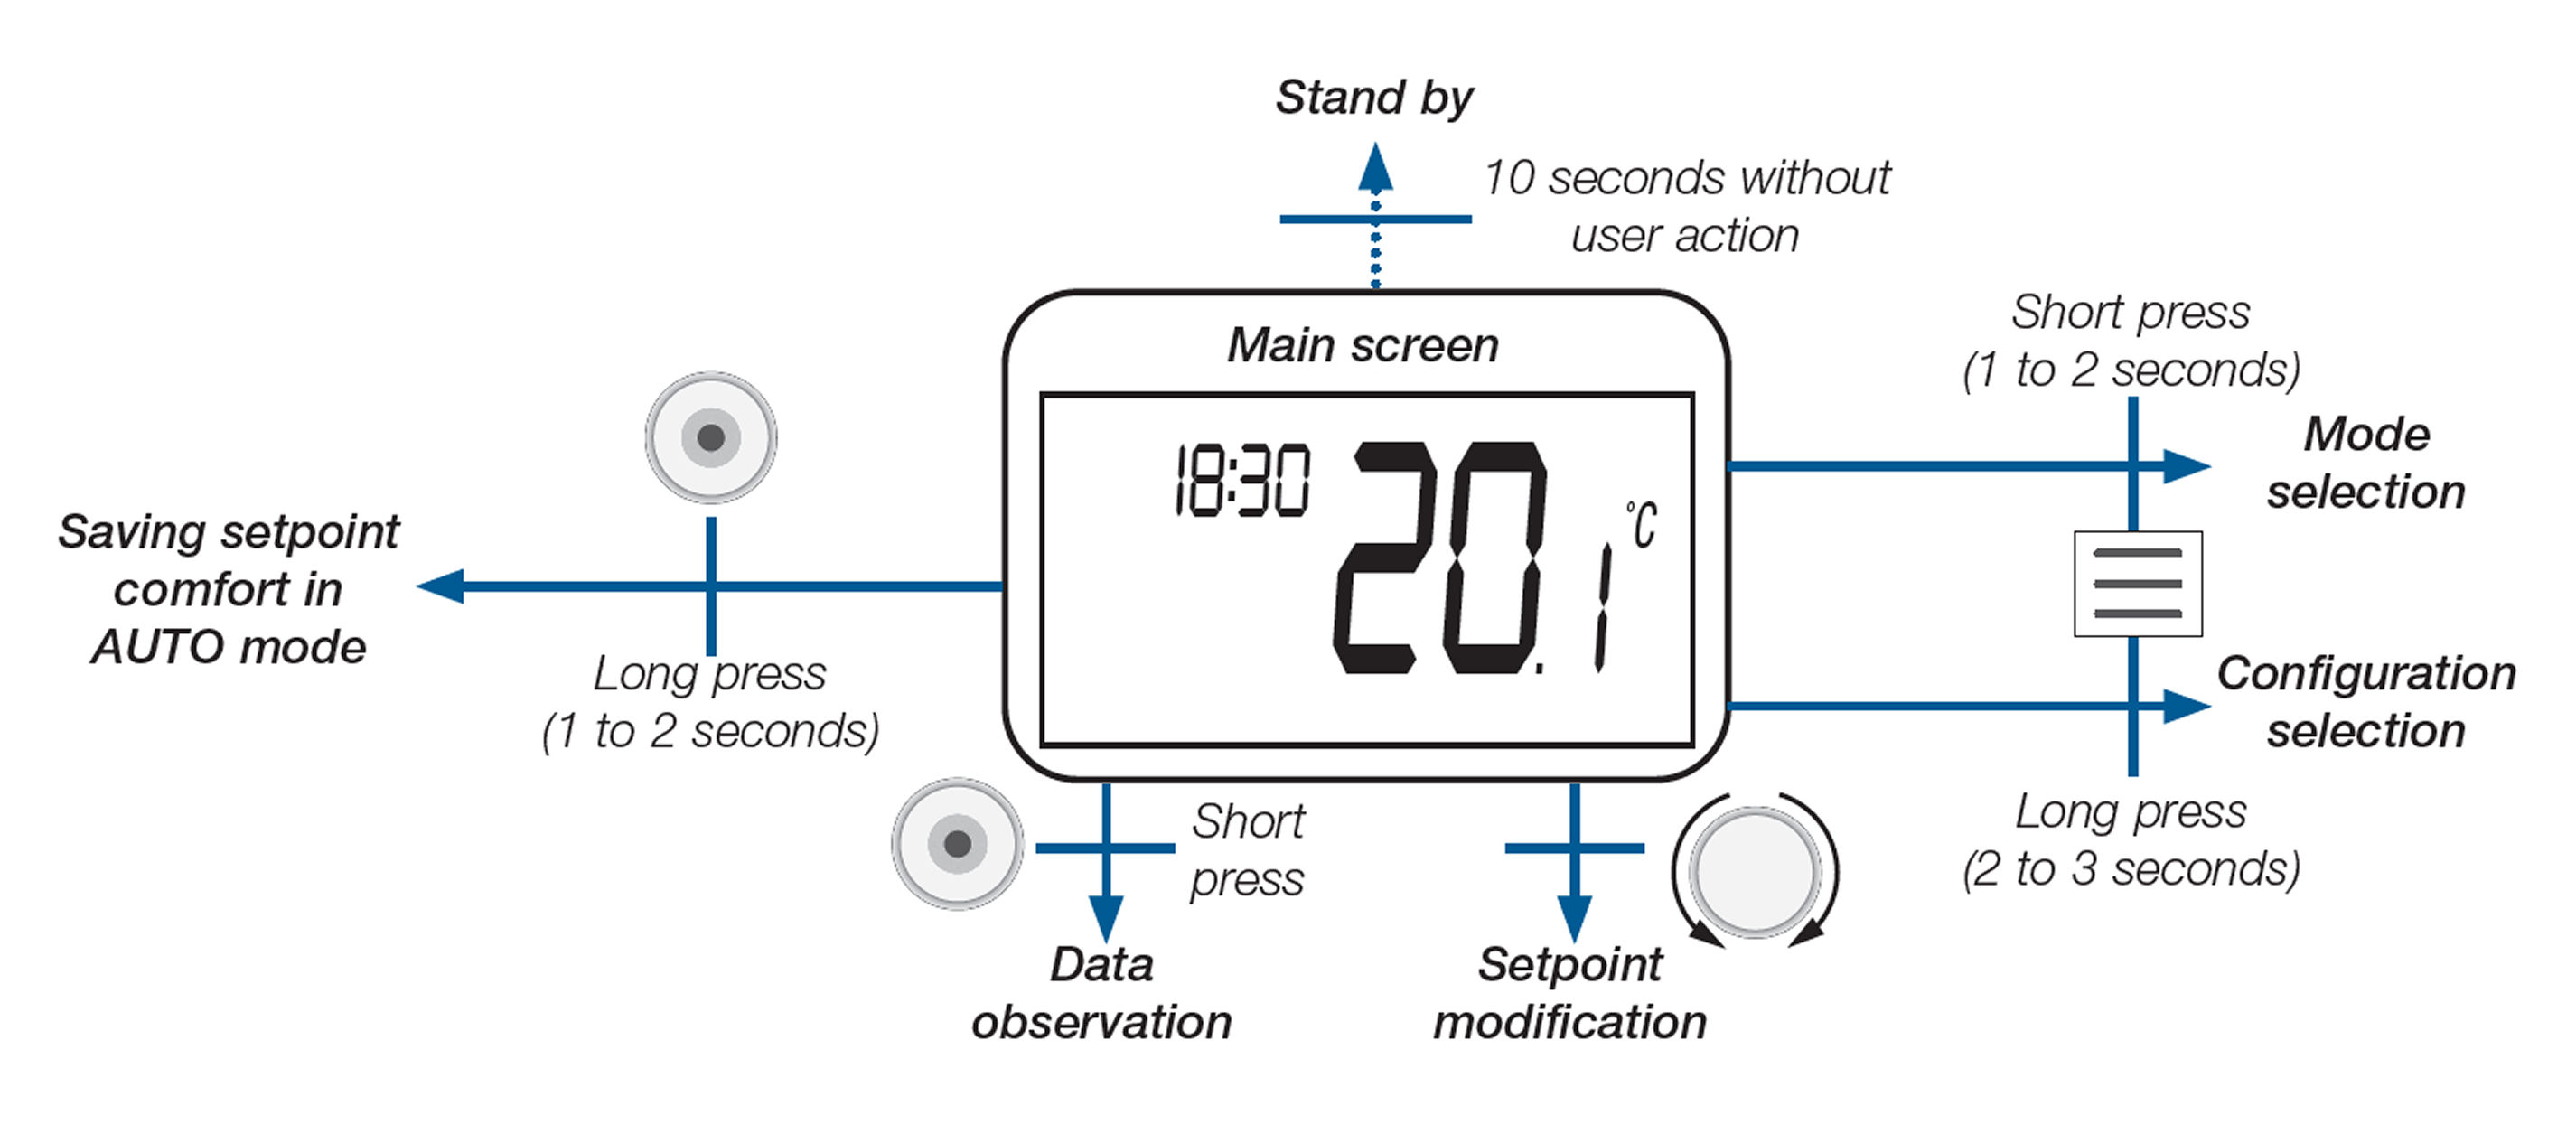
22. Navigate the Main Screen
How to Navigate from the Main Screen:
Access Mode selection (e.g., Auto, Manual, Off): Short press (1–2 seconds) the menu button.
Access Configuration menu (e.g., parameters, date/time settings): Long press (2–3 seconds) the menu button.
Start setpoint temperature modification: Short press the rotary button.
Viewdata observation (sensor info, etc.): Short press the rotary button (again).
Save newcomfort setpoint: Use the rotary button in Auto mode.
Return tostandby screen: No action for 10 seconds.
23. Saving a Temperature Set Point in AUTO Mode
When the thermostat is in AUTO mode and a temporary override (derogation) is active, you can save the current temperature as your new standard (comfort) set point.
How to save the Set Point:
Make sure the thermostat is in AUTO mode (indicated by AUTO and the clock icon on the screen).
Adjust the temperature to your desired value (e.g., 21.0°C).
Press and hold the rotary button for 3 seconds.
The screen will display **SAVE** — confirming the new set point has been saved.
This saves the temperature as the comfort setting for that time period in the program.
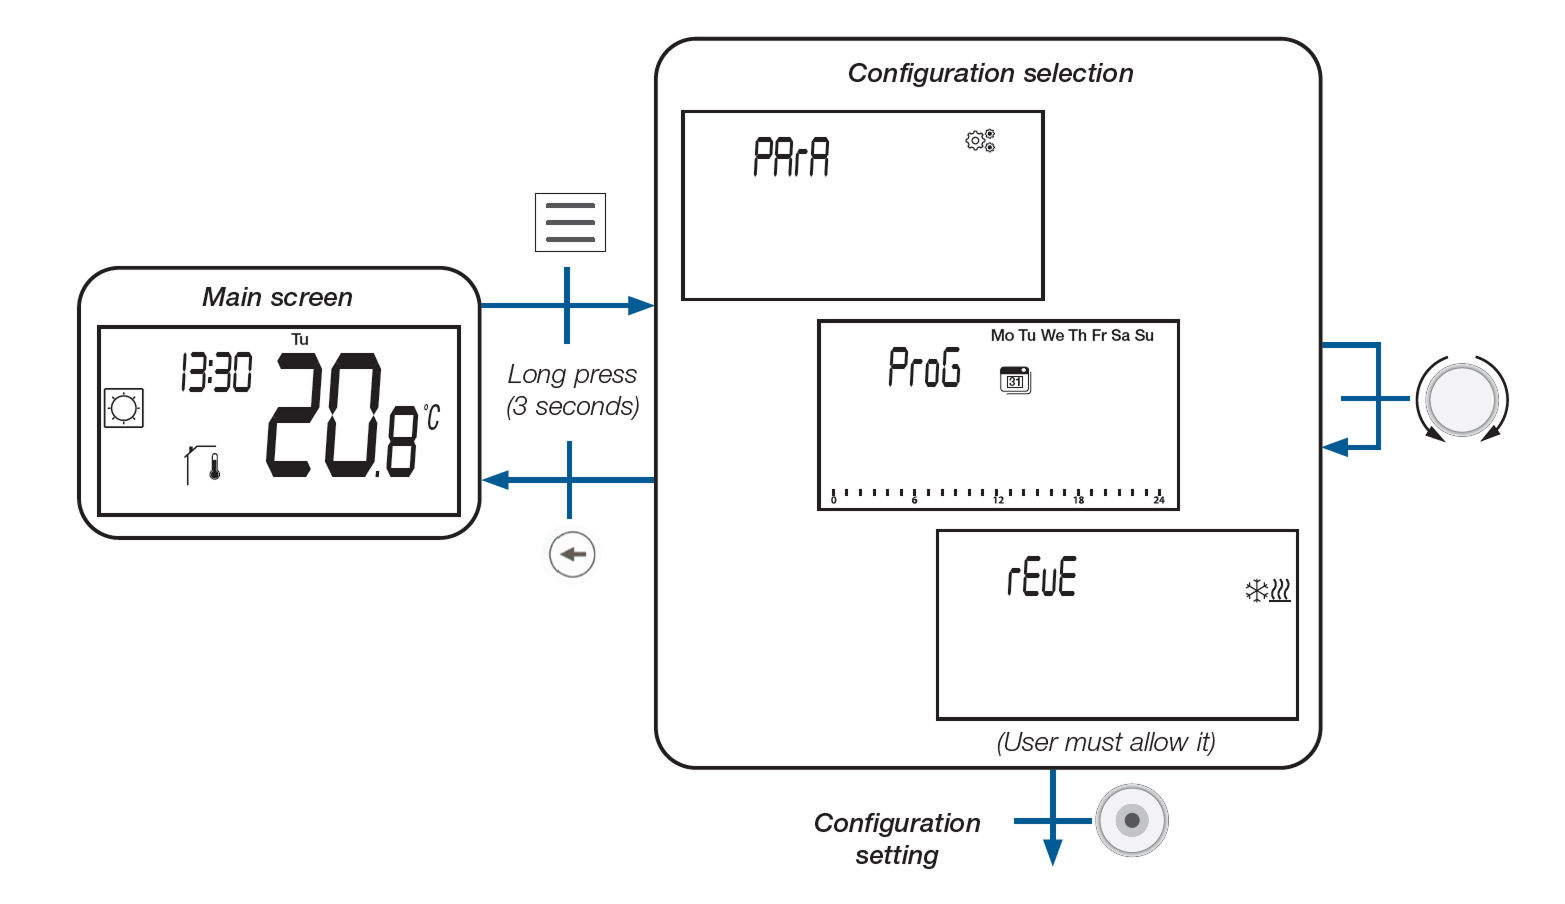
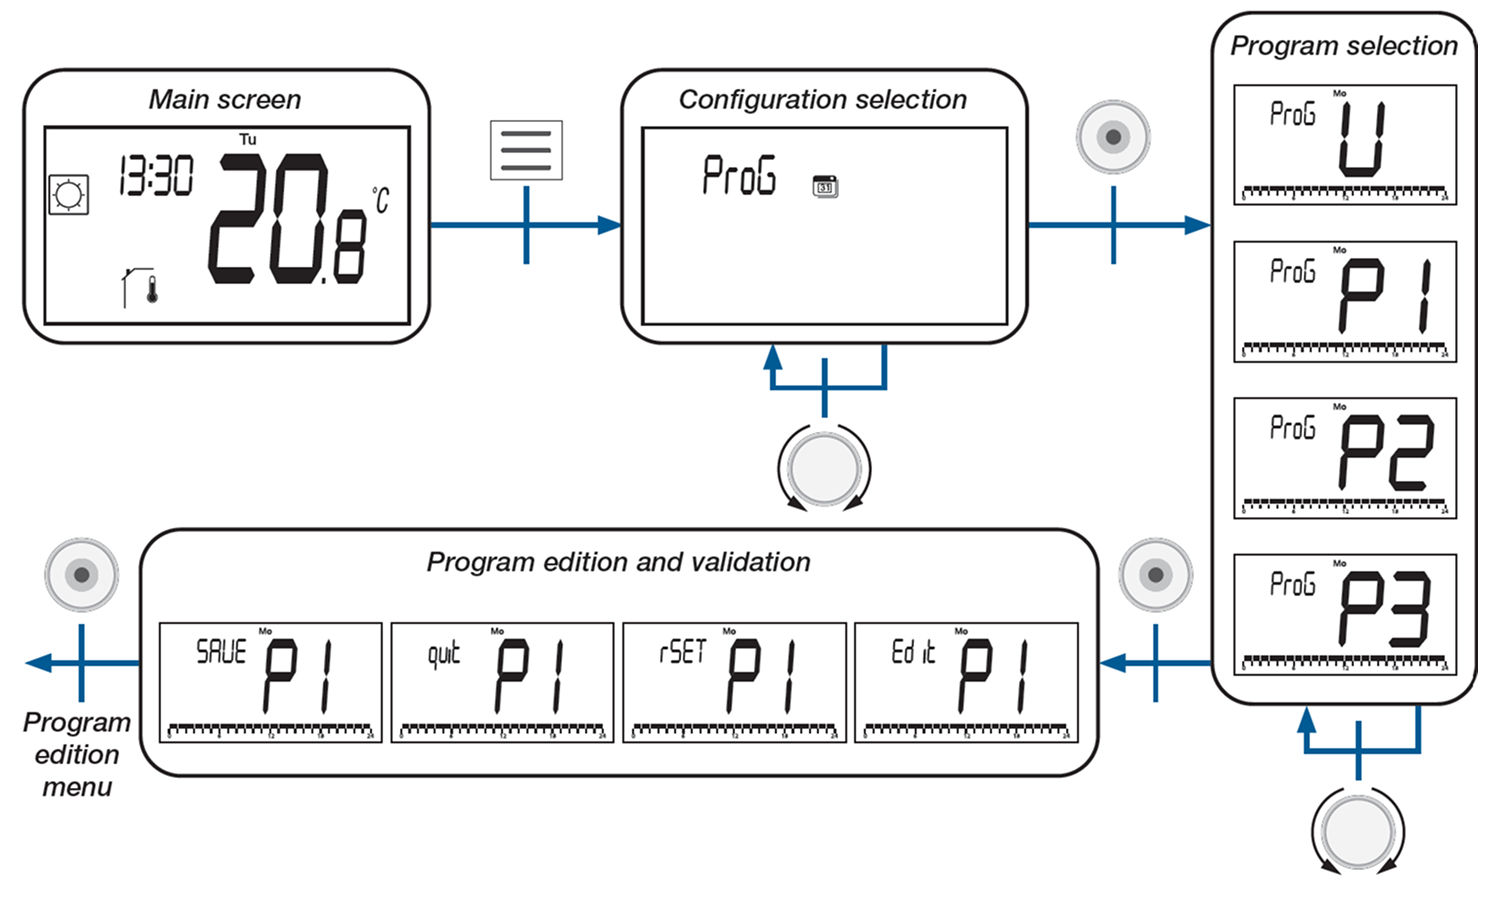
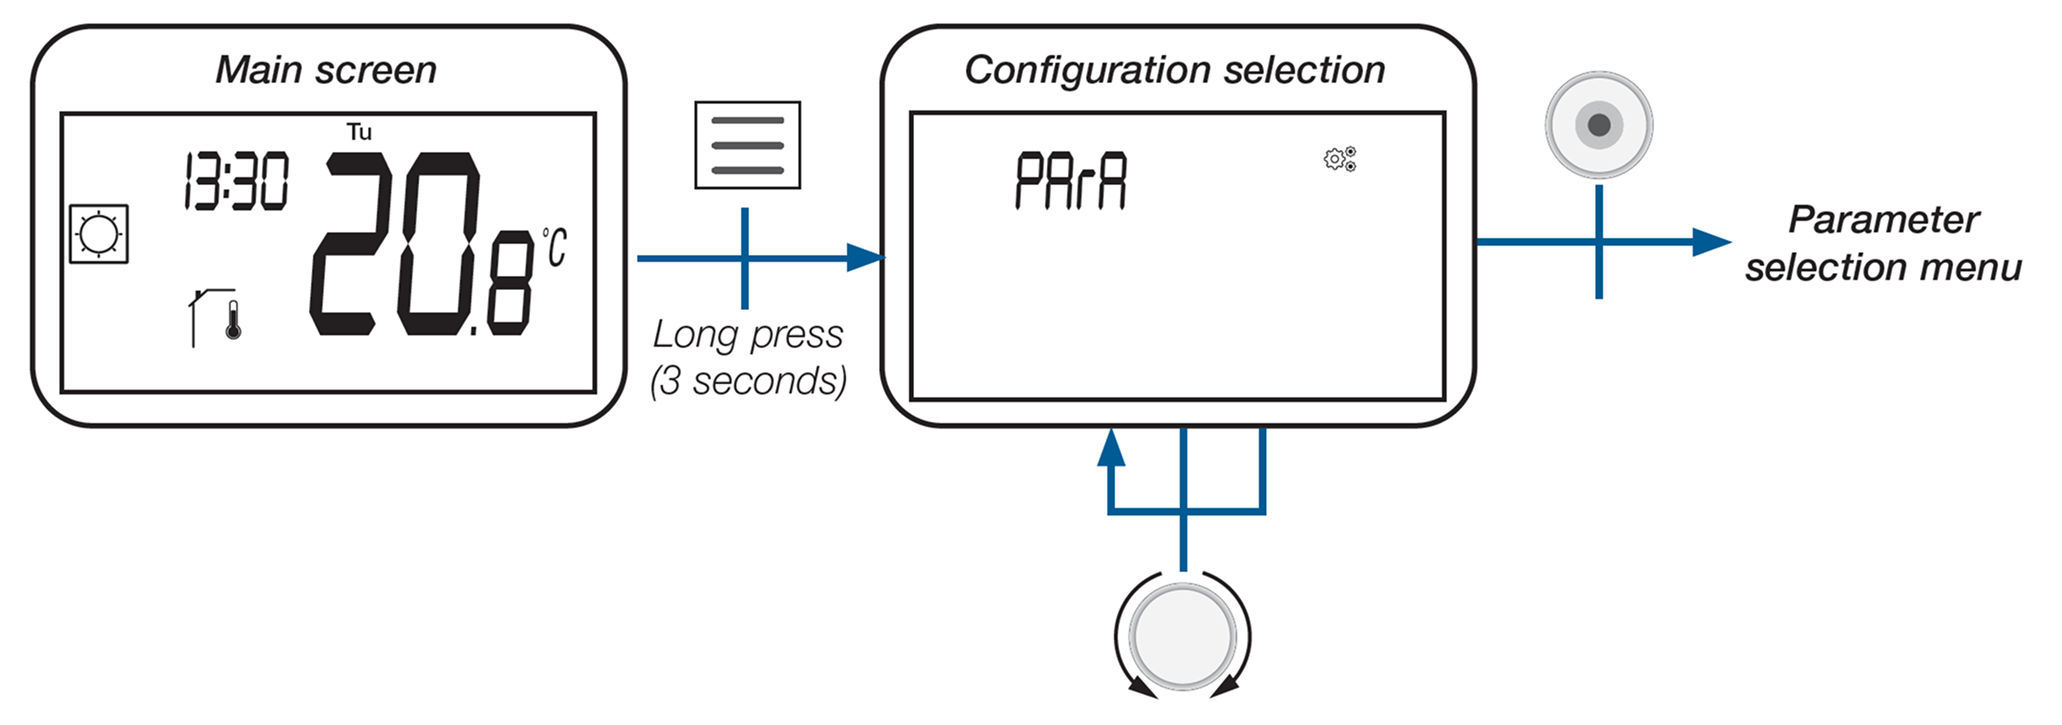
24. Selection of Configuration Menu
You can access thermostat settings by entering the configuration menu.
The full manual refers to the quick guide
How to enter:
Press and hold the Menu button for 3 seconds from the main screen.The screen will display the configuration menu options.
Depending on your device setup, you’ll see two or three menu types:
ProG – Program Selection and Editing Menu - Lets you select or modify the temperature schedule for Auto mode
Only available if the thermostat is not paired with a central control unit
PArA – User Parameter Menu - Allows you to adjust basic thermostat settings (e.g., temperature unit, lock mode, etc.)
rEuE – Reversible Menu(only if enabled) - Lets you configure heating, cooling, or automatic switching modes
Requires prior activation in the user parameters
Notes:
Use the rotary dial to scroll through the options
Press the Home button to enter the selected menu
The rEuE menu only appears if it has been allowed via a specific setting
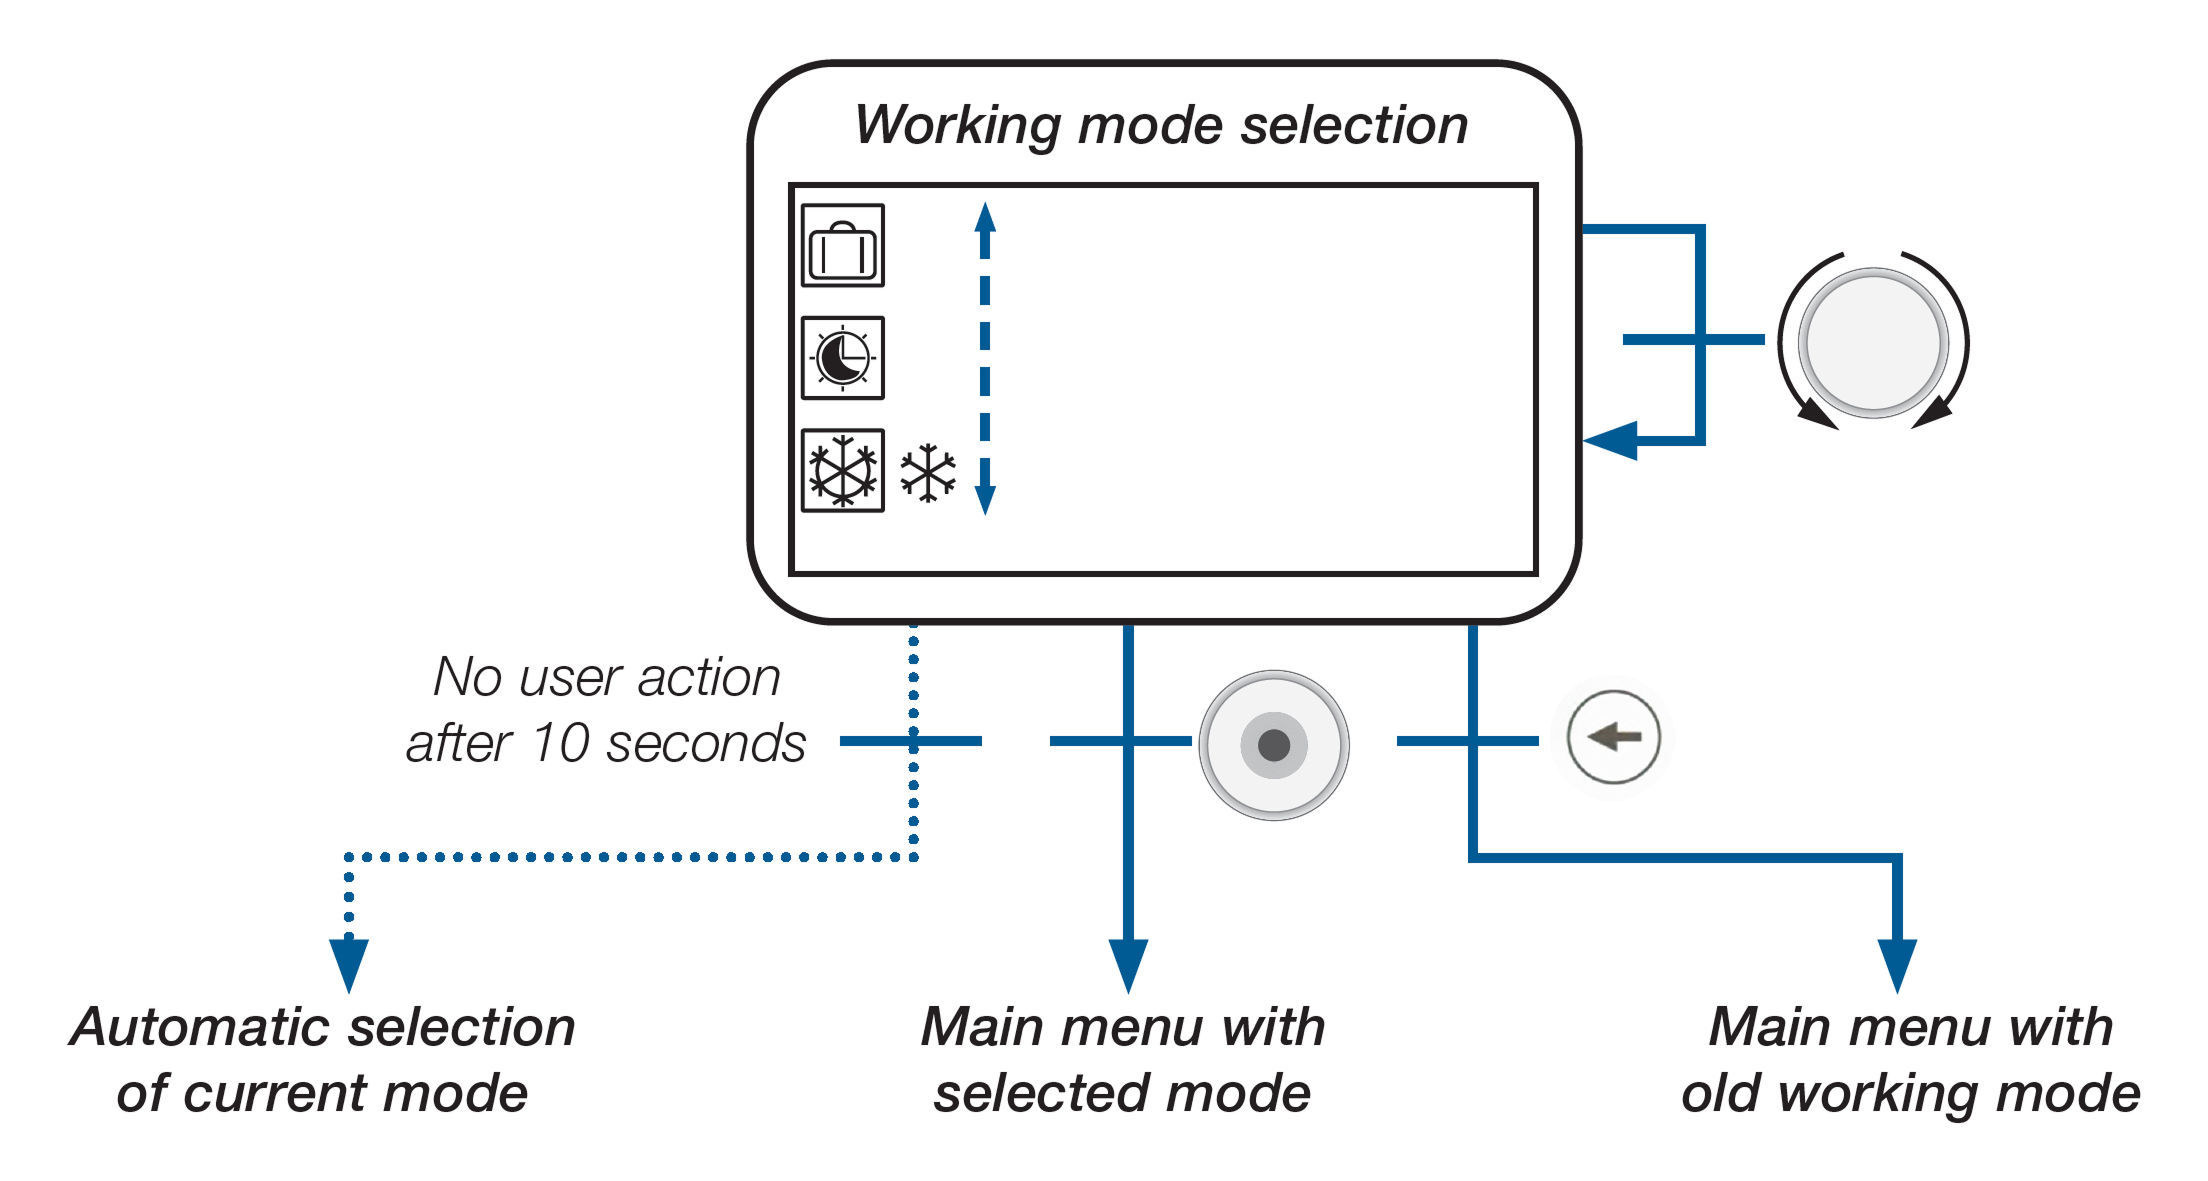
25. Mode Selection Menu
You can choose how your thermostat operates by selecting a working mode:
From the main screen, short press the Menu button (1 to 2 seconds).
The display will show the Mode Selection screen.
Use the rotary dial to scroll through available modes.
Press the Home button to confirm your choice.
The thermostat will return to the main screen.
The thermostat supports the following operating modes, depending on your system setup:
Holiday Mode - Maintains a predefined temperature during extended absences.
Auto Mode - Automatically follows a weekly program with scheduled temperature changes.
Comfort Mode - Maintains a user-defined comfort temperature.Note: Only available when heating or reversible mode is enabled.
Eco/Reduced Mode - Uses a lower, energy-saving temperature setting during inactive periods.
Anti-Freeze Mode - Keeps the room at a minimum temperature to prevent freezing.
Off Mode - Disables heating and cooling while keeping settings stored.
Cooling Mode - Maintains a user-defined cooling temperature.Note: Only available when cooling or reversible mode is enabled.
26. Mode Selection Menu – Detailed Behavior
When the thermostat is active (screen backlight is on), you can scroll through the available modes using the rotary button.
After 10 seconds of inactivity, if no buttons are pressed:
The currently highlighted mode is automatically selected and applied
The system exits the mode selection menu and returns to the main screen
If the current mode is:
Comfort, Eco, Off, Anti-Freeze, or Cooling mode → The thermostat will keep the newly selected mode
Holiday mode or a temporary override (derogation) → The thermostat will revert to the previously active mode after 10 seconds of inactivity
The number of available modes depends on how the thermostat is configured:
Classical configuration: Includes modes like Comfort, Eco, Off, Holiday, Anti-Freeze, and Cooling (if supported)
With “reversible” mode enabled: Enables automatic switching between heating and cooling. This must be allowed in user parameters
With “basic navigation”: Only Comfort and Off modes are shown
27. Mode Selection Menu – Key Functions
Each button on the thermostat has a specific function depending on how it is used:
Reset button (on the back of the device):
Unlocks the thermostat
Enters pairing mode
Resets to factory settings
Rotary button (press):
Adjusts the temperature set point
Confirms parameter changes or temperature selections
Saves a new comfort temperature during derogation in Auto mode
Menu button (short press):
Opens the mode selection menu
Menu button (long press):
Opens the configuration selection menu
Home button:
Returns to the main screen without saving changes
Note: The reset key on the back of the device also provides access to special setup menus.
28. Default Values and Temperature Ranges by Mode
From the main screen, rotate the dial to make the set point temperature blink. Continue turning to adjust the temperature. The new value is automatically saved after a short pause.
To check temperature and humidity, press the Home button to cycle between:
Measured room temperature
Humidity level
Current set point temperature
To access menus, press the Menu button:
Short press: Mode selection menu
Long press: Configuration menu
To exit without saving, press the Back button at any time.
The following default values and ranges apply depending on the selected mode:
Comfort mode: 19.0°C (range: 10.0°C to maximum set point)
Reduced (Eco) mode: 17.0°C (range: 5.0°C to 19.0°C, or up to comfort set point if lower)
Anti-Freeze mode: 7.0°C (range: 0.5°C to 10.0°C)
Cooling mode: 25.0°C (range: 10.0°C to 30.0°C)
Automatic Heat & Cool mode: 21.0°C (range: 10.0°C to 30.0°C)
This structure applies to all modes: Comfort, Reduced, Anti-Freeze, Cooling, and Automatic Heat & Cool.
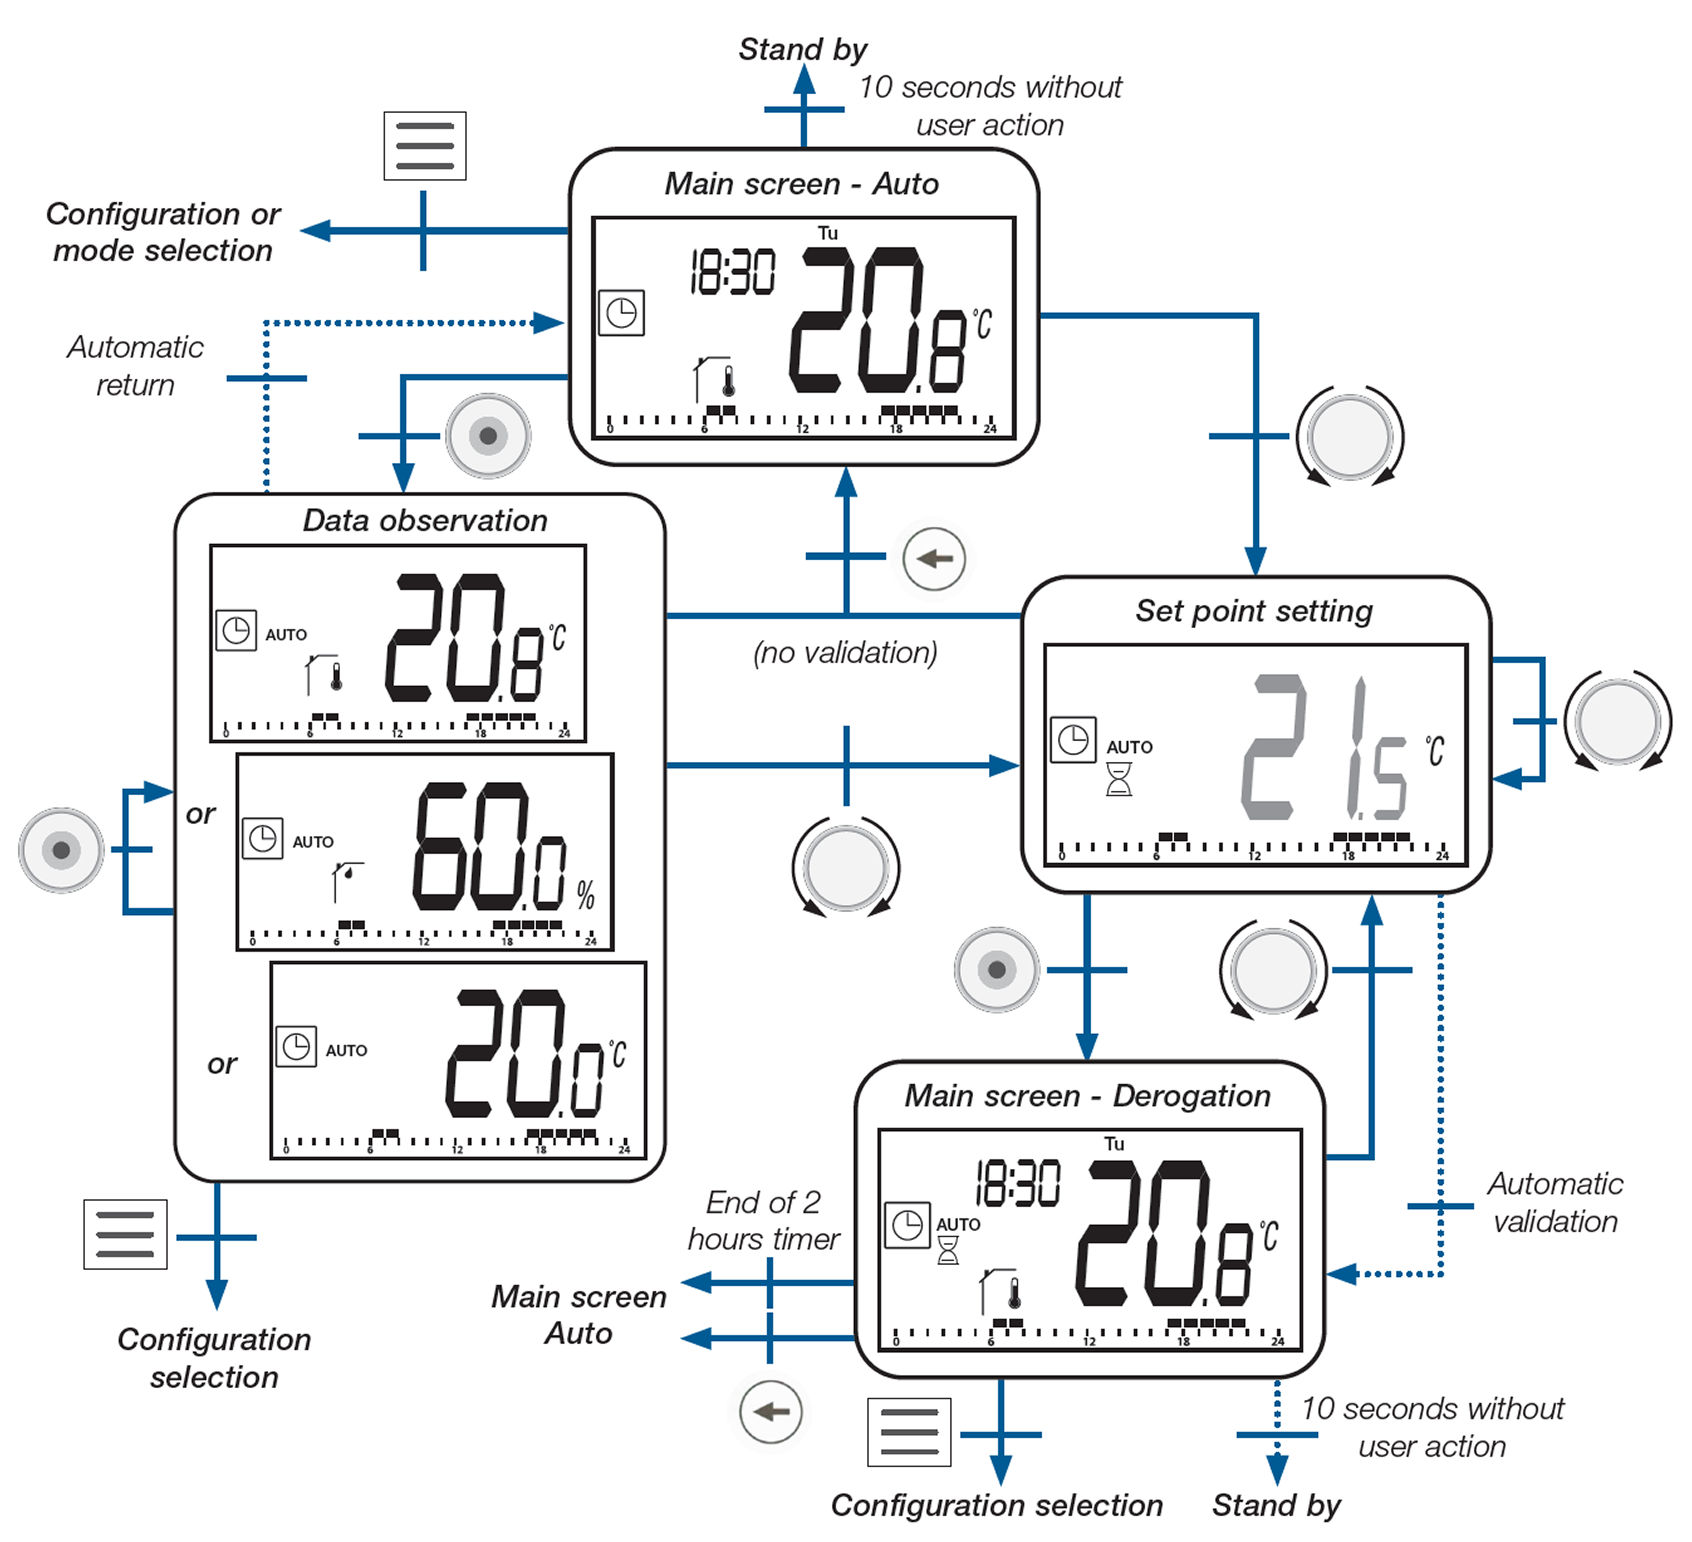
29. AUTO Mode
In AUTO mode, the thermostat follows a schedule based on time and day, automatically switching between Comfort and Reduced (ECO) temperature settings.
To temporarily override the current temperature (derogation):
Rotate the dial from the main screen to access the set point.
Adjust the temperature; the override is activated for a limited time (usually 2 hours).
To save the override as a new comfort temperature:
Hold the dial button for 3 seconds during the override.
This updates the comfort temperature for the selected program step.
From the main screen:
Press the Menu button to access the mode selection or configuration menu.
Press the Home button to cycle through measured temperature, set point, and humidity.
Press the Back button to return to the main screen without saving or activating an override.
After 10 seconds of inactivity, the screen returns to standby automatically, applying the selected settings.
If a central unit is connected:
The user cannot change the program.
Only the Comfort or ECO temperature set point may be overridden manually.
Program States in AUTO Mode:
Auto Comfort Mode: Follows scheduled comfort temperature
Auto Reduced / ECO Mode: Follows scheduled reduced temperature
Auto Overridden Mode: User has manually adjusted the temperature temporarily
Each of these modes is displayed clearly on the screen with the relevant icons (AUTO, ECO, temperature value, etc.).
30. Holiday / Timer Mode
Holiday mode lets you apply a specific set point temperature during a selected time range. After the timer ends, the thermostat returns to its previous operating mode.
To set the temperature, rotate the dial to adjust the value, then press the dial to confirm.
Default value: 7°C
Range: 5°C to 30°C
To set the date, go through the next three steps:
Set the month and year
Set the day
Set the hour
Each setting is adjusted using the rotary button and confirmed by pressing it.
The timer running screen shows the active countdown and applied temperature. Once the countdown ends, the thermostat automatically switches back to the previous mode.
If no action is taken for 10 seconds, the screen returns to standby automatically without saving changes.
To return to the previous screen during setup, press the Back button.
From the main screen:
Press the Menu button to open the configuration menu.
Press the Home button to display measured temperature, set point, and humidity.
Press the Back button to exit to the main menu without saving.
31. Off Mode
In Off mode, the thermostat does not actively heat or cool. The system may be at risk of freezing if ambient temperatures drop too low.
From the main screen, pressing the rotary button cycles through:
OFF status (displayed as oFF)
Measured humidity level
Measured room temperature
Pressing the Menu button opens:
The mode selection menu, to choose a different working mode
The configuration menu, to access advanced settings
If no action is taken for 10 seconds, the thermostat returns to standby mode.
While in Off mode, the screen will still show temperature and humidity readings, but no control is applied to the heating or cooling system.
Program Selection Menu
32. How to Access the Program Selection Menu
From the main screen, press and hold the Menu button for 3 seconds.
Use the rotary button to select the “ProG” option from the configuration menu.
Press the Home button to enter the program selection menu.
33. Available Program Types
P1 to P3 are built-in programs that cannot be changed.
U is a user-defined program that can be edited and customized.
34. Program Selection Menu
Rotate the dial to scroll between available programs (U, P1, P2, P3).
Press the Home button to confirm your choice.
If no action is taken, the selected program is automatically validated after 10 seconds.
Program Editing Options:
After selecting a program, rotate the dial to view available actions:
SAVE – Save the selected program and return to AUTO mode
QUIT – Exit without saving changes, return to AUTO mode
RESET – Restore the program to its default version
EDIT – Enter the program editing menu to customize the schedule
Press the Home button to apply the selected action.
Press the Back button to exit the menu without saving or validating any changes.
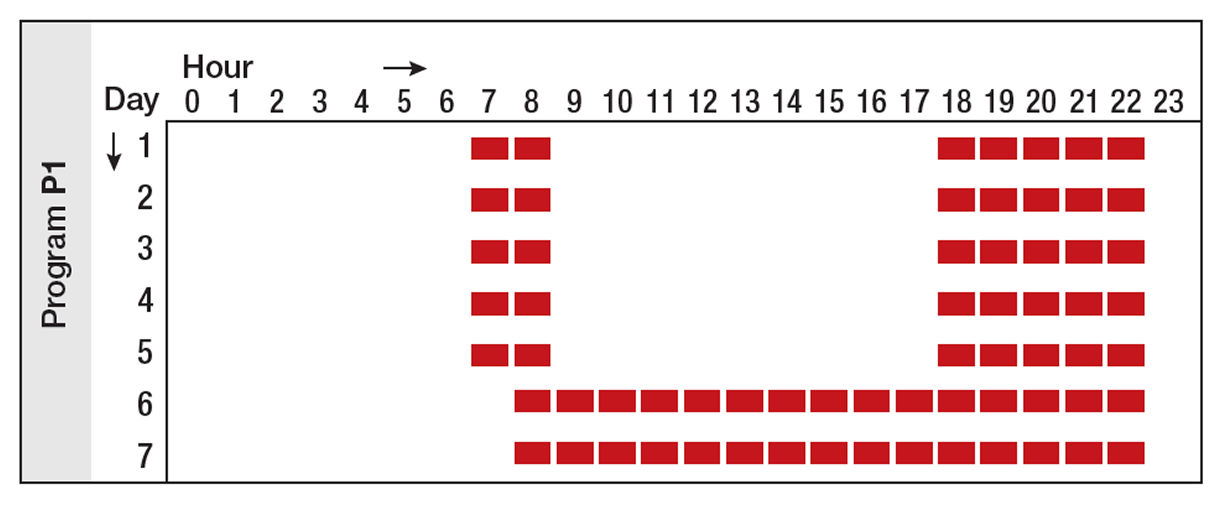
35. Built-in Program Description
The thermostat offers three preconfigured heating/cooling programs. These programs automatically adjust temperature according to the day and time.
Program P1 (Default): Morning (7h-9h), Evening (18h-23h) & Week-end (8h-23h)
This menu allows you to customize the user program “U”.
It is not available if the thermostat is paired with a central control unit.
37. How to Access the Program Edition Menu
From the main screen, press and hold the Menu button for 3 seconds.
In the configuration menu, select “ProG” using the rotary dial and press the Home button.
In the program selection screen, scroll to Program U and press the Home button.
When prompted with edition options, select “EdIt” using the dial and press to confirm.
While in the editing menu, you can scroll between four actions:
SAVE – Save changes and return to AUTO mode with the selected user program.
QUIT – Exit editing without saving.
RESET – Restore the user program to default.
EDIT – Start editing intervals for the selected da
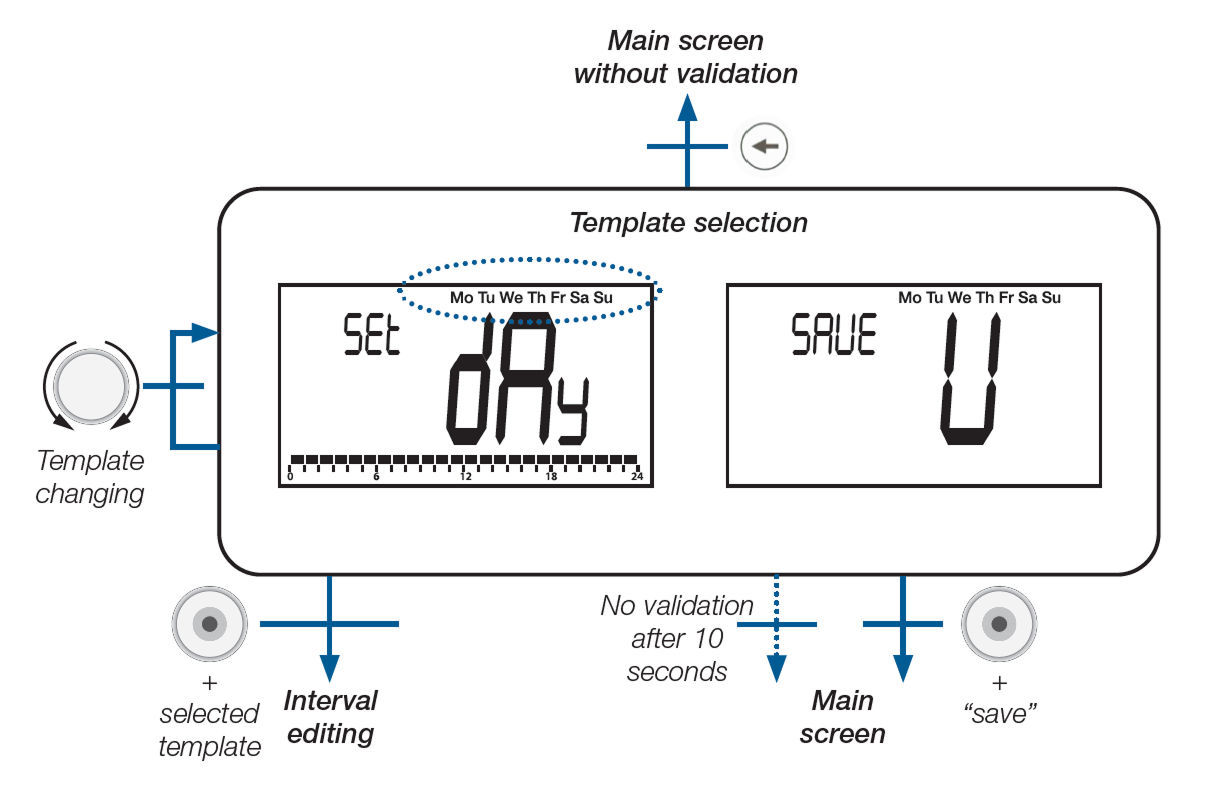
38. Editing Program U
Rotate the dial to choose a day template (explained in the next step).
Press the Home button to enter the selected template.
To save the program, press the rotary dial when the screen shows “SAVE U”.
If there is no activity for 10 seconds, the screen will return to the main display without saving.
39. Predefined Templates
When setting up a weekly program on the thermostat, you can choose from three predefined templates or create a custom schedule for each day:
Mo Tu We Th Fr Sa Su – All days share the same configuration.
Mo Tu We Th Fr – Weekdays share the same configuration.
Sa Su – Saturday and Sunday share the same configuration.
Individual days – Each day (Mo, Tu, We, etc.) can be configured separately.
To apply a template:
Rotate the dial to choose a template.
Press the Home button to confirm and begin interval setup.
When prompted with “SAVE U”, press the rotary dial to confirm and return to the main menu
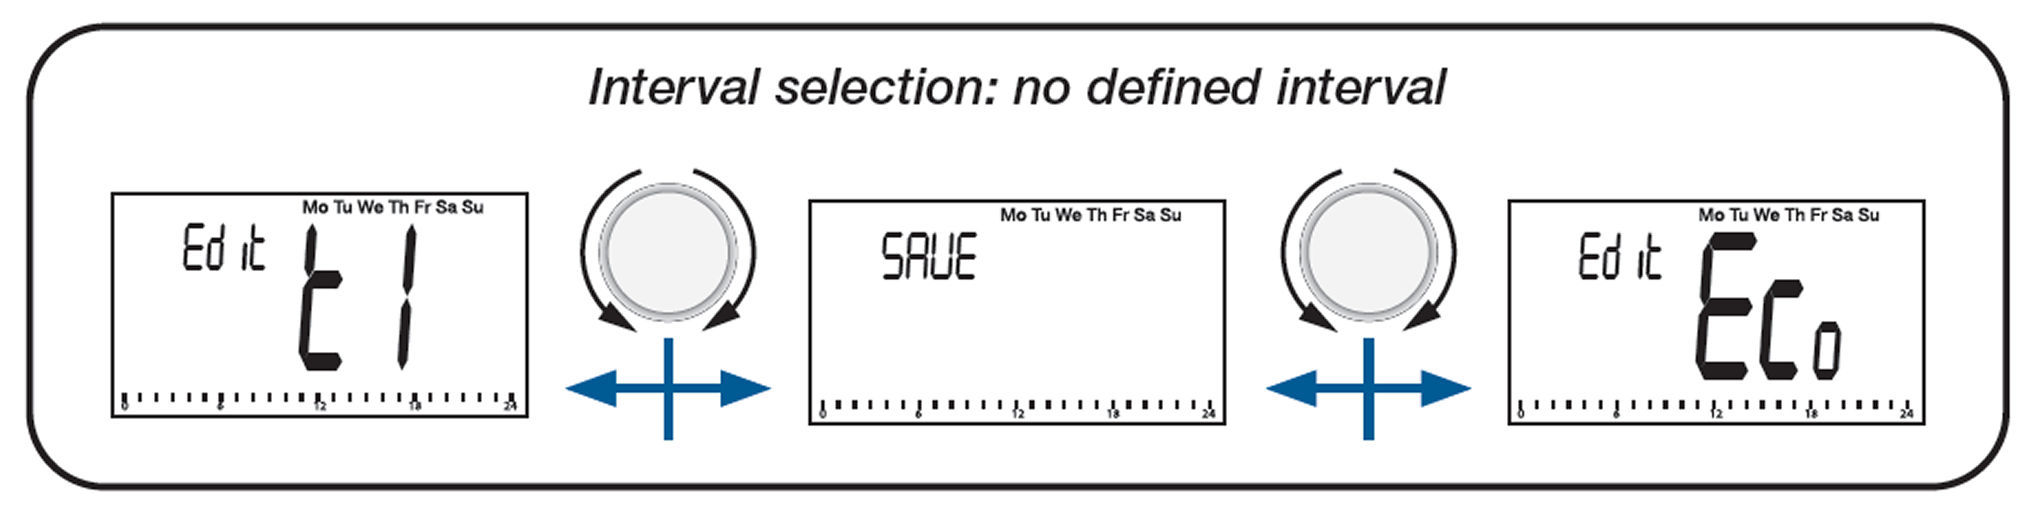
40. Interval Selection
You can define up to four heating/cooling intervals per day.
Intervals are labeled t1 to t4 and each represents a time slot with a specific temperature set point.
Set point temperatures can range from the ECO set point to a maximum of 30°C.
When editing starts, you can:
Select t1 to define the first interval.
Choose ECO to apply only the reduced temperature for the day.
Choose SAVE to save the program without defining any intervals.
After setting interval**t1**, you can:
Return to t1 to modify it.
Move to t2 to define another interval.
Choose ECO to assign the reduced set point to the rest of the day.
Press SAVE to confirm the current setup.
Important Notes:
If no “comfort” interval is defined, the thermostat will apply the ECO temperature for the full day.
The ECO set point can be modified in the Program Edition Menu.
If you update the ECO or Reduced Mode temperature in the main settings, the program will use the new value automatically.
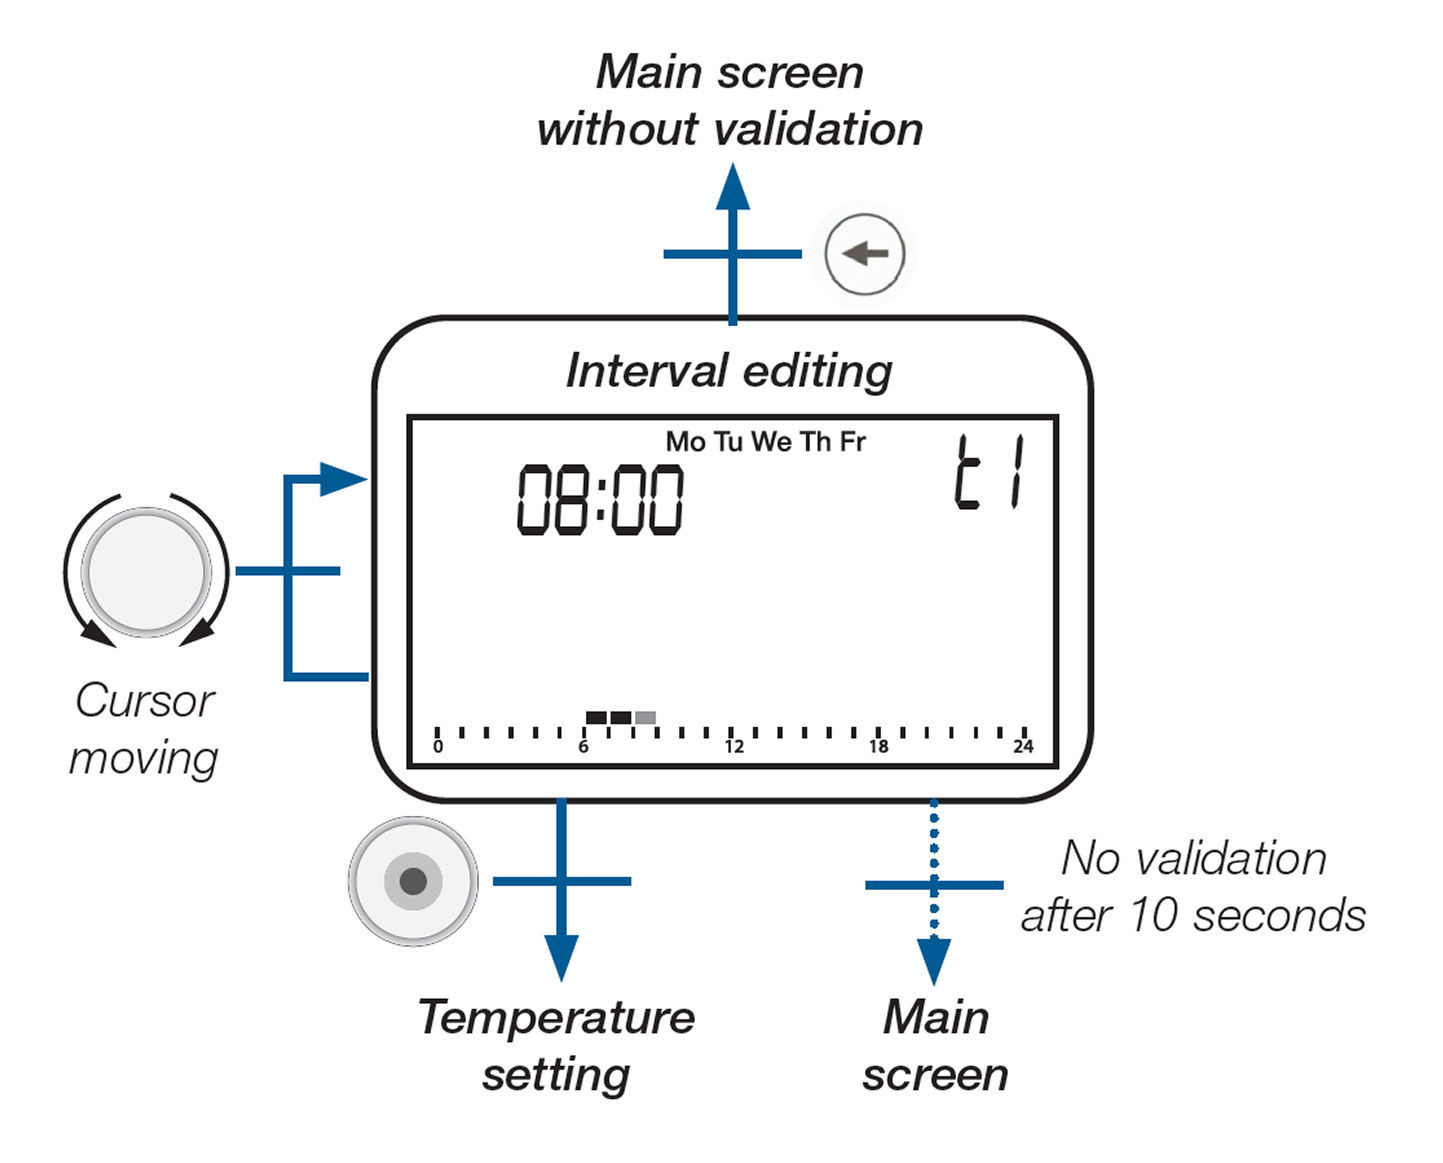
41. Interval Definition
Description of information displayed on LCD:
Interval representation: A bar graph shows a visual layout of all intervals within a 24-hour day.
End interval time: The end time of the interval is displayed.
Used template: The current template in use is shown (e.g. "Mo Tu We Th Fr").
Interval number: The LCD shows the selected interval number (e.g. t1, t2, etc.).
42. How to Edit an Interval
Rotate the dial to move the cursor along the time bar.
Press the dial button to confirm the temperature set point for the selected interval.
After 10 seconds of inactivity, the screen returns to the main menu without saving changes.
Press the Back button to exit without making changes.
Important Points:
If you press the validation button at the beginning of an interval, you will exit back to the interval selection screen.
You cannot overwrite an existing interval directly. To change it, you must first delete the existing interval and then add a new one.
Each interval must be at least 1 hour long.
To add a new interval, there must be at least 1 hour of free space available between other intervals.
The minimum allowed size for an interval is managed automatically by the system.
Examples:
**A - Impossible to add a new interval:**When all time slots are filled without enough space for an additional 1-hour interval.
**B - Allowed to add a new interval:**When there is a free 1-hour block available somewhere in the 24-hour schedule.
43. Set Point Definition
Set point values are the temperatures assigned to specific time intervals. These values must be:
Higher than the ECO temperature by at least 0.5°C
Lower than or equal to the maximum value defined in the user parameters
When editing a set point, the display shows:
Interval representation: A visual bar showing the location of the interval on a 24-hour timeline
Temperature set point value: The temperature set point for that interval
The interval number (e.g. t1, t2)
The template in use (e.g. “Mo Tu We Th Fr”)
How to Edit the Set Point
Rotate the dial to adjust the temperature value.
Press the dial button to confirm the new temperature.
Press the Menu button to go back to the previous interval.
Press the Home button to move to the next interval or to the next day/template.
If no action is taken for 10 seconds, the screen returns to the main display without saving.
44. Reversible Menu
The reversible menu allows you to change the system's configuration between:
Heating mode
Cooling mode
Automatic Heat & Cool switching mode
This menu must first be enabled through a configuration setting (see the "User Parameter Description" section).
Once activated, it becomes available in the configuration menu.
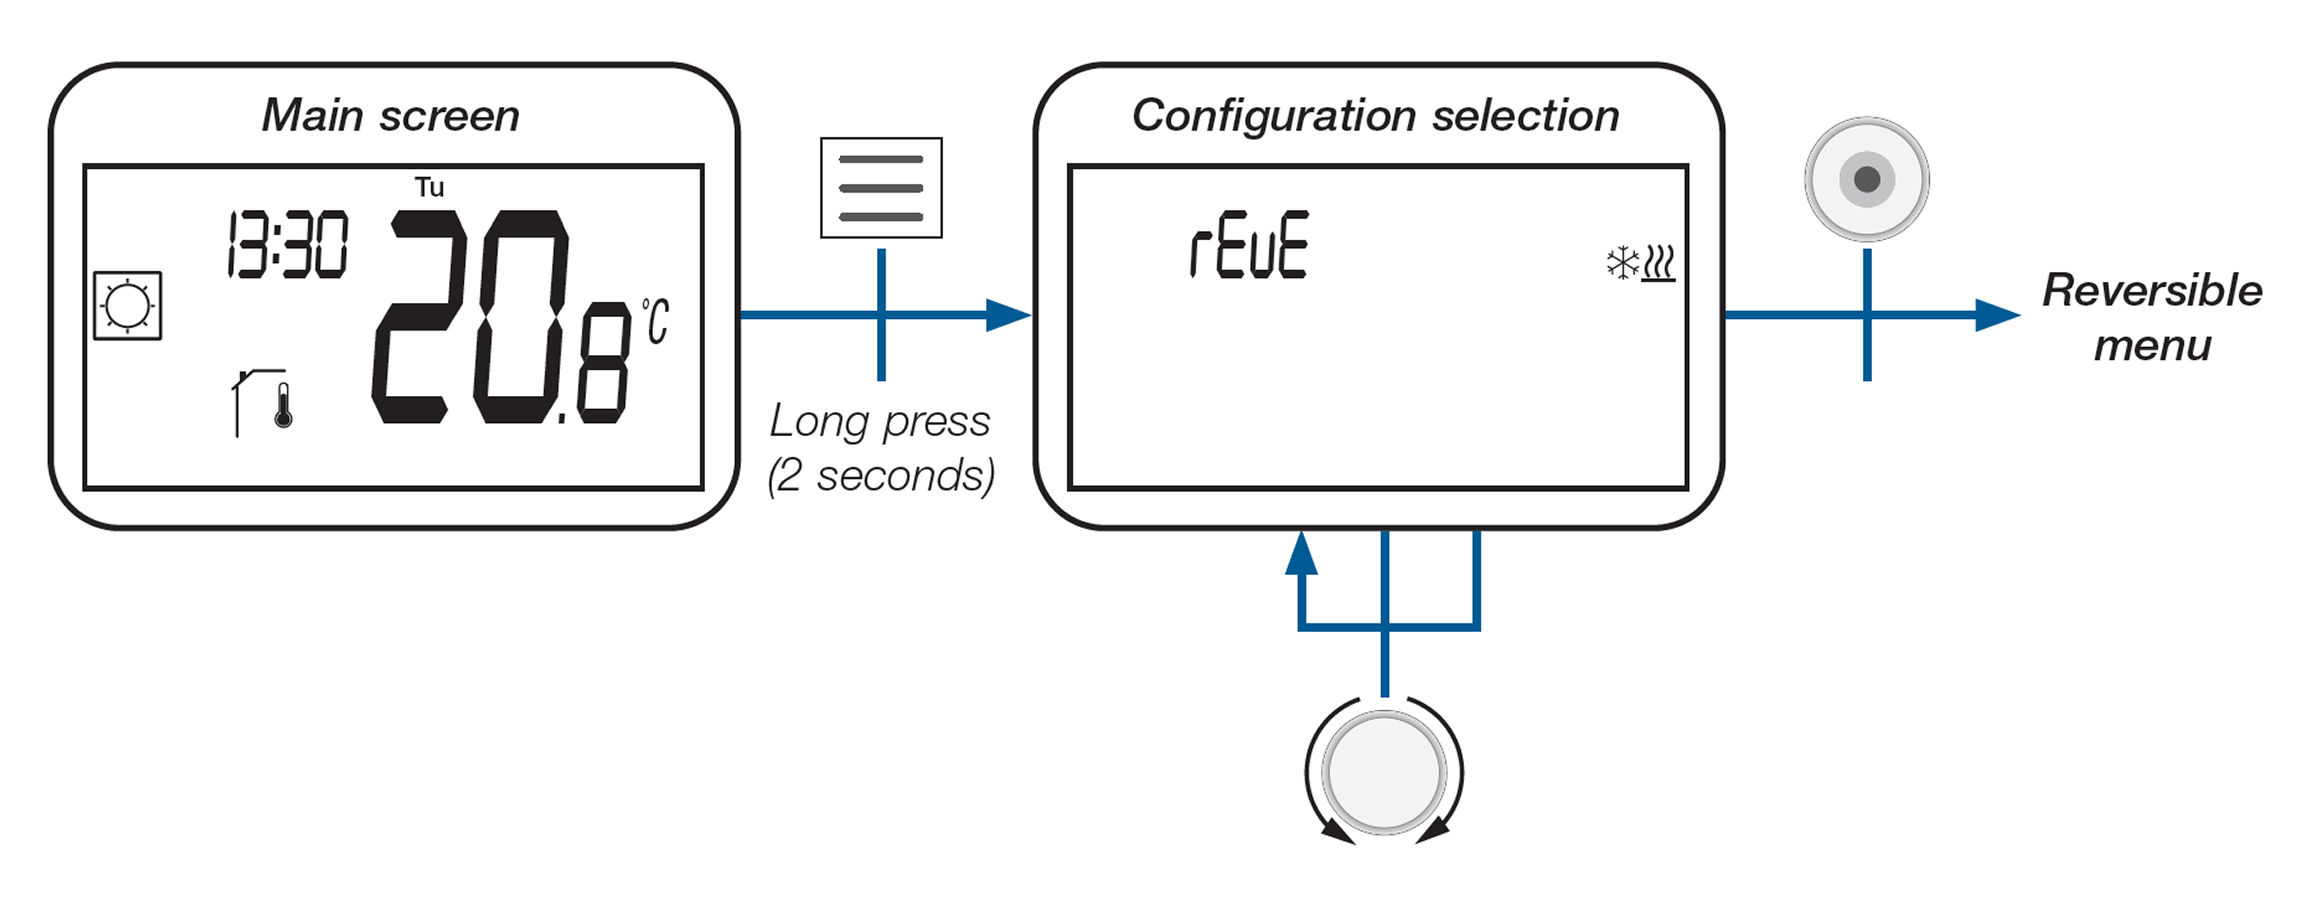
45. How to Access the Reversible Menu
From the main screen, press and hold the Menu button for 2 seconds.
Use the rotary button to scroll to the menu labeled rEuE in the configuration menu.
Press the Home button to enter the reversible menu and adjust system mode.
46. System Configuration
In the reversible menu, you can switch the system mode between:
Heating mode (Hot)
Cooling mode (CLd)
Automatic switching between heating and cooling (Aut)
Rotate the dial to scroll through the options.
Press the dial button to confirm your selection.
If no action is taken for 10 seconds, the screen returns to the main display without saving.
Press the Back button to exit the menu without making changes.
47. Heating & Cooling System Configuration Options
Heating Mode (**Hot**): The system will only provide heating.
Cooling Mode (**CLd**): The system will only provide cooling.
Automatic Mode (**Aut**):
The system will automatically switch between heating and cooling based on:
The active temperature setpoint
The current ambient temperature
48. Opened Window Detection
This feature detects when a window is open and temporarily stops heating.
To activate it, enter user parameter #08 and enable the setting.
When active, the window icon blinks on the display.
The thermostat switches to antifreeze mode during detection.
Press any key to cancel detection and resume heating.
49. Reset
The reset button is located on the back of the thermostat.
Depending on how long you press it:
5 seconds: Unlock PIN code or enter radio pairing mode.
10 seconds: Reset the device to factory settings (parameter values restored).
50. Keyboard Locking
To lock or unlock the keyboard:
Wake up the screen (if off).
Press and hold the Back and Menu buttons simultaneously.
A padlock icon will appear on the display when the keyboard is locked.
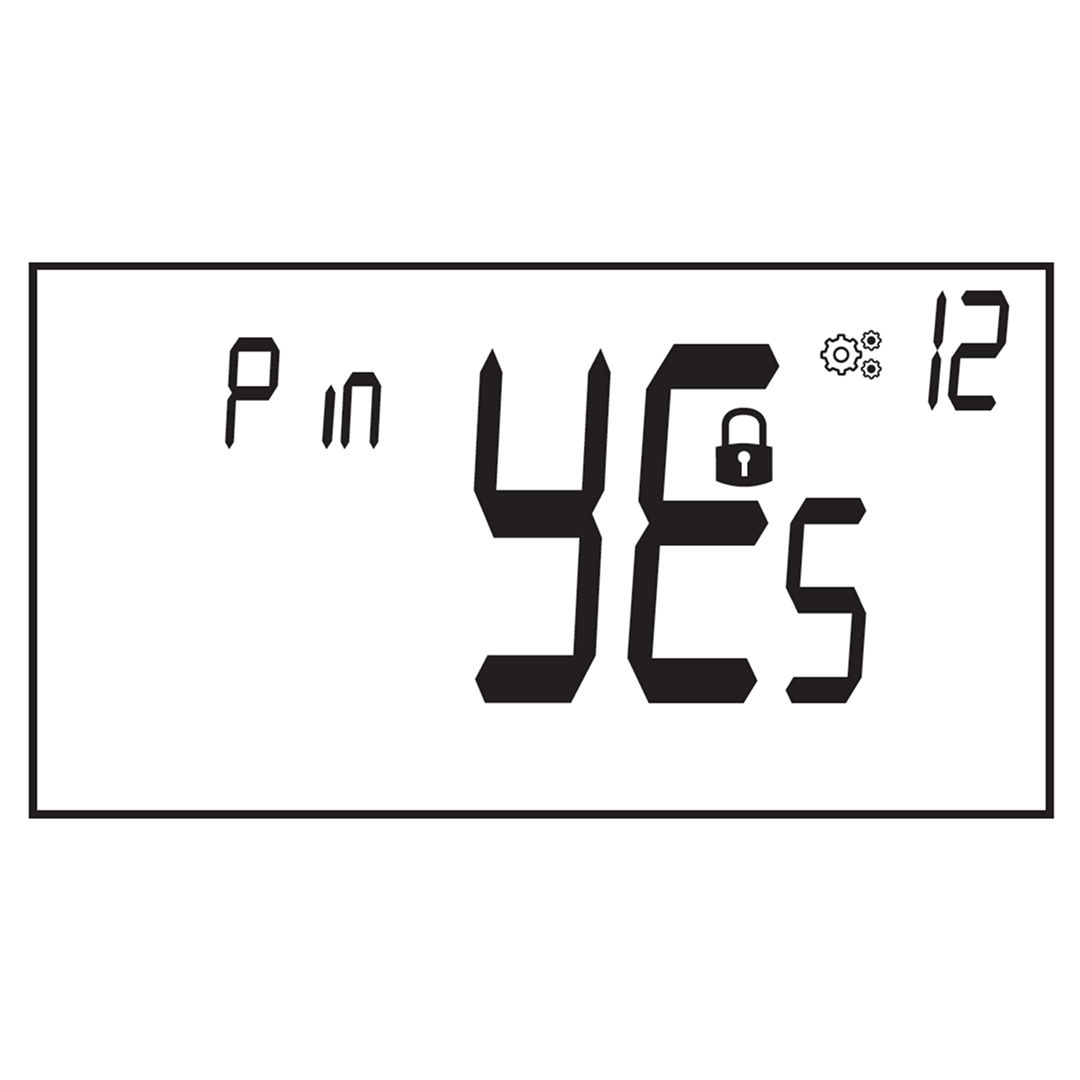
51. PIN Code
To enable PIN protection, activate user parameter 12, then set the PIN using parameter 13.
The PIN prevents any change to thermostat settings (like temperature or mode).
When enabled, pressing any key will show “PIN” on the display.
The user must enter the correct PIN to unlock the device and make changes.
Other Information
52. Heating and Cooling Icons
The heating icon (4e) appears when comfort mode is active.
The cooling icon (4g) appears when the cooling function is running.
53. Wireless Communication
The RF icon (16) blinks on the screen when a wireless signal is sent.
The thermostat sends an RF signal in the following situations:
When any button is pressed.
When updated from a central touch screen.
Automatically every 3 to 4 minutes.
54. Battery Level Indicator
A battery icon (18) blinks on the screen when battery power is low.
After replacing the battery, the icon disappears.
To check battery status manually, press the Home button from the main screen.
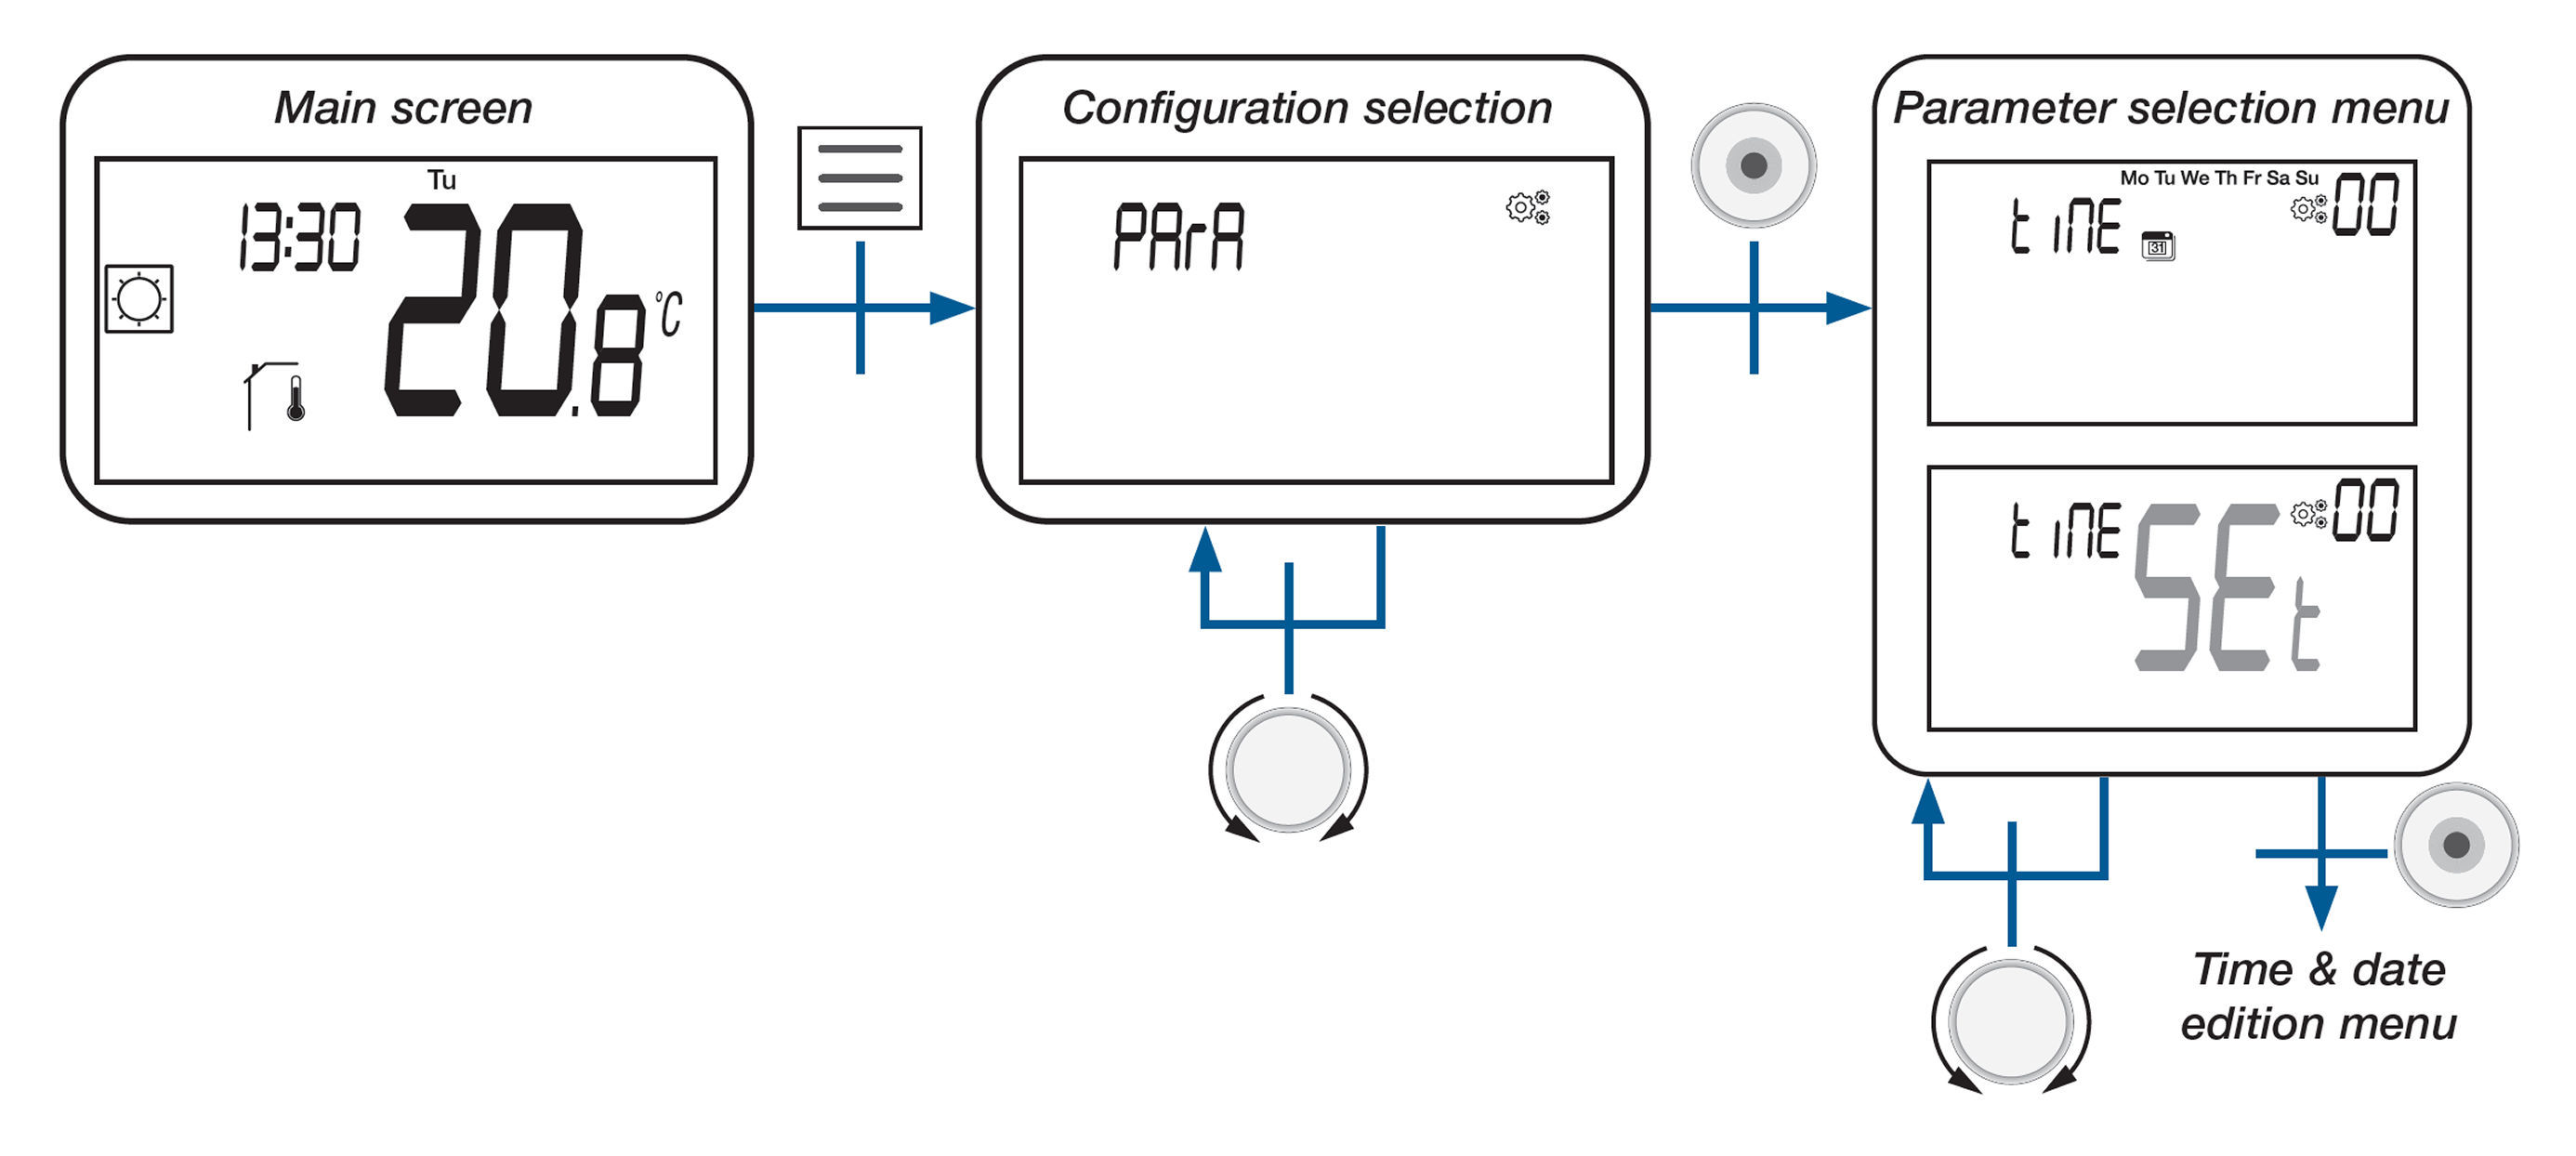
Parameter Selection Menu
55. How to Access the User Parameter Menu
From the main screen, press and hold the Menu button for 3 seconds.
Scroll to the “PArA” menu using the rotary dial.
Press the rotary button to enter the parameter selection menu.
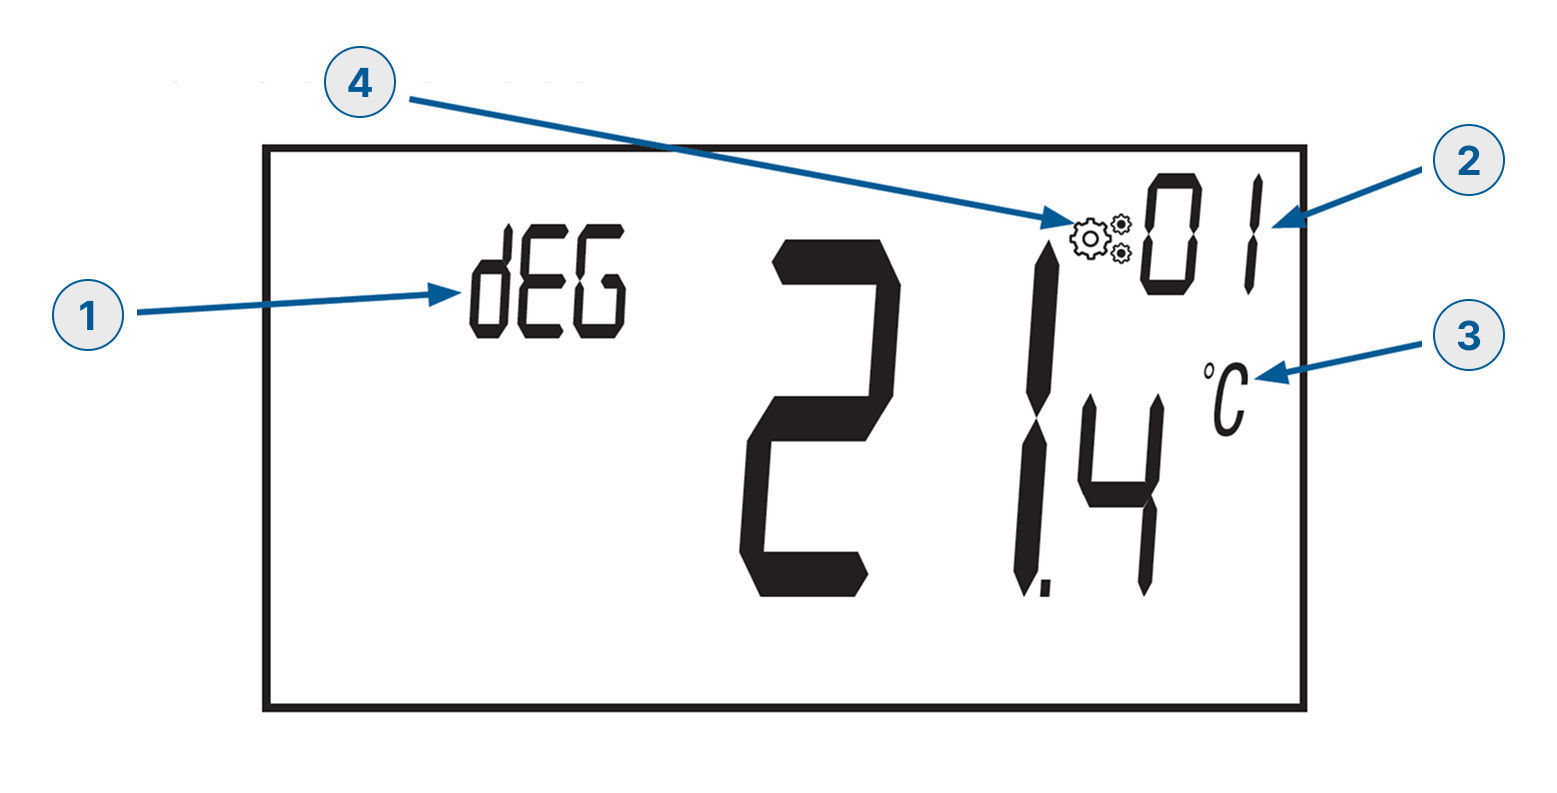
56. User Parameter LCD Information Display
When accessing the user parameters the screen shows:
Parameter name
Parameter number
Parameter value
A blinking icon next to the value indicates it is being modified.
Changes are confirmed by pressing the rotary button.
If no action is taken for 10 seconds, changes are discarded and the screen returns to the main menu
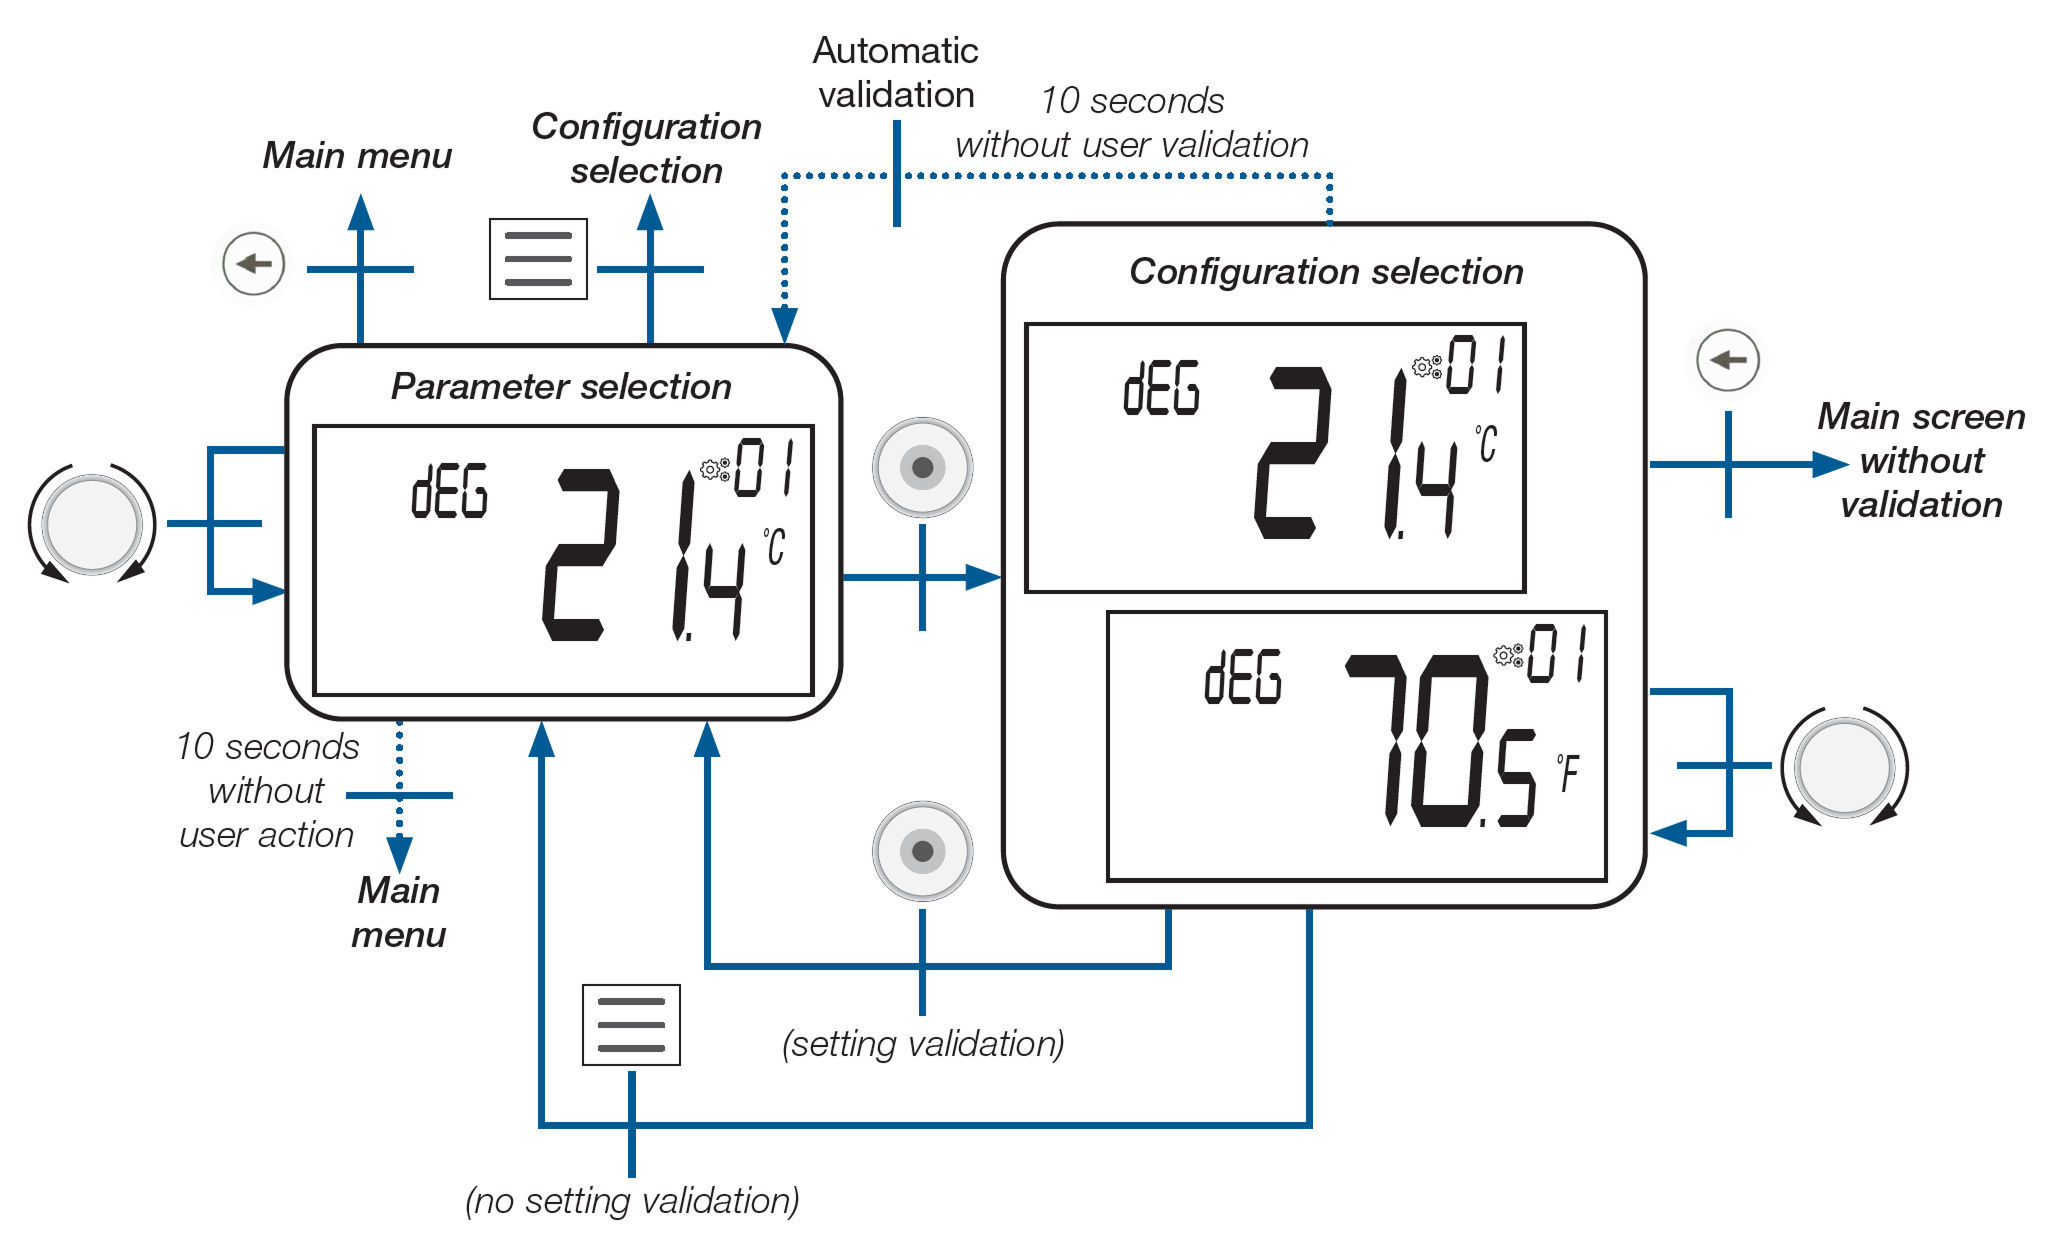
57. How to Adjust a Parameter
Turn the rotation dial to scroll through the parameters (e.g., dEG for temperature units).
Press the rotation dial to open the configuration screen for that parameter.
Turn the dial to choose a new value (e.g., switch to 70.5°F). You can rotate freely between available options.
Press the dial to confirm and save the new setting.
Manual validation happens immediately when you press the dial. — the setting will be saved, and the screen will return to the parameter selection menu.
Automatic validation occurs if no action is taken for 10 seconds — the thermostat will save the setting and return to the parameter selection screen.
No validation occurs if you press the Menu button — the setting will not be saved, and the screen will return to the parameter selection menu.
User Parameter Description
58. Parameter 00 – Set Time and Date
Opens the menu to configure the clock and calendar.
Follow the instructions in the "Time and Date Edition Menu" section
59. Parameter 01 – Clock Format
Choose how the time is displayed on the screen:
**24H**: 24-hour format (default)
**12H**: 12-hour format (AM/PM)
60. Parameter 02 – Daylight Saving Time (SUM)
Automatically adjust the clock between summer and winter time:
**YEs**: Time changes automatically (default)
**no**: No automatic change
61. Parameter 03 – Temperature Unit
Select the unit used to display temperature:
°C: Celsius (default)
°F: Fahrenheit
62. Parameter 04 – Basic Navigation Mode
Restricts navigation to only Comfort and Off modes.
**YEs**: Basic mode activated
**no**: Function not activated (default)
63. Parameter 05 – Room Temperature Display
Choose what is shown on the main screen:
**YEs**: Displays the measured temperature
**no**: Displays the set point temperature (default)
64. Parameter 06 – Calibration of Internal Room Sensor
Adjusts the thermostat’s internal temperature reading.
Only available if parameter **rEGU (#30)** is set to **Air**,**FLIr**, or **FLL**.
Use a separate thermometer to measure the room temperature after the system has stabilized for 1 hour.
Enter the measured temperature using the rotary button (adjustable in steps of 0.1°C).
Confirm by pressing the dial button.
Values:
Offset range: –5.0°C to +5.0°C
Default: 0.0°C
Important Notes:
Large offsets may indicate the thermostat is not installed correctly.
Open window detection will be disabled temporarily during calibration and reactivated after validation.
65. Parameter 07 – Calibration of External Room Sensor
Only available if **rEGU (#30)** is set to **Amb**.
Lets you align external sensor readings with a reference thermometer.
Place a thermometer at about 1.5 m height in the room center after one day of system use.
Record the temperature after 1 hour and input it using the rotary button.
Press the dial button to validate.
Values:
Range: –5.0°C to +5.0°C
Default: 0.0°C
Important Notes:
Large offsets may suggest incorrect sensor placement.
Open window detection is paused during calibration and resumes after user validation.
66. Parameter 08 – Open Window Detection (WIN)
Enables or disables automatic detection of open windows.
**YEs**: Detection is activated (default)
**no**: Detection is turned off
See full explanation in the “Opened Window Detection” section.
67. Parameter 09 – Smart Scheduled Temperature (SMAR)
Activates adaptive start in AUTO mode. The thermostat will start heating early to reach the setpoint by the scheduled time.
**YEs**: Feature is enabled (default)
**no**: Feature is disabled
68. Parameter 10 – Operating Configuration of Thermostat
This setting is available only if the thermostat is not paired with an RF box or central unit.
It defines whether the system works in heating, cooling, or automatic mode:
**Hot**: Heating only – Comfort and heating menus are enabled. Cooling is disabled. (default)
**CLd**: Cooling only – Only the cooling menu is enabled. Heating is disabled.
**rEv**: Reversible – Enables both heating and cooling; lets you switch modes manually.
**Aut**: Automatic – Heating and cooling use the same set point. The system switches automatically.
69. Parameter 11 – Cooling Mode Authorization
This setting is available only when using the thermostat with a compatible touch screen (BT-CT03) or a 6Z/10Z connecting box.
**YEs**: Cooling mode is allowed (default)
**no**: Cooling mode is disabled
This determines whether the cooling system can be used in the thermostat's room.
70. Parameter 12 – PIN Code Activation
Activates the security PIN feature to lock access to settings.
**YES**: PIN protection is enabled (default)
**no**: PIN protection is disabled
See the "PIN Code" step for more information.
71. Parameter 13 – Set PIN Code
Lets the user define a 3-digit PIN code using the rotary dial.
Range: **000** to **999**
Default: **000**
Confirm using the dial button.
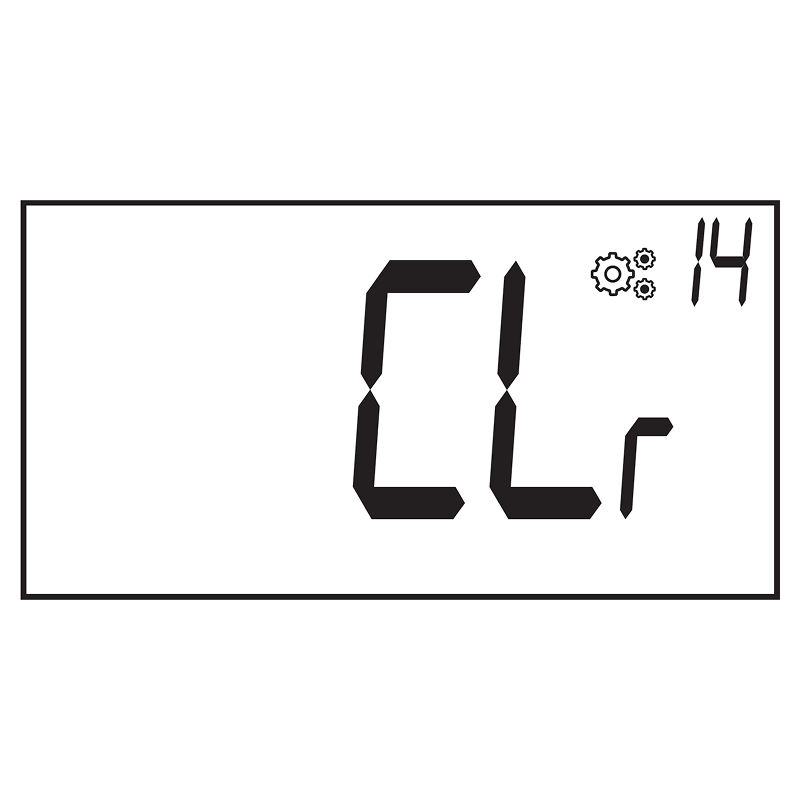
72. Parameter 14 – Reset User Settings
Resets all thermostat settings and user-defined values to factory defaults.
To activate:
Press and hold the Reset button (on the back) for 5 seconds.
All display segments light up.
The following are reset:
Comfort, Reduced, Anti-Freeze, and other set point temperatures
All user parameters
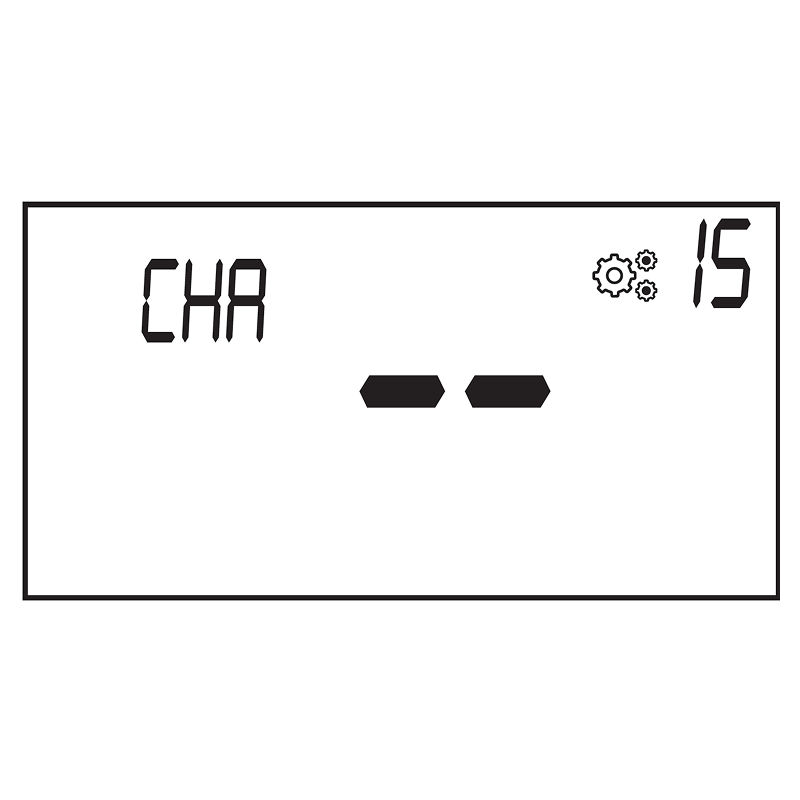
73. Parameter 15 – Zone Number Display
Only available when the thermostat is paired with a multi-zone receiver.
Shows the assigned zone number (e.g. CHA 01).
If not correctly associated, the display shows --.
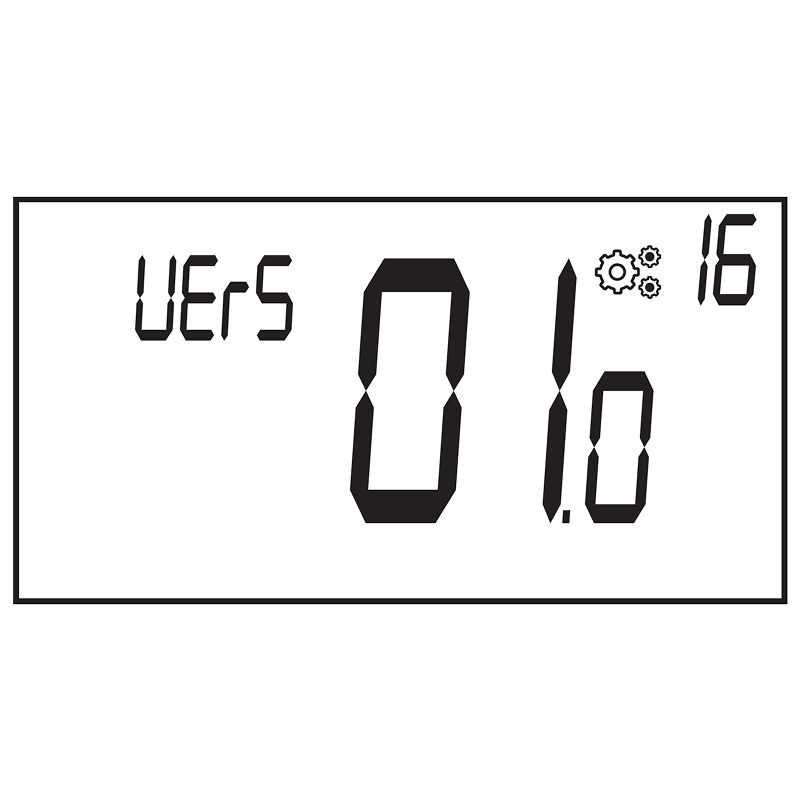
74. Parameter 16 – Displaying Software Version
Press and hold the dial button to view the thermostat’s software version and debug info.
The display shows:
**UErS**: Software version
**QUAL**: Qualification/debug version
75. Parameter 17 – Professional / Installer Menu
Grants access to installer-specific parameters.
Press and hold the dial button on parameter **Pro** to enter installer mode.
Keep holding until the first installer parameter (e.g., **rEGU**) appears.
Release to begin configuring advanced settings.
76. Parameter 18 – Exit User Menu
Displays **End** when reached.
Press the dial button to return to the main screen.
Time and Date Edition Menu
77. How to Access to Time and Date Edition Menu
From the main screen, press and hold the Menu button for 3 seconds.
In the configuration menu, select “PArA” using the dial.
Press the rotary button to enter the parameter list.
Scroll to parameter 00 and select SEt to adjust the time and date.
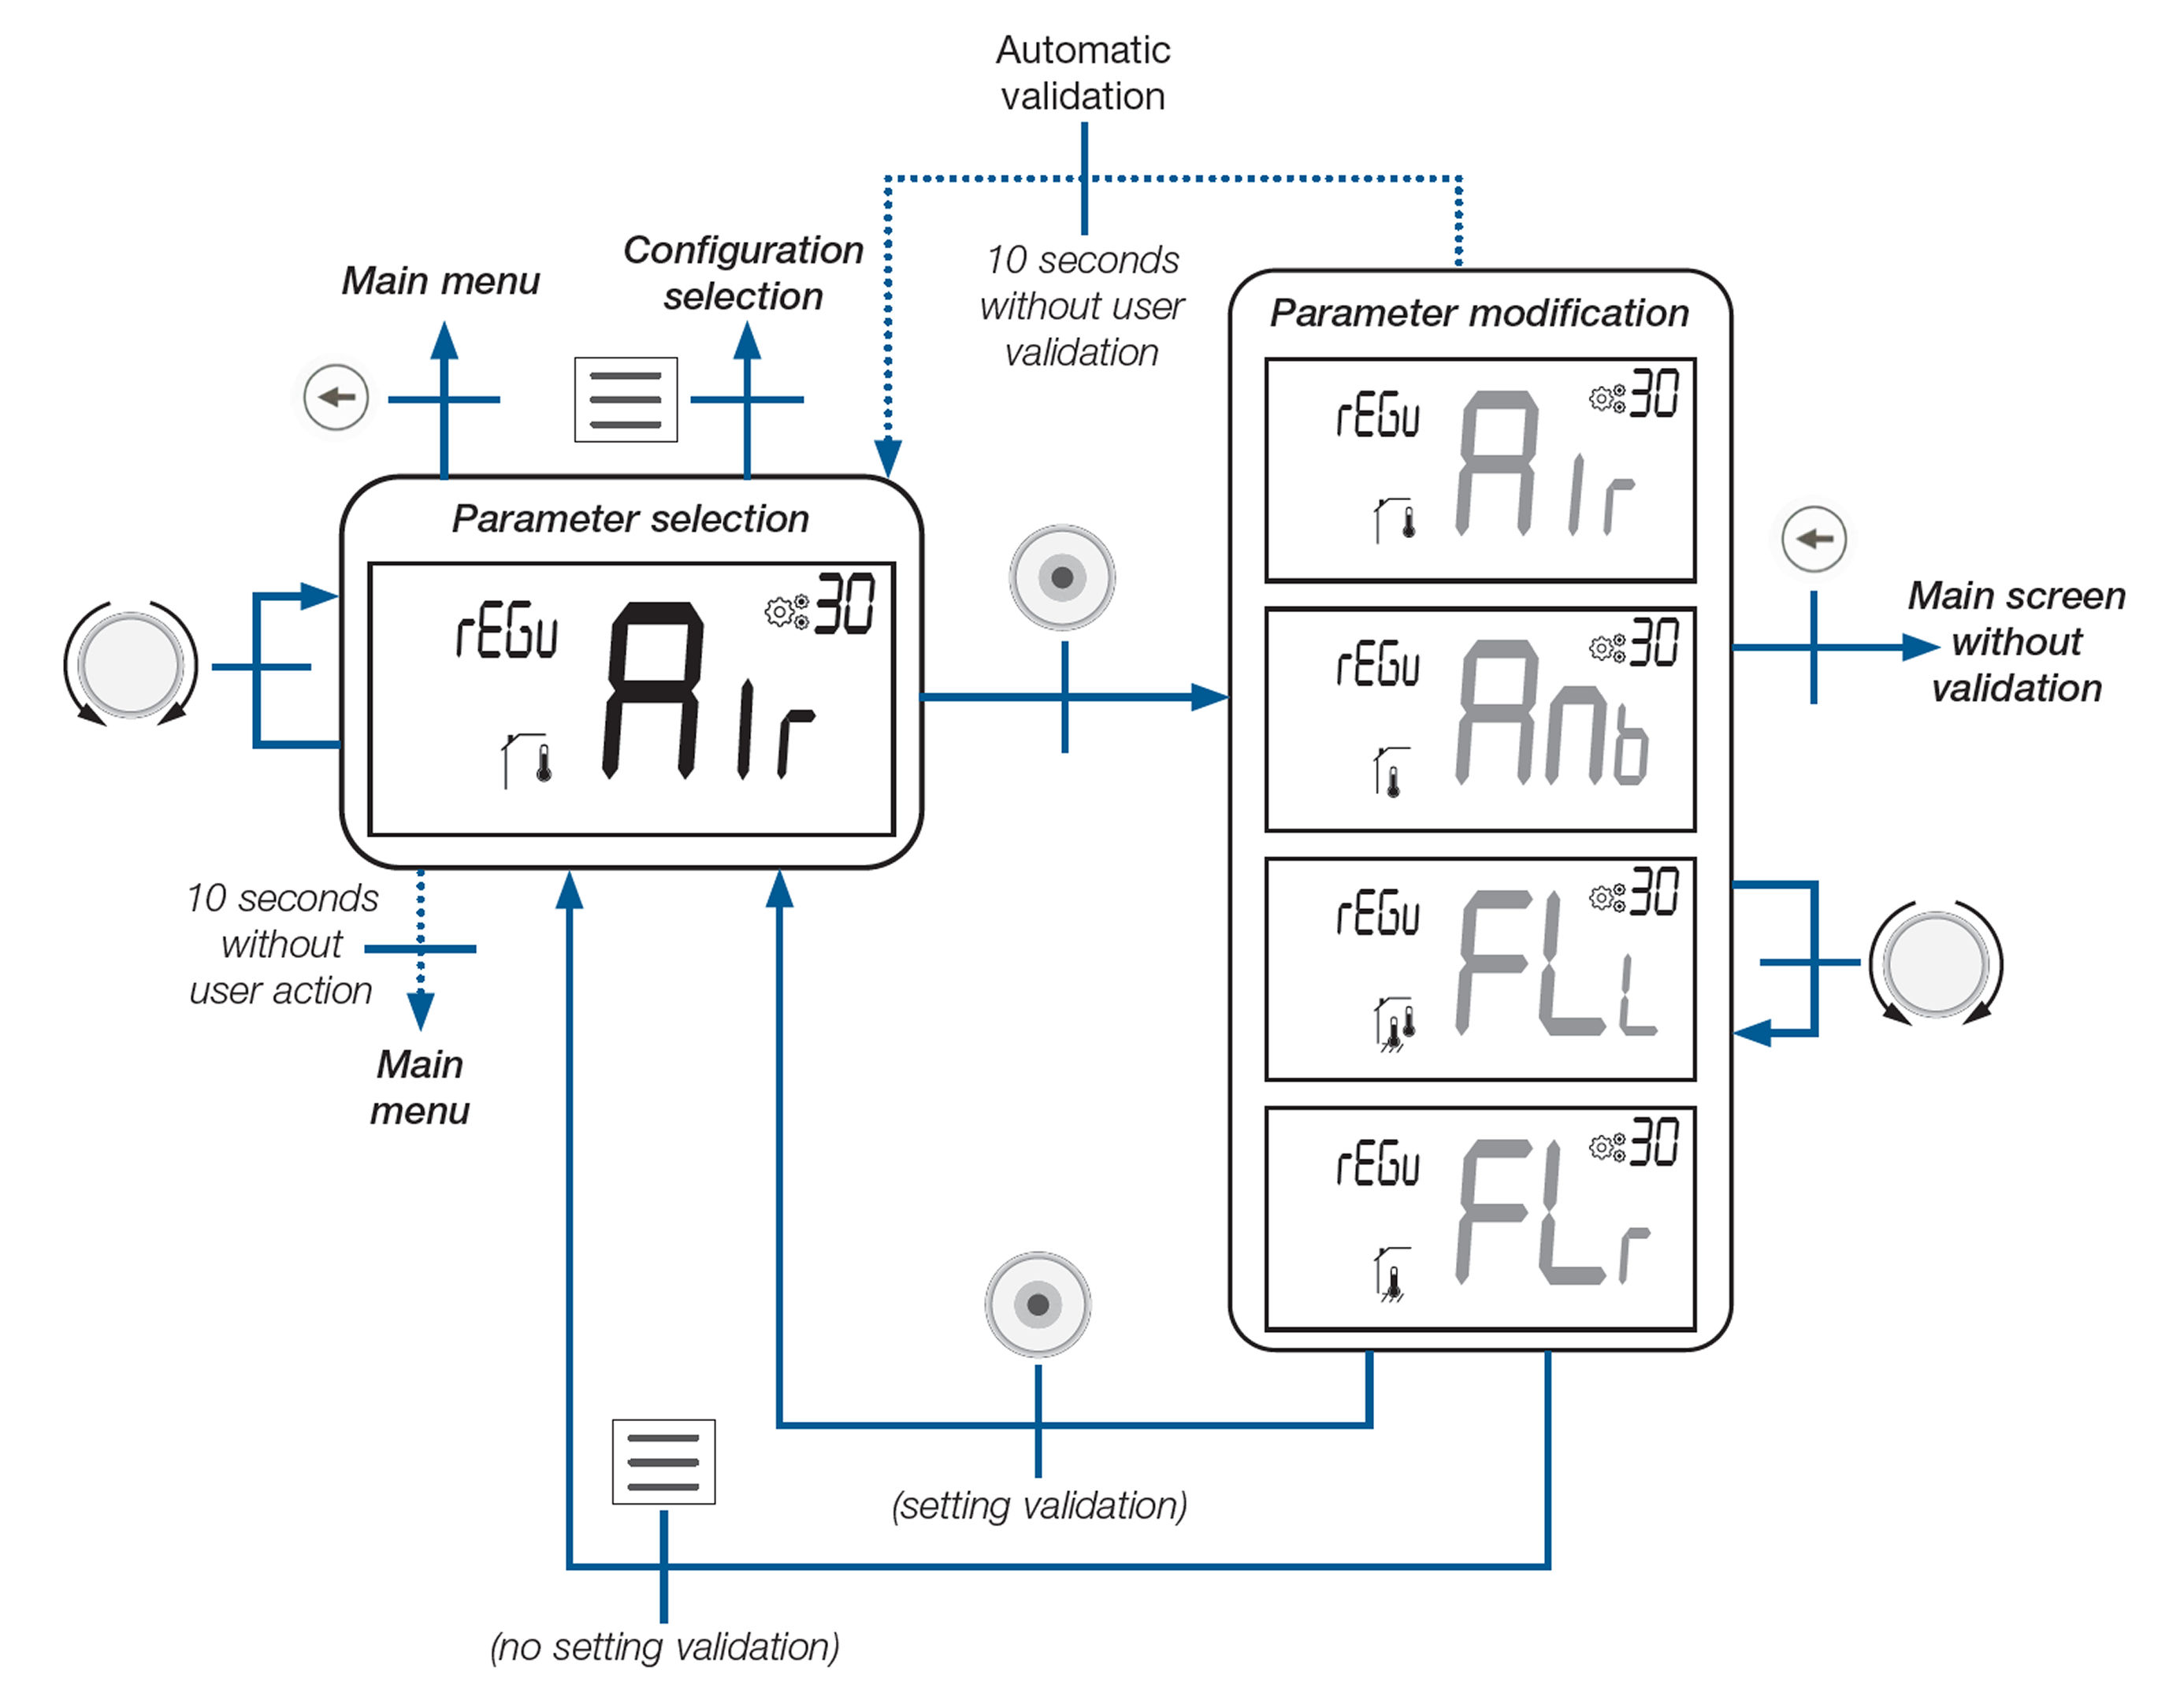
Installer Parameter Access and Use
78. How to Access Installer Parameters
Go to user parameter 15 (**Pro**) in the configuration menu.
Press and hold the rotary button for 5 seconds until the installer parameters appear.
An animation will show on the display during the hold.
You can also access this menu directly by using the reset button on the back of the thermostat (see “Reset” section).
79. Using the Installer Parameter Menu
Scroll through installer parameters using the rotary button.
To select a parameter:
Press the rotary button once.
To change the value:
Rotate the dial to adjust the value.
Press again to confirm.
If no action is taken for 10 seconds, the screen returns to the main display without saving changes.
Example: Parameter**rEGU**(#30)
This installer parameter lets you define how the temperature is measured:
**AIr**: Use internal sensor
**Amb**: Use external ambient sensor
**FLIr**: Use external floor sensor only
**FLL**: Use combination of internal and floor sensors
You can use the same interaction pattern to view and adjust all installer-level settings.
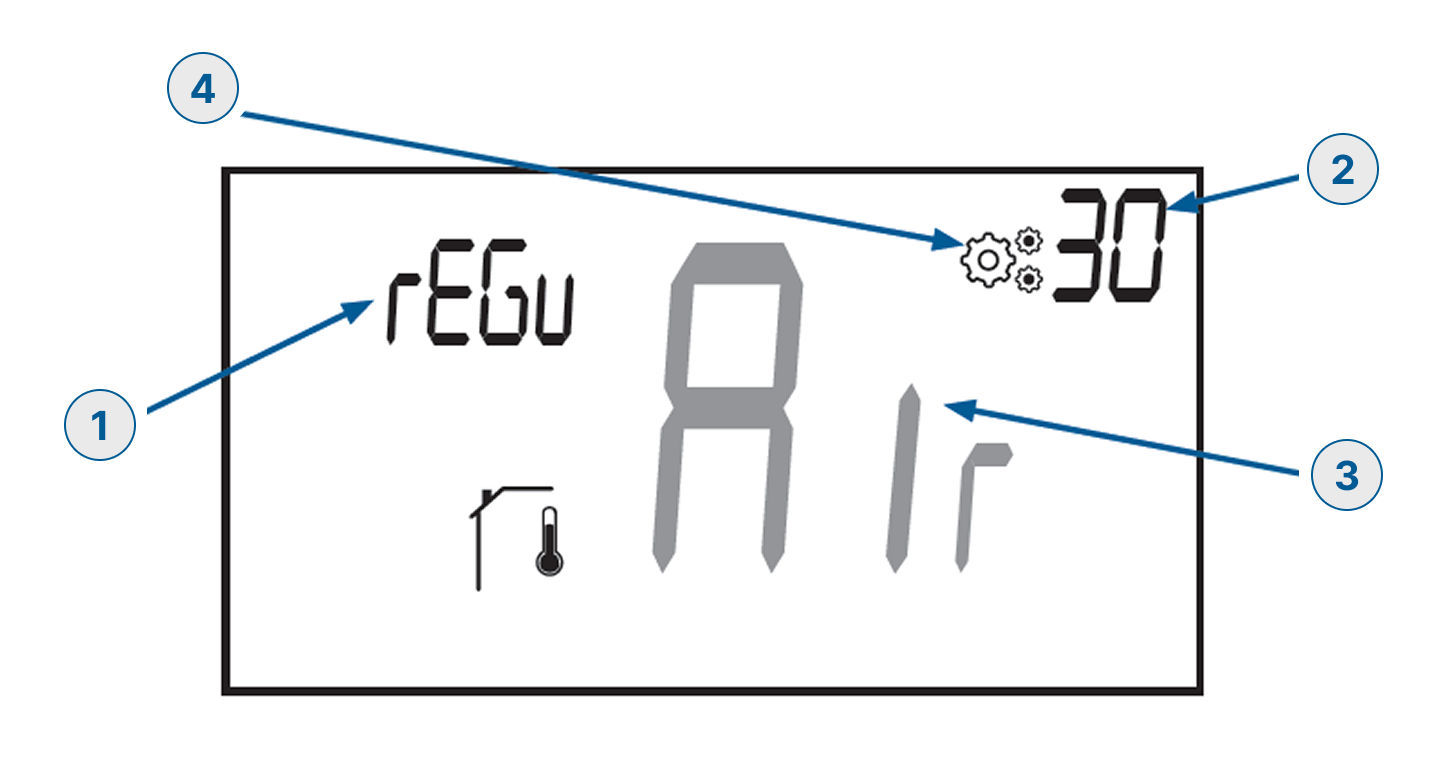
80. LCD Information Display
When accessing installer parameters the screen shows:
Parameter name
Parameter number
Parameter value
A blinking icon next to the value indicates it is being modified.
Changes are confirmed by pressing the rotary button.
If no action is taken for 10 seconds, changes are discarded and the screen returns to the main menu.
Professional Parameter
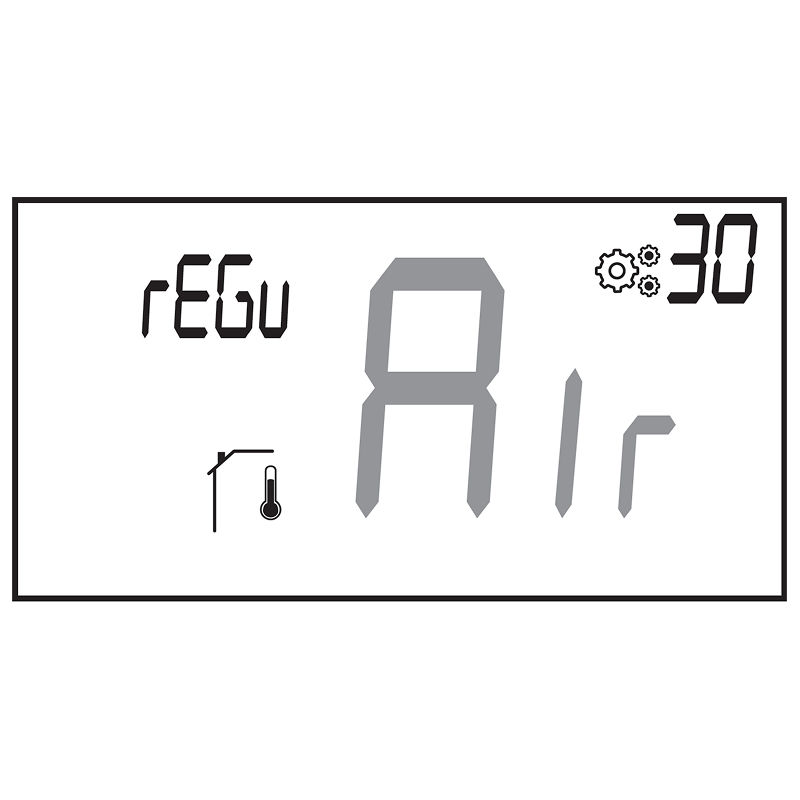
81. Parameter 30 – Temperature Sensor Selection (rEGU)
This setting defines which temperature sensor is used for system regulation.
Air (**AIr**) – Uses the internal sensor (default setting)
Amb (**Amb**) – Uses an external ambient sensor
FLr (**FLr**) – Uses an external floor sensor (requires connection to a master thermostat or embedded receiver sensor)
FLL (**FLL**) – Combines the floor sensor and air sensor for regulation
Default value: **AIr**
Available values: **AIr**,**Amb**,**FLr**,**FLL**
82. Parameter 31 – Displaying Internal Sensor Temperature (tEnP )
Shows the temperature currently measured by the internal sensor.
If the screen displays Err, the internal sensor may be damaged or disconnected.
83. Parameter 32 – External Sensor Temperature Display
Displays the measured temperature from an external sensor.
Sensor type depends on system configuration:
Floor temperature if paired with a connecting box.
Ambient temperature if parameter 30 is set to Amb.
If **Err** is shown, the external or ambient sensor is not connected or damaged.
84. Parameter 33 – Floor Sensor Temperature from Receiver
Displays temperature from a floor sensor connected to a receiver (central unit only).
If **Err** is shown, the thermostat is either:
Not connected to a compatible receiver, or
The sensor is damaged.
85. Parameter 34 – Pipe Sensor Temperature (Connected Box)
Displays temperature measured by a pipe sensor connected via a receiver.
If **Err** appears, the receiver is not associated with a valid pipe sensor or the sensor is damaged.
86. Parameter 35 – Calibration of Pipe Sensor
Only visible if pipe temperature is received via RF communication.
To calibrate:
Place a thermometer on the floor and record temperature after 1 hour.
Enter this value using the rotary button (in steps of 0.1°C).
Confirm with the dial button.
Values:
Offset range: –5.0°C to +5.0°C
Default value: 0.0°C
Important Notes:
If you hold the dial button for 3 seconds, the calibration will reset.
Calibration confirmation is shown by a dotted bar (• • • • •).
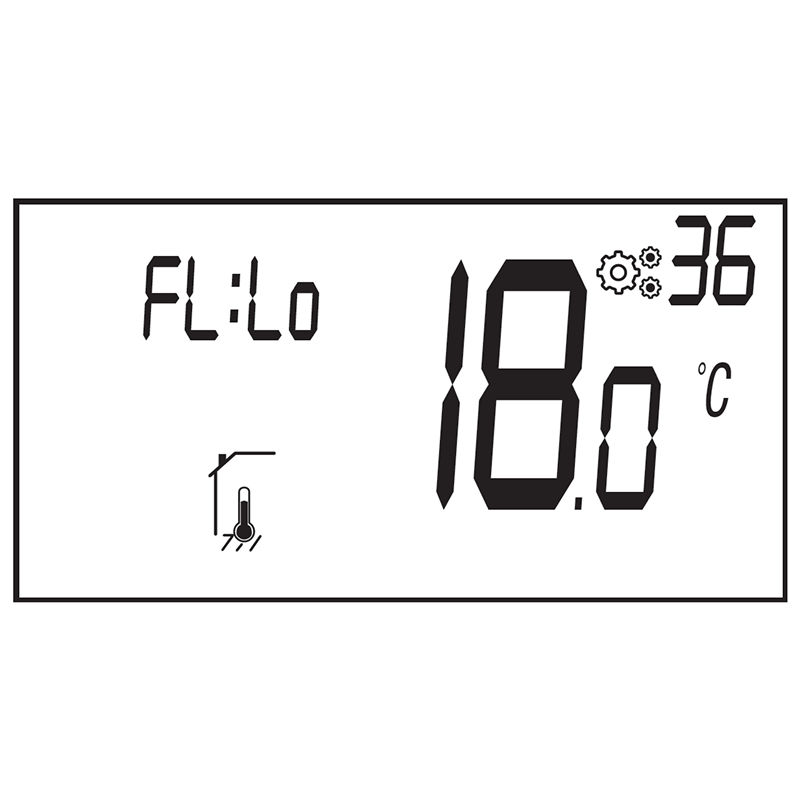
87. Parameter 36 – Lower Limit of Floor Temperature (FL:Lo)
Only available if parameter 30 is set to FLL (floor + air regulation).
Sets the minimum allowable floor temperature.
Default: Not activated
Value range: 5°C to (FL:Hi – 0.5°
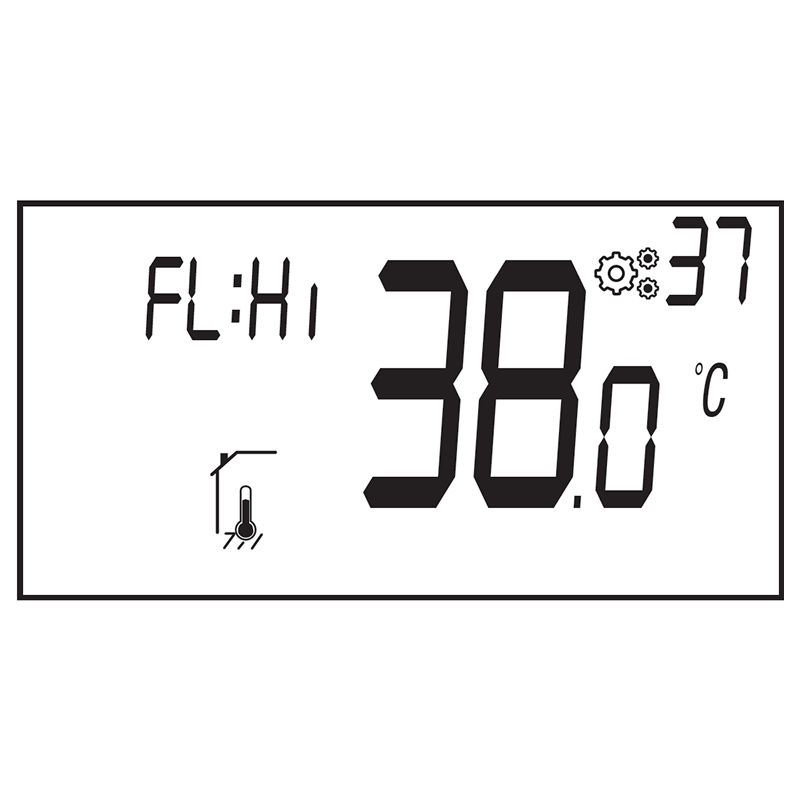
88. Parameter 37 – Upper Limit of Floor Temperature (FL:Hi)
Also only available if parameter 30 is set to FLL.
Sets the maximum allowable floor temperature.
Default: Not activated
Value range: (FL:Lo + 0.5°C) to 40°C
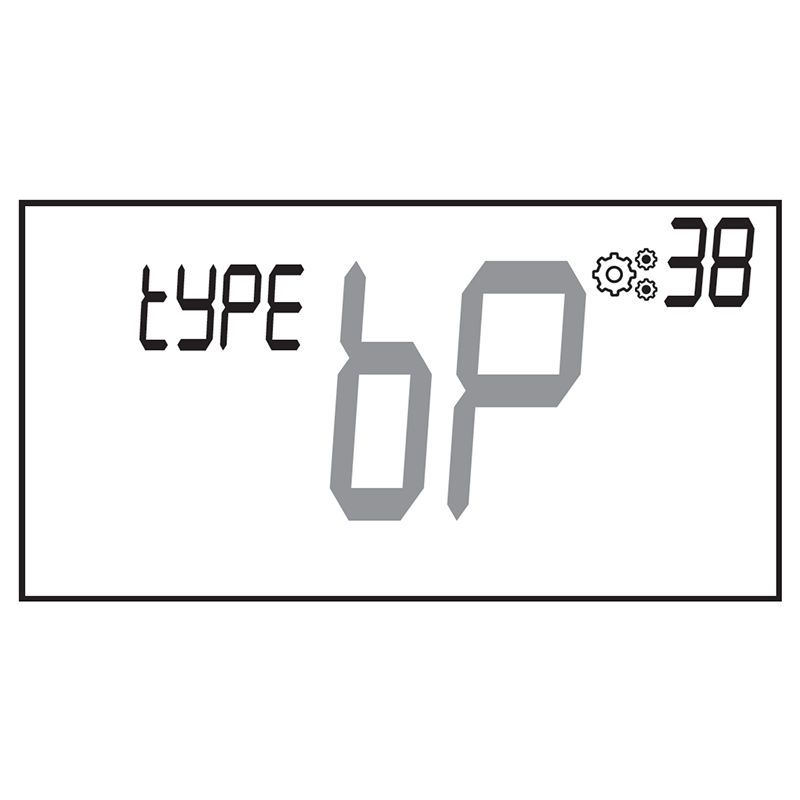
89. Parameter 38 – Regulation Type (TYPE)
Defines how the thermostat regulates temperature.
Options:
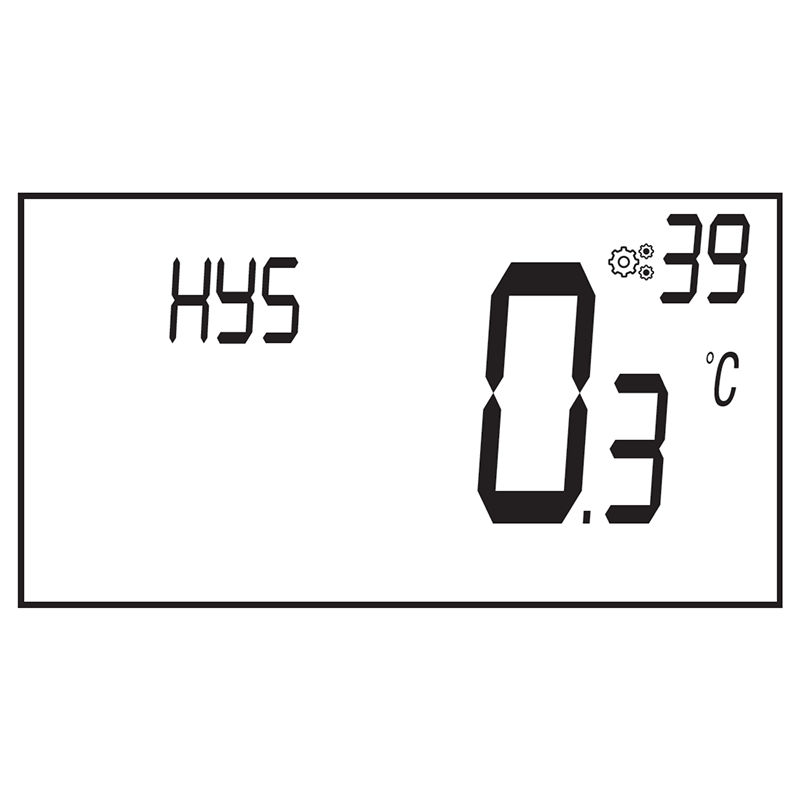
HYs: Hysteresis mode – heating turns on and off at fixed margins (default)
bP: Proportional mode – adjusts output gradually based on temperature difference
90. Parameter 39 – Hysteresis Value (HYs)
Only available if parameter 38 is set to HYs.
Allows setting the hysteresis threshold (how much the temperature can deviate before reacting).
Default: 0.5°C
Range: 0.2°C to 3.0°C
Use the rotary dial to adjust and press the button to confirm.
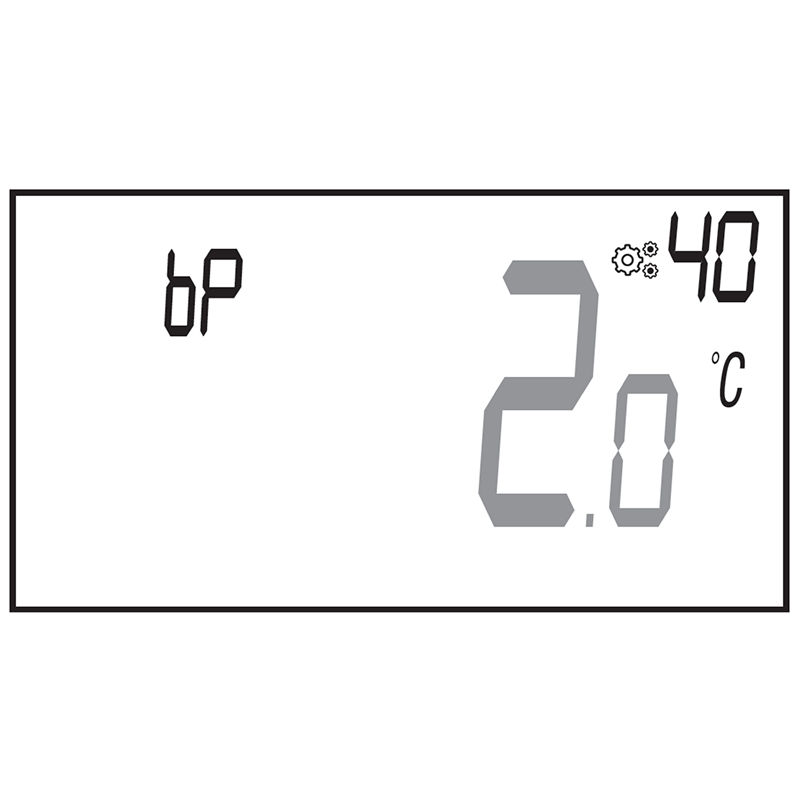
91. Parameter 40 – Proportional Band (bP)
Only shown if regulation type (TYPE, parameter 38) is set to bP (proportional).
Sets how wide the proportional band is.
Default: 2.0°C
Range: 2.0°C to 5.0°C
Adjust with the rotary button and confirm with the dial press.
92. Parameter 41 – Cycle Time (tCY)
Also shown only if **TYPE** is set to **bP**.
Defines the duration of the heating/cooling cycle.
Default: 10 minutes
Options: 10, 15, 30, 45, 60 minutes
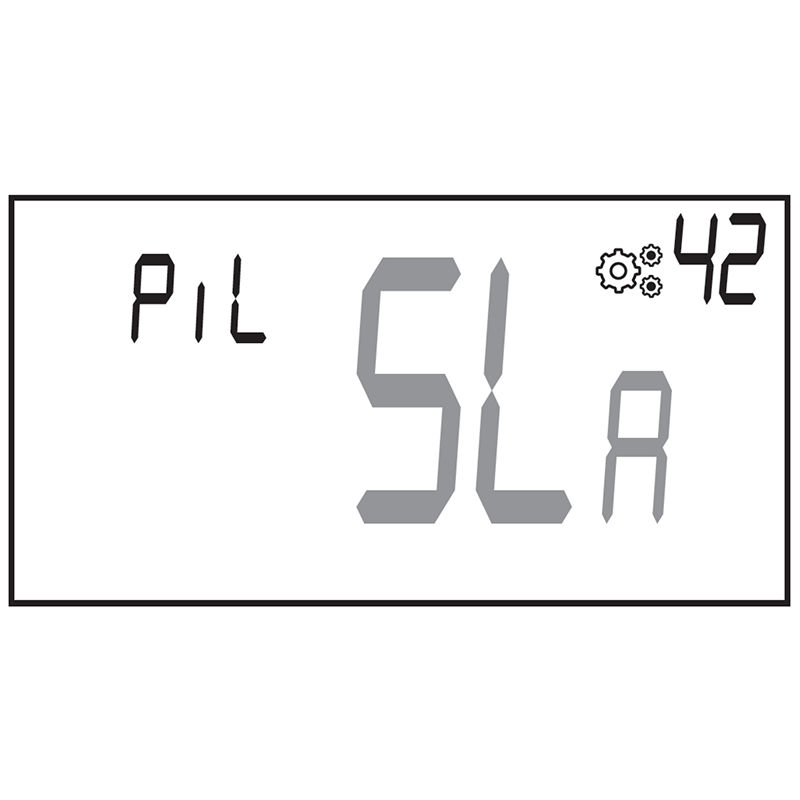
93. Parameter 42 – PiLote Configuration
Sets the thermostat to work as either a master or slave in the system:
**SLA**: Slave (default)
**MAS**: Master
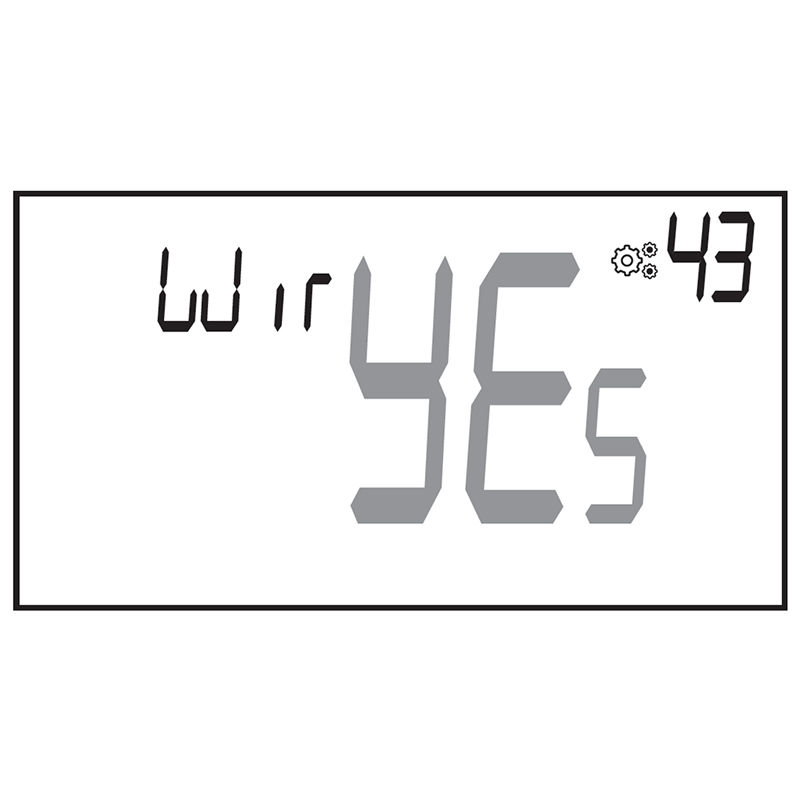
94. Parameter 43 – Pilot Wire Function (Wir)
Enables or disables the pilot wire output for controlling external systems.
**YES**: Pilot wire is active
**no**: Function disabled (default)
95. Parameter 44 – Minimum Set Point Temperature
Defines the lowest temperature the user is allowed to set.
Default: 5.0°C
Range: 5.0°C to 15.0°C
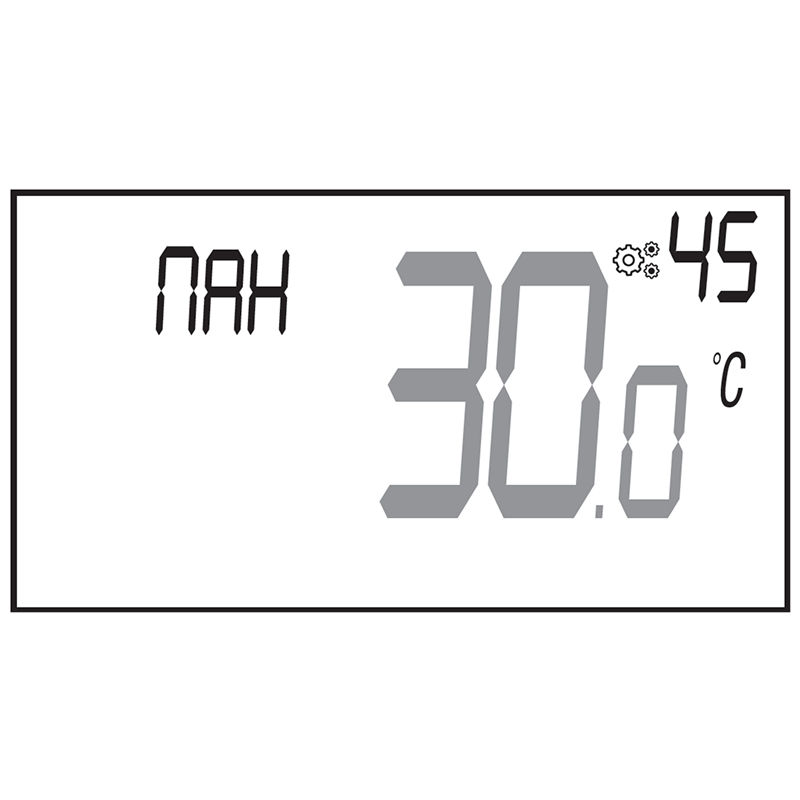
96. Parameter 45 – Room Temperature Limit
Sets a maximum room temperature that can be selected from a remote control.
Default: 30.0°C
Range: 20.0°C to 35.0°C
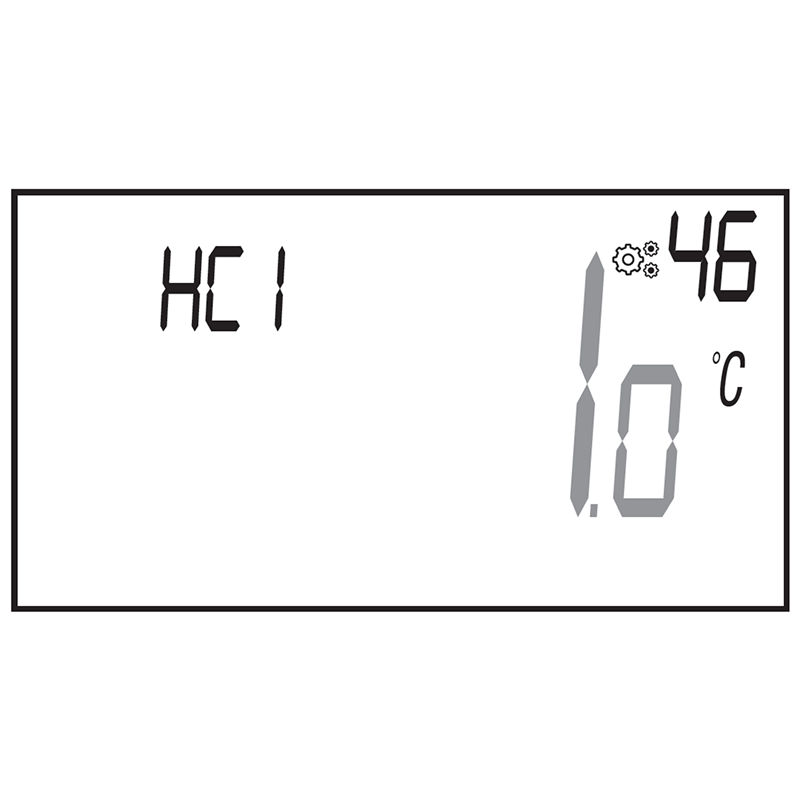
97. Parameter 46 – H&C Signal Width (Death Band)
Available only when parameter 10 **ConF** is set to **Aut**.
Sets the neutral zone between heating and cooling in automatic mode.
Default: 1.0°C
Range: 0.5°C to 5.0°C, adjustable in 0.5°C steps
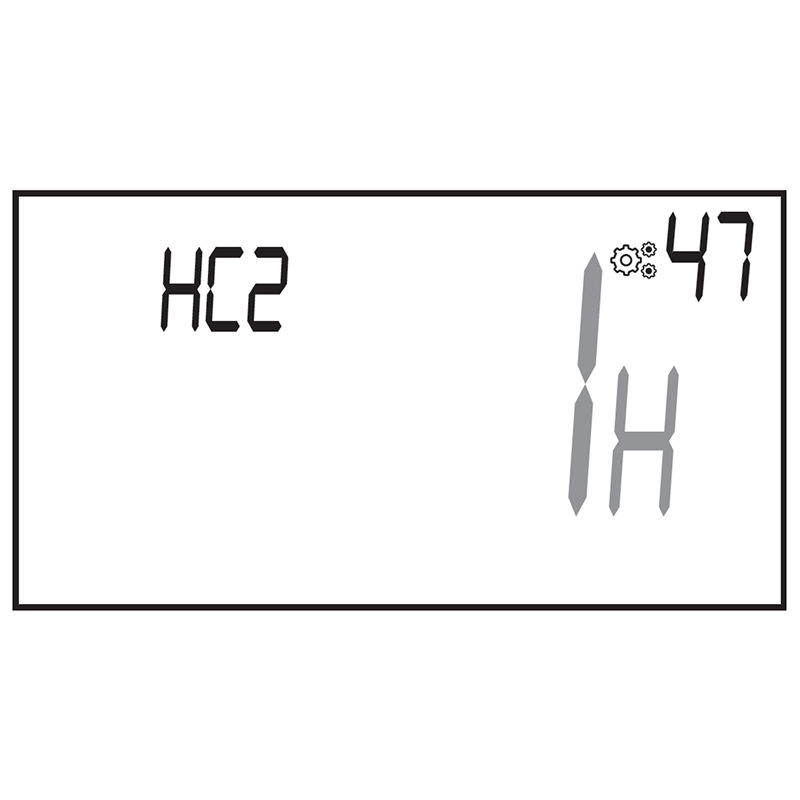
98. Parameter 47 – H&C Signal Delay (Time Threshold)
Available when parameter 10 **ConF** is set to **Aut** or when using Reversible mode.
Sets the minimum time between switching from heating to cooling or vice versa.
Default: 2 hours
Options: 30 min, 1H, 2H, 3H, 4H, 5H
99. Parameter 48 – RF Pairing Activation
Starts the radio frequency pairing process.
Press the dial button to initiate pairing (**InIt** will display).
Press the button again to exit pairing mode.
100. Parameter 49 – RF Power Signal Observation
Shows the signal strength between the thermostat and the receiver.
Display includes:
Labels “Min” and “Max” for clarity
Signal strength from 1 (min) to 7 (max)
Parameter name
Parameter number
Blinking parameter name = If parameter name is blinking, it means that transmission isn't done.
Blinking RF logo = Blinking logo means that product communicates.
Signal Strength Descriptions:
A: 7 = Max signal
B: 4–6 = Normal
C: 2–3 = Weak (“Faible”)
D: 1 = Minimum
E: No bars = No signal
Note:
This menu only appears after a successful pairing has been completed.
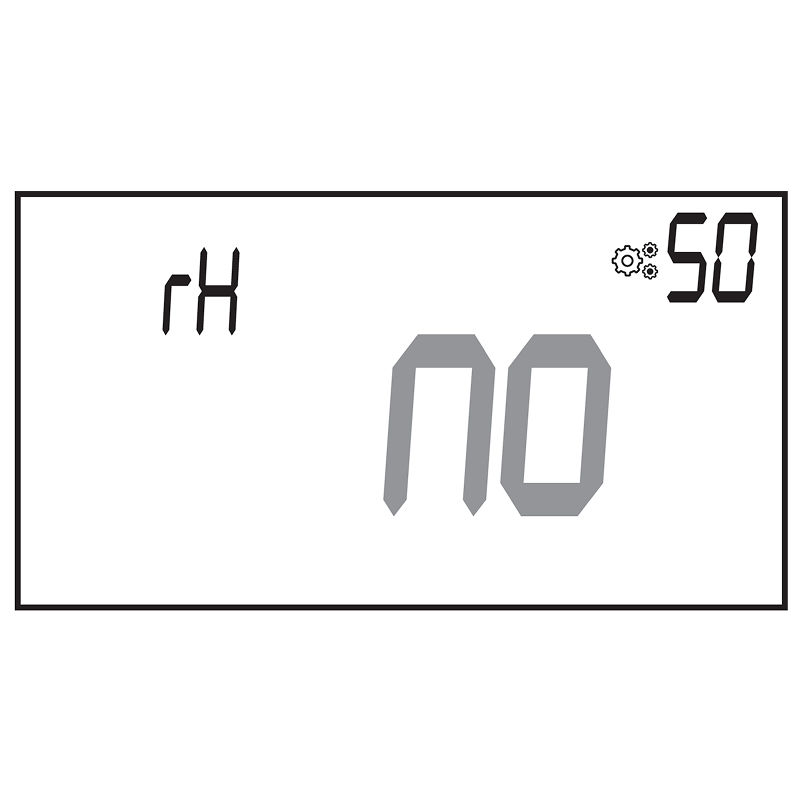
101. Parameter 50 – Humidity Set Point (rH)
(Available only on thermostats with humidity sensor “RH”)
Sets the maximum allowed humidity before triggering an alert or system response.
Default: 75%
Range: 0% to 100%
Set to **no** to deactivate the feature.
If humidity exceeds the set point, the system will trigger an error.
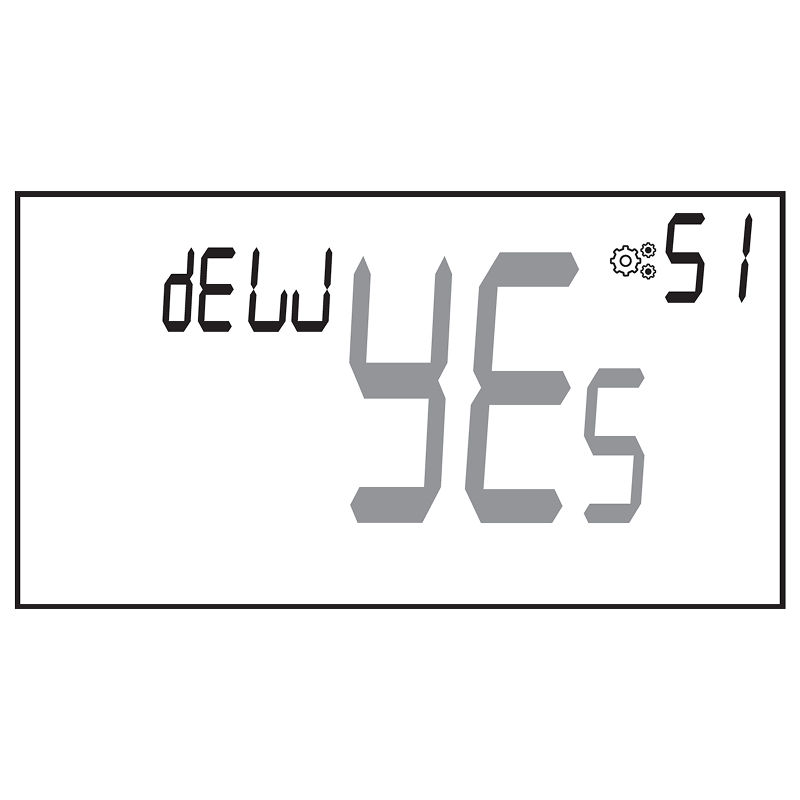
102. Parameter 51 – Anti-Condensation Function (dEW)
(Available only on “RH” thermostat models)
Enables automatic response when condensation is detected:
Air conditioning may stop
Dehumidifier may activate
**YES**: Function activated (default)
**no**: Function deactivated
103. Parameter 52 – EEPROM Clearing (EEP)
Resets all thermostat parameters to factory default.
To activate:
Press and hold the rotary button.
The display will show a sequence confirming the reset.
When all display segments light up, the reset is complete.
104. Parameter 53 – Exit Installer Menu (End)
Ends the configuration session and returns to the main screen.
Press the dial button to exit the installer menu.
Troubleshooting & Solutions
105. Description of thermostat errors displaying
Thermostat errors may be caused by issues with sensors, communication, or power. Here's how to recognize and interpret them:
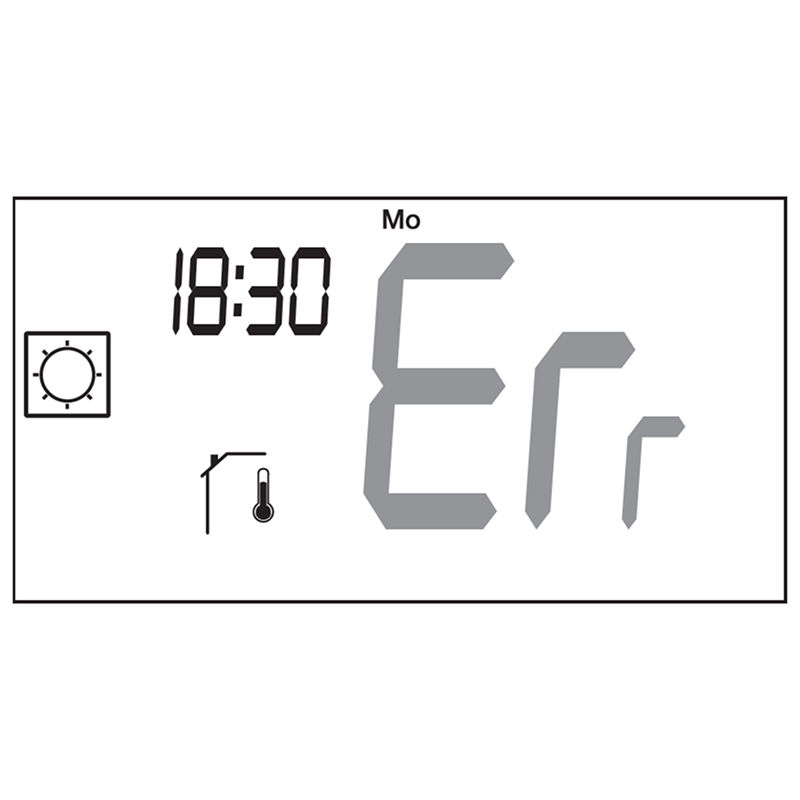
106. Internal Sensor Error
Screen shows: **Err**and internal sensor icon
Indicates the internal temperature sensor is faulty or disconnected.
107. External / Pipe / Receiver Sensor Error
Sensor icon blinks.
Internal temperature is used instead.
The screen shows temperature but uses internal sensor for regulation.
108. Low Battery
Battery icon blinks.
Backlight remains ON.
Replace the batteries as soon as possible to avoid malfunction.
109. RF Communication Error
(Only if connected to a central unit or master receiver)
RF icon blinks on screen.
Indicates lost connection between thermostat and paired device
110. Humidity Sensor Error
(Only if the remote has a built-in humidity sensor)
Humidity icon blinks.
Screen displays **Err** when trying to read humidity level.
Indicates failure or disconnection of humidity sensor.
Maintenance
111. Battery Level Indication
The battery icon will blink when the batteries are too weak for proper operation.
Replace batteries promptly to maintain performance.
112. Cleaning the Thermostat
Use a soft, lint-free cloth to gently wipe dust from the exterior.
For deeper cleaning:
Lightly dampen a clean cloth with water.
Wring out excess water.
Wipe the display and edges carefully, avoiding moisture inside the device.
Important:
Never spray water directly onto the thermostat.
Do not use cleaning agents, solvents, or polishes.
Previous stepCopy link to sharePrint / PDFNext step